
MooTyper
Versions
Current version
5.1.0 (Build: 2026041000) (2026041000)
5.1.0 (Build: 2026041000)
Plugin type: Activities
Frankenstyle component name: mod_mootyper
Version build number: 2026041000
Version release name: 5.1.0 (Build: 2026041000)
Maturity: Stable
Supported Moodle versions: 4.5, 5.0, 5.1, 5.2
Repository URL (Git): https://github.com/drachels/moodle-mod_mootyper
Repository branch:
Repository tag: v5.1.0
Issue/bug tracker URL: https://github.com/drachels/moodle-mod_mootyper/issues
Moodle Mootyper module
- Moodle tracker component: https://github.com/drachels/moodle-mod_mootyper/issues
- Documentation: https://github.com/drachels/moodle-mod_mootyper/wiki
- Source Code: https://github.com/drachels/moodle-mod_mootyper
- License: http://www.gnu.org/licenses/gpl.txt
Install from git
- Navigate to Moodle root folder
- git clone git://github.com/drachels/moodle-mod_mootyper.git mod/mootyper
- cd mootyper
- git checkout MOODLE_XY_STABLE (where XY is the moodle version, e.g: MOODLE_30_STABLE, MOODLE_28_STABLE...)
- Click the 'Notifications' link on the frontpage administration block or php admin/cli/upgrade.php if you have access to a command line interpreter.
Install from a compressed file
- Extract the compressed file data
- Rename the main folder to mootyper
- Copy to the Moodle mod/ folder
- Click the 'Notifications' link on the frontpage administration block or php admin/cli/upgrade.php if you have access to a command line interpreter.
This is the README file for the MooTyper project. MooTyper is
a moodle extension, that adds the 'typing instructor' functionallity to Moodle.
The plugin url is: https://moodle.org/plugins/view.php?plugin=mod_mootyper
MooTyper is free software, the same as Moodle.
- REQUIREMENTS
The MooTyper module uses javascript which is not welcome in Moodle but it is a
requirement for the use of the module. The typing procedure cannot be done without
the client side logic.
It creates some new tables in a moodle database and inserts some sample
typing exercises. This is all done automaticaly through the intstallation,
but real lessons and exercises should be added by teachers afterwards.
- INSTALLATION
MooTyper is an activity module. You have to extract it to the 'mod' directory.
If the directory name is something like "moodle_mod_mootyper" you have to change
that to just "mootyper". So for example, the path should be like this:
Than go to Site Administration -> Notifications and click on the button to start
the install.
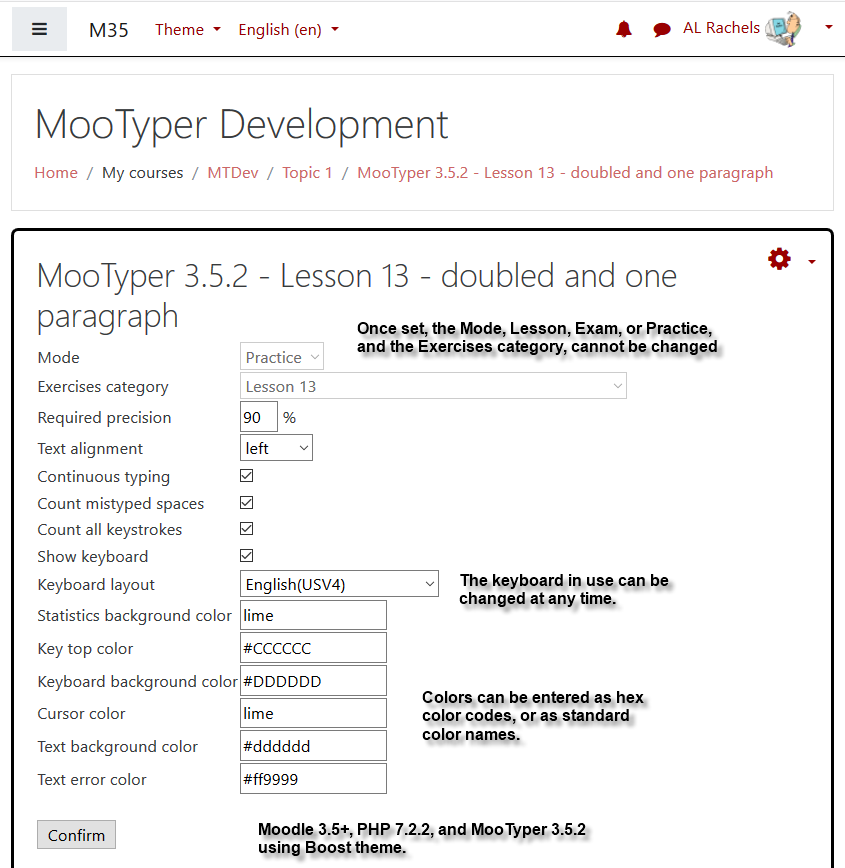
Right after an install or upgrade of the new MooTyper 3.6.1, you will then see
the settings page. You can now set the date display format for the grade views.
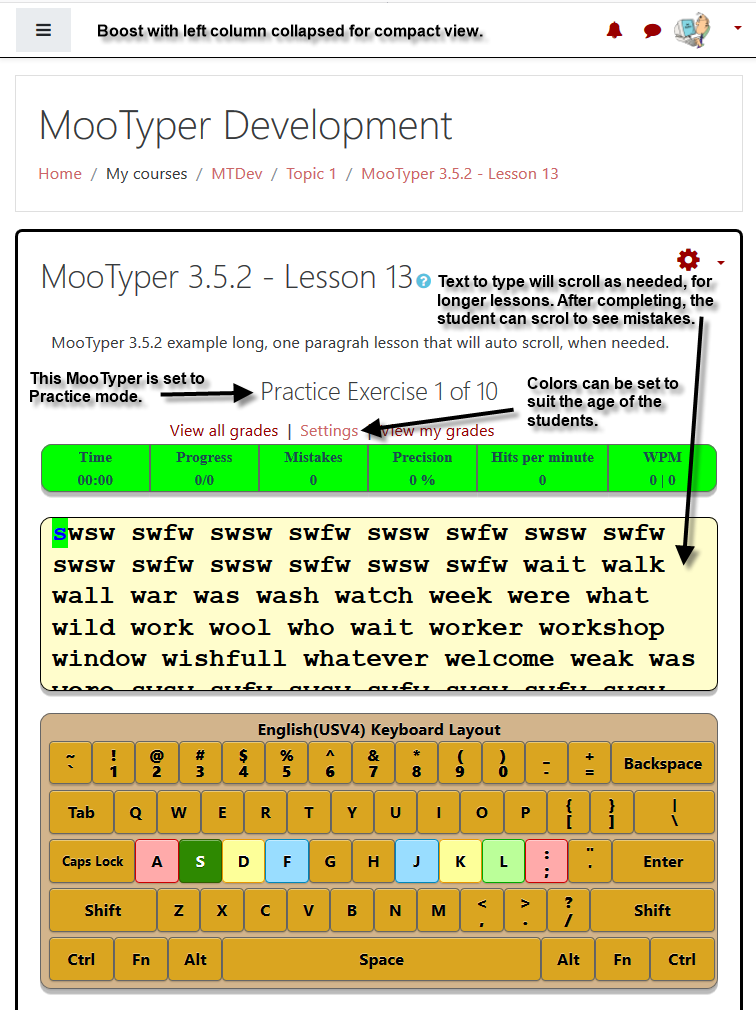
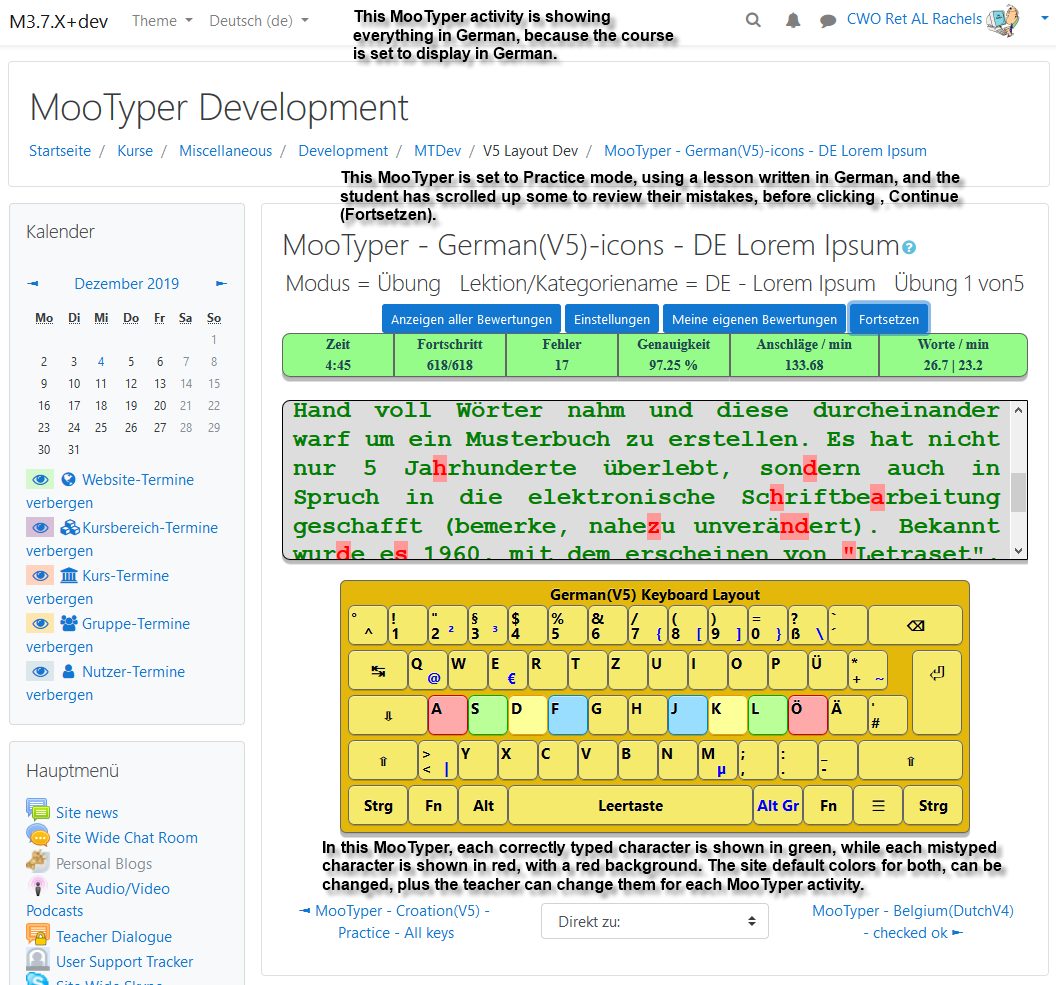
You can also set colors for grade views, the background of the new keyboard
layouts, and the color for keytops that are not home row keys. This allows you
to color coordinate MooTyper with your theme color scheme.
- USING MOOTYPER
Using MooTyper activity module is very simple. An instance can be added as a
new activity in a course like Lesson or Quiz. The simplest way to setup a
MooTyper, is select MooTyper from the list, Add an activity or resource.
Add the name you want to use for this activity. I recommend adding the
lesson name as part of the activity name. Add a description if you desire.
Then, add Availability times, if desired, then click, Save and display.
Yes, that's right! Don't bother with any other options as they will then be
available on the, Setup link.
Thanks to Mary Cooch from moodle.org we have this video, which shows how
to add exercises, create mootyper instance, and then view grades.
It's a little outdated (one of the first versions of mootyper), but I
guess everything still holds:
- ADDITIONAL KEYBOARD LAYOUTS
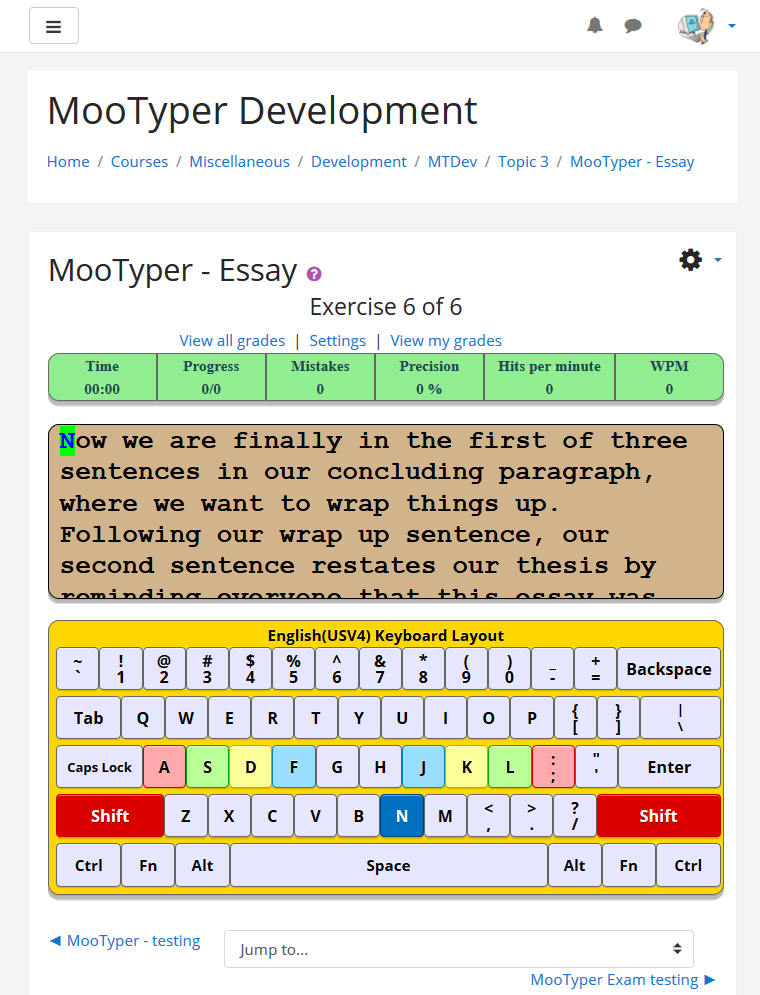
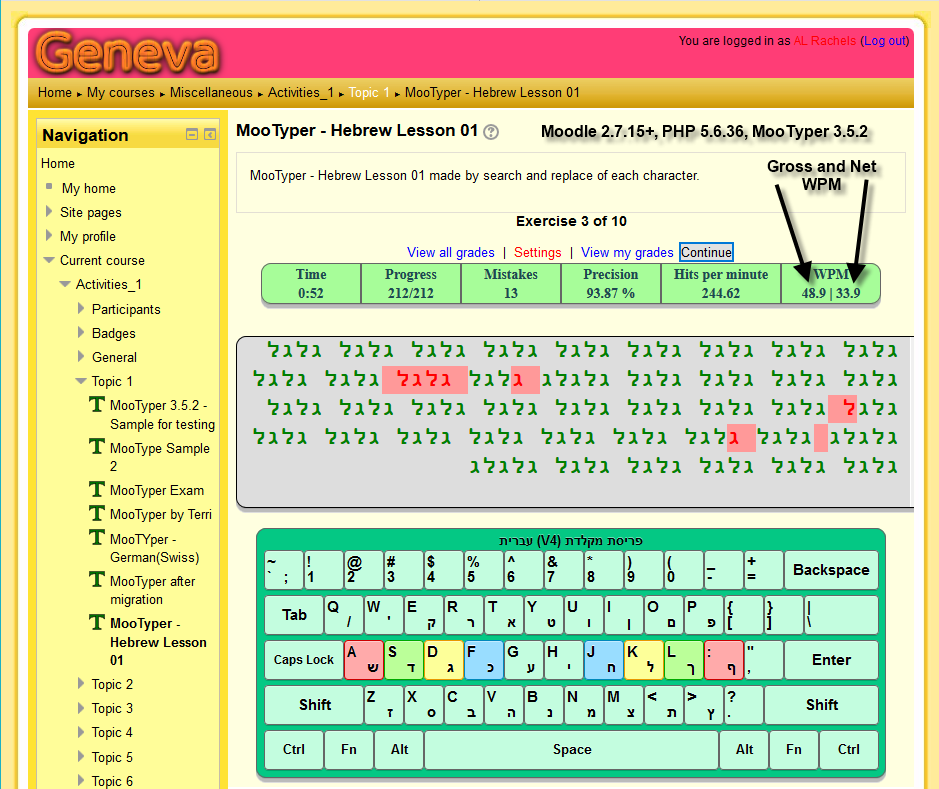
This MooTyper currently includes keyboard layouts to support many languages.
If you do not see one that need, please let the maintainer know.
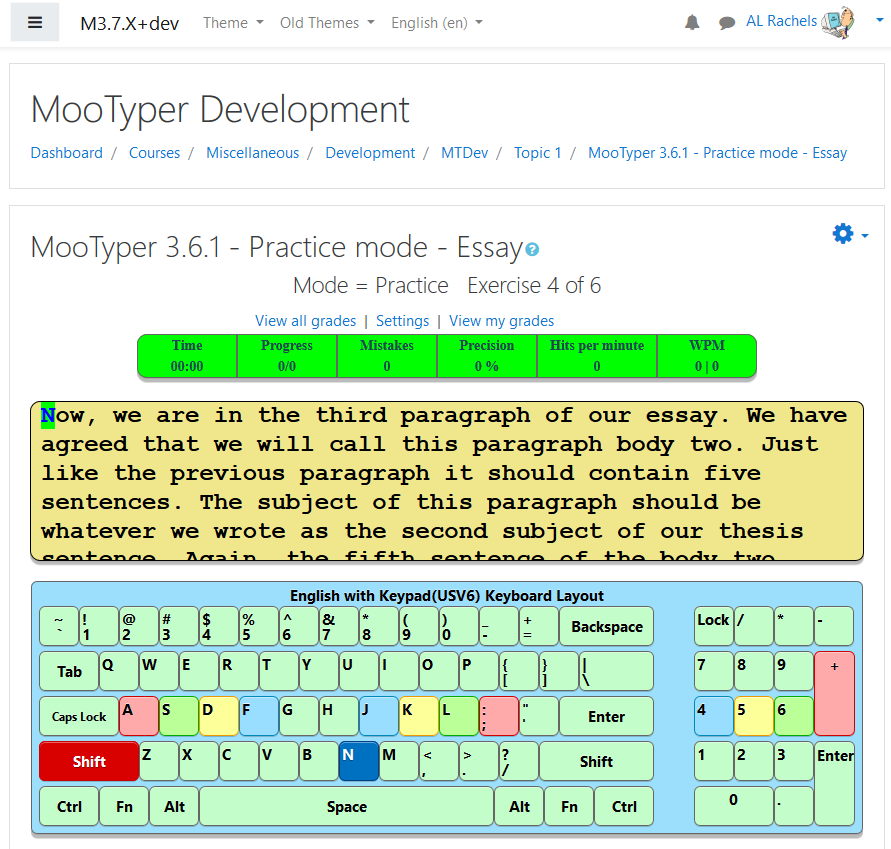
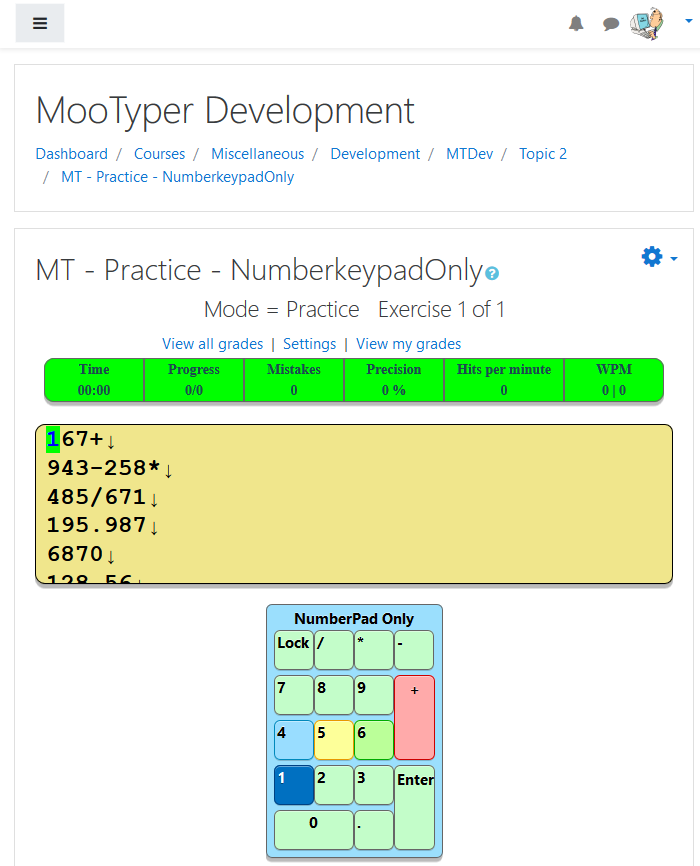
Note: There are two special layouts, English(USV6) that includes both the normal
keys and the number keypad, and numberKeypadOnly(V1), which shows ONLY the
number keypad.
To implement any other layout you have to:
Create a php file with keyboard layout defined with HTML. Create a javascript
file (with the same name and .js extension) that implements the logic of the keyboard
layout. If you have any mistakes in your js file the module won't work, so in
this case try to validate your code with a tool like this...
http://www.javascriptlint.com/online_lint.php
- SAVING YOUR OWN OR MODIFIED LESSONS
In previous versions of MooTyper, if you created your own lessons there was
no built in way to export a copy for backup purposes or for safekeeping.
Once installed, there was no way to add additional lessons to MooTyper
unless you used the built in editing capability, which is not as convenient
as it would be to create lessons in a word processing program. If you wanted
to add lessons to MooTyper without using the built in editor, you had to do
a completely new installation of MooTyper which meant you would lose all
student progress and grades.
As of version 3.1.0, MooTyper now supports Import and Export of MooTyper Lessons
via links in the Administration block, which overcomes these limitations.
- NEW IN THIS RELEASE
There is now a new key top text color setting. This will allow you to now
have a layout with dark colored keys, with white text, or some other light
colored text.
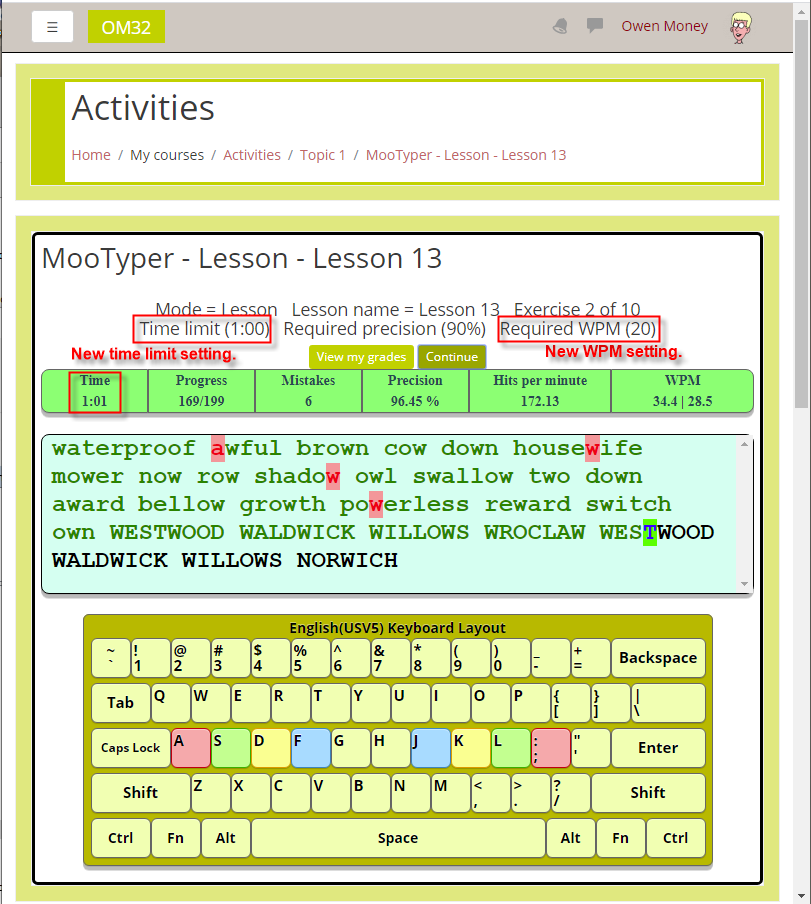
There is now a new time limit setting that can be used for any Mode.
There is now a new required WPM rate setting that can be used for any Mode.
Information labels on the pages for view.php, gview.php, and owngrades.php
now include the new time limit, Required precision, and the new Required WPM.
You can now set a typing time limit from 0:00 (not used) to 10:00 minutes.
However, you will need to make sure each exercise is long enough, character
count wise, so that your fastest typer will NOT run out of something to type.
You can now set a required Word Per Minute rate. Failure to achieve the
posted rate, is treated just the same as failing to achieve the required
precision.
You can mix and match the time limit, precision, and wpm.
A zero timelimit lets the student type all the way to the end of the exercise,
just as it always has. If a time limit is set, the exercise is halted when
time expires.
A zero required precision means the grade will NOT be shown with a red
background no matter the precision achieved for the exercise. Any other
required precision is treated as before.
A zero required WPM rate means the grade will NOT be shown with a red
background no matter the WPM rate achieved for the exercise. Any other
required precision like the required precision rate. Red grade background
for not exceeding the required WPM. Green if it is exceeded.
If using both a required precision and required WPM, they must both be
exceeded to get a green "passed" background. If one is exceeded and one
is not, the grade background will be red.
- OTHER IMPORTANT CAPABILITIES
There are four settings that affect the typing modes.
1.The original mode - This mode requires you to type the correct letter before
you can move to the next letter. Extra spaces are ignored. Mistyped letters
are counted as mistakes.
2. Count mistyped spaces - Same as the original mode, but counts mistyped spaces
as well as mistyped letters.
3. Continuous typing - In this mode you do not have to type the correct letter
before moving to the next letter. All mistyped letters and space are counted
as mistakes.
4. Count all keystrokes - If you mistype the same key multiple times, you have the
option of counting it as one mistake, or counting all of them.
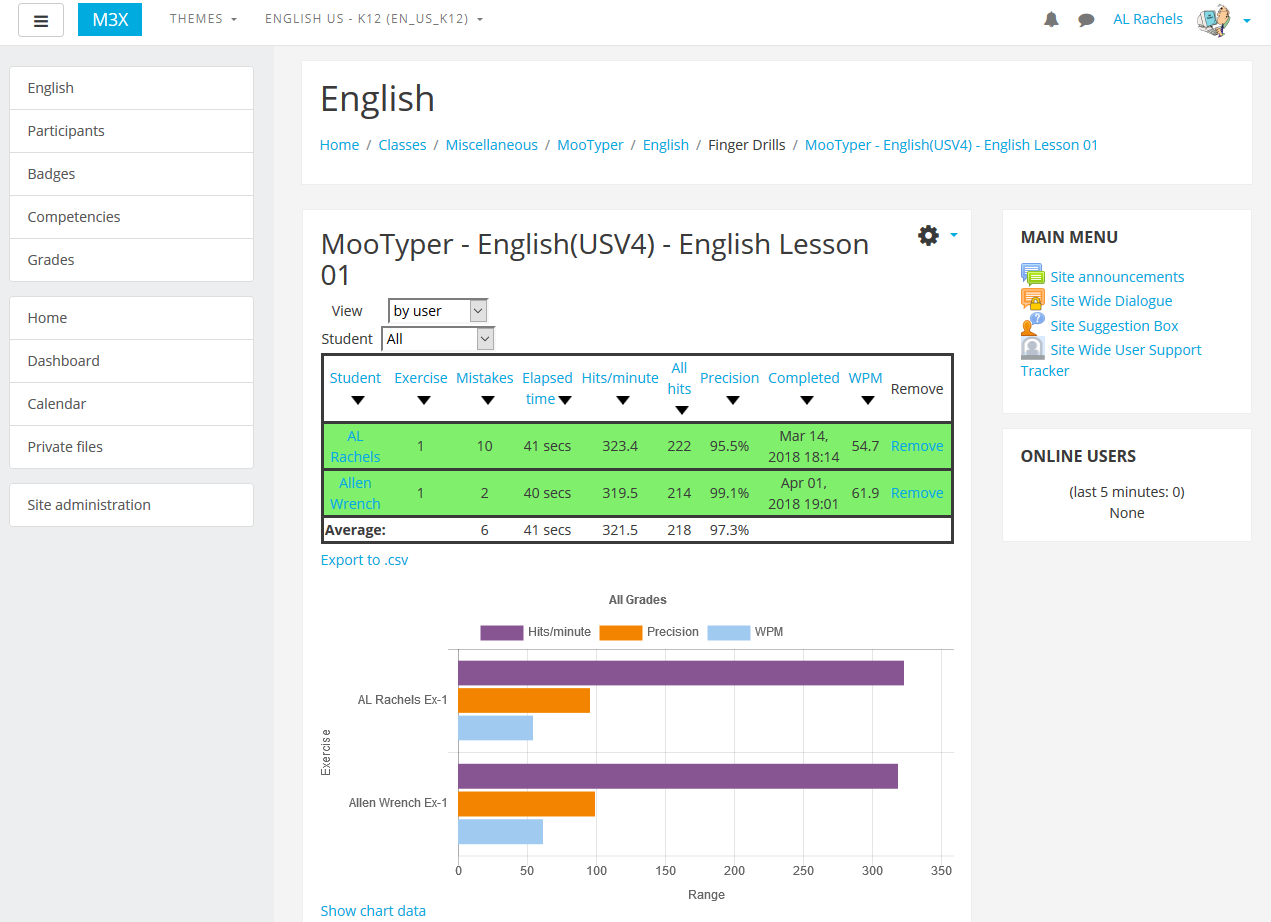
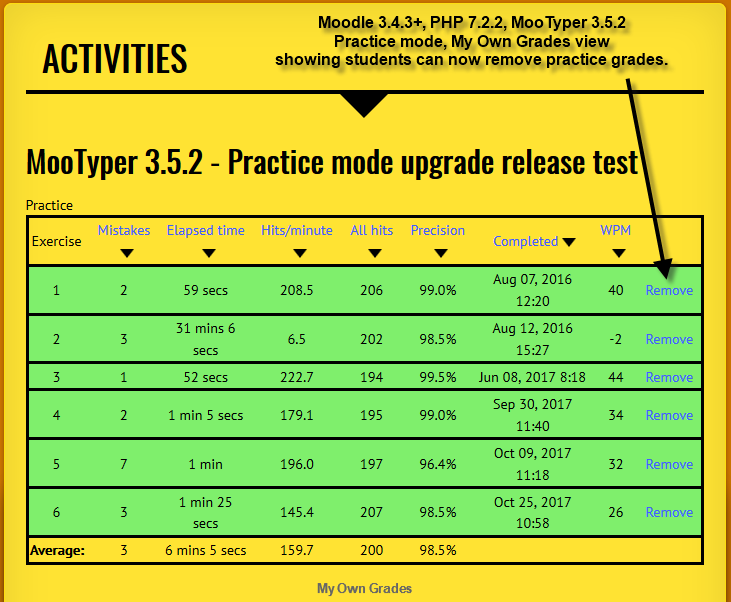
If a user clicks, View my grades, depending on the Moodle version, they will now
see a horizontal bar chart beneath their grade table that charts Hits per minute,
Precision, and WPM results. If a non-editing teacher, teacher, manager, or admin,
clicks on, 'View all grades, depending on the Moodle version, they will see the
normal grade table as well as horizontal bar charts showing Hits per minute,
Precision, and WPM for each exercise for each student.
For more info please visit the plugins wiki on github:
https://github.com/drachels/moodle-mod_mootyper/wiki
5.0.0 (Build: 2026032100) (2026032100)
5.0.0 (Build: 2026032100)
Plugin type: Activities
Frankenstyle component name: mod_mootyper
Version build number: 2026032100
Version release name: 5.0.0 (Build: 2026032100)
Maturity: Stable
Supported Moodle versions: 4.5, 5.0, 5.1, 5.2
Repository URL (Git): https://github.com/drachels/moodle-mod_mootyper
Repository branch:
Repository tag: v5.0.0
Issue/bug tracker URL: https://github.com/drachels/moodle-mod_mootyper/issues
Moodle Mootyper module
- Moodle tracker component: https://github.com/drachels/moodle-mod_mootyper/issues
- Documentation: https://github.com/drachels/moodle-mod_mootyper/wiki
- Source Code: https://github.com/drachels/moodle-mod_mootyper
- License: http://www.gnu.org/licenses/gpl.txt
Install from git
- Navigate to Moodle root folder
- git clone git://github.com/drachels/moodle-mod_mootyper.git mod/mootyper
- cd mootyper
- git checkout MOODLE_XY_STABLE (where XY is the moodle version, e.g: MOODLE_30_STABLE, MOODLE_28_STABLE...)
- Click the 'Notifications' link on the frontpage administration block or php admin/cli/upgrade.php if you have access to a command line interpreter.
Install from a compressed file
- Extract the compressed file data
- Rename the main folder to mootyper
- Copy to the Moodle mod/ folder
- Click the 'Notifications' link on the frontpage administration block or php admin/cli/upgrade.php if you have access to a command line interpreter.
This is the README file for the MooTyper project. MooTyper is
a moodle extension, that adds the 'typing instructor' functionallity to Moodle.
The plugin url is: https://moodle.org/plugins/view.php?plugin=mod_mootyper
MooTyper is free software, the same as Moodle.
- REQUIREMENTS
The MooTyper module uses javascript which is not welcome in Moodle but it is a
requirement for the use of the module. The typing procedure cannot be done without
the client side logic.
It creates some new tables in a moodle database and inserts some sample
typing exercises. This is all done automaticaly through the intstallation,
but real lessons and exercises should be added by teachers afterwards.
- INSTALLATION
MooTyper is an activity module. You have to extract it to the 'mod' directory.
If the directory name is something like "moodle_mod_mootyper" you have to change
that to just "mootyper". So for example, the path should be like this:
Than go to Site Administration -> Notifications and click on the button to start
the install.
Right after an install or upgrade of the new MooTyper 3.6.1, you will then see
the settings page. You can now set the date display format for the grade views.
You can also set colors for grade views, the background of the new keyboard
layouts, and the color for keytops that are not home row keys. This allows you
to color coordinate MooTyper with your theme color scheme.
- USING MOOTYPER
Using MooTyper activity module is very simple. An instance can be added as a
new activity in a course like Lesson or Quiz. The simplest way to setup a
MooTyper, is select MooTyper from the list, Add an activity or resource.
Add the name you want to use for this activity. I recommend adding the
lesson name as part of the activity name. Add a description if you desire.
Then, add Availability times, if desired, then click, Save and display.
Yes, that's right! Don't bother with any other options as they will then be
available on the, Setup link.
Thanks to Mary Cooch from moodle.org we have this video, which shows how
to add exercises, create mootyper instance, and then view grades.
It's a little outdated (one of the first versions of mootyper), but I
guess everything still holds:
- ADDITIONAL KEYBOARD LAYOUTS
This MooTyper currently includes keyboard layouts to support many languages.
If you do not see one that need, please let the maintainer know.
Note: There are two special layouts, English(USV6) that includes both the normal
keys and the number keypad, and numberKeypadOnly(V1), which shows ONLY the
number keypad.
To implement any other layout you have to:
Create a php file with keyboard layout defined with HTML. Create a javascript
file (with the same name and .js extension) that implements the logic of the keyboard
layout. If you have any mistakes in your js file the module won't work, so in
this case try to validate your code with a tool like this...
http://www.javascriptlint.com/online_lint.php
- SAVING YOUR OWN OR MODIFIED LESSONS
In previous versions of MooTyper, if you created your own lessons there was
no built in way to export a copy for backup purposes or for safekeeping.
Once installed, there was no way to add additional lessons to MooTyper
unless you used the built in editing capability, which is not as convenient
as it would be to create lessons in a word processing program. If you wanted
to add lessons to MooTyper without using the built in editor, you had to do
a completely new installation of MooTyper which meant you would lose all
student progress and grades.
As of version 3.1.0, MooTyper now supports Import and Export of MooTyper Lessons
via links in the Administration block, which overcomes these limitations.
- NEW IN THIS RELEASE
There is now a new key top text color setting. This will allow you to now
have a layout with dark colored keys, with white text, or some other light
colored text.
There is now a new time limit setting that can be used for any Mode.
There is now a new required WPM rate setting that can be used for any Mode.
Information labels on the pages for view.php, gview.php, and owngrades.php
now include the new time limit, Required precision, and the new Required WPM.
You can now set a typing time limit from 0:00 (not used) to 10:00 minutes.
However, you will need to make sure each exercise is long enough, character
count wise, so that your fastest typer will NOT run out of something to type.
You can now set a required Word Per Minute rate. Failure to achieve the
posted rate, is treated just the same as failing to achieve the required
precision.
You can mix and match the time limit, precision, and wpm.
A zero timelimit lets the student type all the way to the end of the exercise,
just as it always has. If a time limit is set, the exercise is halted when
time expires.
A zero required precision means the grade will NOT be shown with a red
background no matter the precision achieved for the exercise. Any other
required precision is treated as before.
A zero required WPM rate means the grade will NOT be shown with a red
background no matter the WPM rate achieved for the exercise. Any other
required precision like the required precision rate. Red grade background
for not exceeding the required WPM. Green if it is exceeded.
If using both a required precision and required WPM, they must both be
exceeded to get a green "passed" background. If one is exceeded and one
is not, the grade background will be red.
- OTHER IMPORTANT CAPABILITIES
There are four settings that affect the typing modes.
1.The original mode - This mode requires you to type the correct letter before
you can move to the next letter. Extra spaces are ignored. Mistyped letters
are counted as mistakes.
2. Count mistyped spaces - Same as the original mode, but counts mistyped spaces
as well as mistyped letters.
3. Continuous typing - In this mode you do not have to type the correct letter
before moving to the next letter. All mistyped letters and space are counted
as mistakes.
4. Count all keystrokes - If you mistype the same key multiple times, you have the
option of counting it as one mistake, or counting all of them.
If a user clicks, View my grades, depending on the Moodle version, they will now
see a horizontal bar chart beneath their grade table that charts Hits per minute,
Precision, and WPM results. If a non-editing teacher, teacher, manager, or admin,
clicks on, 'View all grades, depending on the Moodle version, they will see the
normal grade table as well as horizontal bar charts showing Hits per minute,
Precision, and WPM for each exercise for each student.
For more info please visit the plugins wiki on github:
https://github.com/drachels/moodle-mod_mootyper/wiki
4.3.0 (Build: 2024090200) (2024090200)
4.3.0 (Build: 2024090200)
Plugin type: Activities
Frankenstyle component name: mod_mootyper
Version build number: 2024090200
Version release name: 4.3.0 (Build: 2024090200)
Maturity: Stable
Supported Moodle versions: 3.11, 4.0, 4.1, 4.2, 4.3, 4.4, 4.5
Repository URL (Git): https://github.com/drachels/moodle-mod_mootyper
Repository branch:
Repository tag: v4.3.0
Issue/bug tracker URL: https://github.com/drachels/moodle-mod_mootyper/issues
Moodle Mootyper module
- Moodle tracker component: https://github.com/drachels/moodle-mod_mootyper/issues
- Documentation: https://github.com/drachels/moodle-mod_mootyper/wiki
- Source Code: https://github.com/drachels/moodle-mod_mootyper
- License: http://www.gnu.org/licenses/gpl.txt
Install from git
- Navigate to Moodle root folder
- git clone git://github.com/drachels/moodle-mod_mootyper.git mod/mootyper
- cd mootyper
- git checkout MOODLE_XY_STABLE (where XY is the moodle version, e.g: MOODLE_30_STABLE, MOODLE_28_STABLE...)
- Click the 'Notifications' link on the frontpage administration block or php admin/cli/upgrade.php if you have access to a command line interpreter.
Install from a compressed file
- Extract the compressed file data
- Rename the main folder to mootyper
- Copy to the Moodle mod/ folder
- Click the 'Notifications' link on the frontpage administration block or php admin/cli/upgrade.php if you have access to a command line interpreter.
This is the README file for the MooTyper project. MooTyper is
a moodle extension, that adds the 'typing instructor' functionallity to Moodle.
The plugin url is: https://moodle.org/plugins/view.php?plugin=mod_mootyper
MooTyper is free software, the same as Moodle.
- REQUIREMENTS
The MooTyper module uses javascript which is not welcome in Moodle but it is a
requirement for the use of the module. The typing procedure cannot be done without
the client side logic.
It creates some new tables in a moodle database and inserts some sample
typing exercises. This is all done automaticaly through the intstallation,
but real lessons and exercises should be added by teachers afterwards.
- INSTALLATION
MooTyper is an activity module. You have to extract it to the 'mod' directory.
If the directory name is something like "moodle_mod_mootyper" you have to change
that to just "mootyper". So for example, the path should be like this:
Than go to Site Administration -> Notifications and click on the button to start
the install.
Right after an install or upgrade of the new MooTyper 3.6.1, you will then see
the settings page. You can now set the date display format for the grade views.
You can also set colors for grade views, the background of the new keyboard
layouts, and the color for keytops that are not home row keys. This allows you
to color coordinate MooTyper with your theme color scheme.
- USING MOOTYPER
Using MooTyper activity module is very simple. An instance can be added as a
new activity in a course like Lesson or Quiz. The simplest way to setup a
MooTyper, is select MooTyper from the list, Add an activity or resource.
Add the name you want to use for this activity. I recommend adding the
lesson name as part of the activity name. Add a description if you desire.
Then, add Availability times, if desired, then click, Save and display.
Yes, that's right! Don't bother with any other options as they will then be
available on the, Setup link.
Thanks to Mary Cooch from moodle.org we have this video, which shows how
to add exercises, create mootyper instance, and then view grades.
It's a little outdated (one of the first versions of mootyper), but I
guess everything still holds:
- ADDITIONAL KEYBOARD LAYOUTS
This MooTyper currently includes keyboard layouts to support many languages.
If you do not see one that need, please let the maintainer know.
Note: There are two special layouts, English(USV6) that includes both the normal
keys and the number keypad, and numberKeypadOnly(V1), which shows ONLY the
number keypad.
To implement any other layout you have to:
Create a php file with keyboard layout defined with HTML. Create a javascript
file (with the same name and .js extension) that implements the logic of the keyboard
layout. If you have any mistakes in your js file the module won't work, so in
this case try to validate your code with a tool like this...
http://www.javascriptlint.com/online_lint.php
- SAVING YOUR OWN OR MODIFIED LESSONS
In previous versions of MooTyper, if you created your own lessons there was
no built in way to export a copy for backup purposes or for safekeeping.
Once installed, there was no way to add additional lessons to MooTyper
unless you used the built in editing capability, which is not as convenient
as it would be to create lessons in a word processing program. If you wanted
to add lessons to MooTyper without using the built in editor, you had to do
a completely new installation of MooTyper which meant you would lose all
student progress and grades.
As of version 3.1.0, MooTyper now supports Import and Export of MooTyper Lessons
via links in the Administration block, which overcomes these limitations.
- NEW IN THIS RELEASE
There is now a new key top text color setting. This will allow you to now
have a layout with dark colored keys, with white text, or some other light
colored text.
There is now a new time limit setting that can be used for any Mode.
There is now a new required WPM rate setting that can be used for any Mode.
Information labels on the pages for view.php, gview.php, and owngrades.php
now include the new time limit, Required precision, and the new Required WPM.
You can now set a typing time limit from 0:00 (not used) to 10:00 minutes.
However, you will need to make sure each exercise is long enough, character
count wise, so that your fastest typer will NOT run out of something to type.
You can now set a required Word Per Minute rate. Failure to achieve the
posted rate, is treated just the same as failing to achieve the required
precision.
You can mix and match the time limit, precision, and wpm.
A zero timelimit lets the student type all the way to the end of the exercise,
just as it always has. If a time limit is set, the exercise is halted when
time expires.
A zero required precision means the grade will NOT be shown with a red
background no matter the precision achieved for the exercise. Any other
required precision is treated as before.
A zero required WPM rate means the grade will NOT be shown with a red
background no matter the WPM rate achieved for the exercise. Any other
required precision like the required precision rate. Red grade background
for not exceeding the required WPM. Green if it is exceeded.
If using both a required precision and required WPM, they must both be
exceeded to get a green "passed" background. If one is exceeded and one
is not, the grade background will be red.
- OTHER IMPORTANT CAPABILITIES
There are four settings that affect the typing modes.
1.The original mode - This mode requires you to type the correct letter before
you can move to the next letter. Extra spaces are ignored. Mistyped letters
are counted as mistakes.
2. Count mistyped spaces - Same as the original mode, but counts mistyped spaces
as well as mistyped letters.
3. Continuous typing - In this mode you do not have to type the correct letter
before moving to the next letter. All mistyped letters and space are counted
as mistakes.
4. Count all keystrokes - If you mistype the same key multiple times, you have the
option of counting it as one mistake, or counting all of them.
If a user clicks, View my grades, depending on the Moodle version, they will now
see a horizontal bar chart beneath their grade table that charts Hits per minute,
Precision, and WPM results. If a non-editing teacher, teacher, manager, or admin,
clicks on, 'View all grades, depending on the Moodle version, they will see the
normal grade table as well as horizontal bar charts showing Hits per minute,
Precision, and WPM for each exercise for each student.
For more info please visit the plugins wiki on github:
https://github.com/drachels/moodle-mod_mootyper/wiki
4.2.9 (Build: 2024061300) (2024061300)
4.2.9 (Build: 2024061300)
Plugin type: Activities
Frankenstyle component name: mod_mootyper
Version build number: 2024061300
Version release name: 4.2.9 (Build: 2024061300)
Maturity: Stable
Supported Moodle versions: 3.11, 4.0, 4.1, 4.2, 4.3, 4.4, 4.5
Repository URL (Git): https://github.com/drachels/moodle-mod_mootyper
Repository branch:
Repository tag: v4.2.9
Issue/bug tracker URL: https://github.com/drachels/moodle-mod_mootyper/issues
Moodle Mootyper module
- Moodle tracker component: https://github.com/drachels/moodle-mod_mootyper/issues
- Documentation: https://github.com/drachels/moodle-mod_mootyper/wiki
- Source Code: https://github.com/drachels/moodle-mod_mootyper
- License: http://www.gnu.org/licenses/gpl.txt
Install from git
- Navigate to Moodle root folder
- git clone git://github.com/drachels/moodle-mod_mootyper.git mod/mootyper
- cd mootyper
- git checkout MOODLE_XY_STABLE (where XY is the moodle version, e.g: MOODLE_30_STABLE, MOODLE_28_STABLE...)
- Click the 'Notifications' link on the frontpage administration block or php admin/cli/upgrade.php if you have access to a command line interpreter.
Install from a compressed file
- Extract the compressed file data
- Rename the main folder to mootyper
- Copy to the Moodle mod/ folder
- Click the 'Notifications' link on the frontpage administration block or php admin/cli/upgrade.php if you have access to a command line interpreter.
This is the README file for the MooTyper project. MooTyper is
a moodle extension, that adds the 'typing instructor' functionallity to Moodle.
The plugin url is: https://moodle.org/plugins/view.php?plugin=mod_mootyper
MooTyper is free software, the same as Moodle.
- REQUIREMENTS
The MooTyper module uses javascript which is not welcome in Moodle but it is a
requirement for the use of the module. The typing procedure cannot be done without
the client side logic.
It creates some new tables in a moodle database and inserts some sample
typing exercises. This is all done automaticaly through the intstallation,
but real lessons and exercises should be added by teachers afterwards.
- INSTALLATION
MooTyper is an activity module. You have to extract it to the 'mod' directory.
If the directory name is something like "moodle_mod_mootyper" you have to change
that to just "mootyper". So for example, the path should be like this:
Than go to Site Administration -> Notifications and click on the button to start
the install.
Right after an install or upgrade of the new MooTyper 3.6.1, you will then see
the settings page. You can now set the date display format for the grade views.
You can also set colors for grade views, the background of the new keyboard
layouts, and the color for keytops that are not home row keys. This allows you
to color coordinate MooTyper with your theme color scheme.
- USING MOOTYPER
Using MooTyper activity module is very simple. An instance can be added as a
new activity in a course like Lesson or Quiz. The simplest way to setup a
MooTyper, is select MooTyper from the list, Add an activity or resource.
Add the name you want to use for this activity. I recommend adding the
lesson name as part of the activity name. Add a description if you desire.
Then, add Availability times, if desired, then click, Save and display.
Yes, that's right! Don't bother with any other options as they will then be
available on the, Setup link.
Thanks to Mary Cooch from moodle.org we have this video, which shows how
to add exercises, create mootyper instance, and then view grades.
It's a little outdated (one of the first versions of mootyper), but I
guess everything still holds:
- ADDITIONAL KEYBOARD LAYOUTS
This MooTyper currently includes keyboard layouts to support many languages.
If you do not see one that need, please let the maintainer know.
Note: There are two special layouts, English(USV6) that includes both the normal
keys and the number keypad, and numberKeypadOnly(V1), which shows ONLY the
number keypad.
To implement any other layout you have to:
Create a php file with keyboard layout defined with HTML. Create a javascript
file (with the same name and .js extension) that implements the logic of the keyboard
layout. If you have any mistakes in your js file the module won't work, so in
this case try to validate your code with a tool like this...
http://www.javascriptlint.com/online_lint.php
- SAVING YOUR OWN OR MODIFIED LESSONS
In previous versions of MooTyper, if you created your own lessons there was
no built in way to export a copy for backup purposes or for safekeeping.
Once installed, there was no way to add additional lessons to MooTyper
unless you used the built in editing capability, which is not as convenient
as it would be to create lessons in a word processing program. If you wanted
to add lessons to MooTyper without using the built in editor, you had to do
a completely new installation of MooTyper which meant you would lose all
student progress and grades.
As of version 3.1.0, MooTyper now supports Import and Export of MooTyper Lessons
via links in the Administration block, which overcomes these limitations.
- NEW IN THIS RELEASE
There is now a new key top text color setting. This will allow you to now
have a layout with dark colored keys, with white text, or some other light
colored text.
There is now a new time limit setting that can be used for any Mode.
There is now a new required WPM rate setting that can be used for any Mode.
Information labels on the pages for view.php, gview.php, and owngrades.php
now include the new time limit, Required precision, and the new Required WPM.
You can now set a typing time limit from 0:00 (not used) to 10:00 minutes.
However, you will need to make sure each exercise is long enough, character
count wise, so that your fastest typer will NOT run out of something to type.
You can now set a required Word Per Minute rate. Failure to achieve the
posted rate, is treated just the same as failing to achieve the required
precision.
You can mix and match the time limit, precision, and wpm.
A zero timelimit lets the student type all the way to the end of the exercise,
just as it always has. If a time limit is set, the exercise is halted when
time expires.
A zero required precision means the grade will NOT be shown with a red
background no matter the precision achieved for the exercise. Any other
required precision is treated as before.
A zero required WPM rate means the grade will NOT be shown with a red
background no matter the WPM rate achieved for the exercise. Any other
required precision like the required precision rate. Red grade background
for not exceeding the required WPM. Green if it is exceeded.
If using both a required precision and required WPM, they must both be
exceeded to get a green "passed" background. If one is exceeded and one
is not, the grade background will be red.
- OTHER IMPORTANT CAPABILITIES
There are four settings that affect the typing modes.
1.The original mode - This mode requires you to type the correct letter before
you can move to the next letter. Extra spaces are ignored. Mistyped letters
are counted as mistakes.
2. Count mistyped spaces - Same as the original mode, but counts mistyped spaces
as well as mistyped letters.
3. Continuous typing - In this mode you do not have to type the correct letter
before moving to the next letter. All mistyped letters and space are counted
as mistakes.
4. Count all keystrokes - If you mistype the same key multiple times, you have the
option of counting it as one mistake, or counting all of them.
If a user clicks, View my grades, depending on the Moodle version, they will now
see a horizontal bar chart beneath their grade table that charts Hits per minute,
Precision, and WPM results. If a non-editing teacher, teacher, manager, or admin,
clicks on, 'View all grades, depending on the Moodle version, they will see the
normal grade table as well as horizontal bar charts showing Hits per minute,
Precision, and WPM for each exercise for each student.
For more info please visit the plugins wiki on github:
https://github.com/drachels/moodle-mod_mootyper/wiki
4.2.8 (Build: 2024032100) (2024032100)
4.2.8 (Build: 2024032100)
Plugin type: Activities
Frankenstyle component name: mod_mootyper
Version build number: 2024032100
Version release name: 4.2.8 (Build: 2024032100)
Maturity: Stable
Supported Moodle versions: 3.11, 4.0, 4.1, 4.2, 4.3
Repository URL (Git): https://github.com/drachels/moodle-mod_mootyper
Repository branch:
Repository tag: v4.2.8
Issue/bug tracker URL: https://github.com/drachels/moodle-mod_mootyper/issues
Moodle Mootyper module
- Moodle tracker component: https://github.com/drachels/moodle-mod_mootyper/issues
- Documentation: https://github.com/drachels/moodle-mod_mootyper/wiki
- Source Code: https://github.com/drachels/moodle-mod_mootyper
- License: http://www.gnu.org/licenses/gpl.txt
Install from git
- Navigate to Moodle root folder
- git clone git://github.com/drachels/moodle-mod_mootyper.git mod/mootyper
- cd mootyper
- git checkout MOODLE_XY_STABLE (where XY is the moodle version, e.g: MOODLE_30_STABLE, MOODLE_28_STABLE...)
- Click the 'Notifications' link on the frontpage administration block or php admin/cli/upgrade.php if you have access to a command line interpreter.
Install from a compressed file
- Extract the compressed file data
- Rename the main folder to mootyper
- Copy to the Moodle mod/ folder
- Click the 'Notifications' link on the frontpage administration block or php admin/cli/upgrade.php if you have access to a command line interpreter.
This is the README file for the MooTyper project. MooTyper is
a moodle extension, that adds the 'typing instructor' functionallity to Moodle.
The plugin url is: https://moodle.org/plugins/view.php?plugin=mod_mootyper
MooTyper is free software, the same as Moodle.
- REQUIREMENTS
The MooTyper module uses javascript which is not welcome in Moodle but it is a
requirement for the use of the module. The typing procedure cannot be done without
the client side logic.
It creates some new tables in a moodle database and inserts some sample
typing exercises. This is all done automaticaly through the intstallation,
but real lessons and exercises should be added by teachers afterwards.
- INSTALLATION
MooTyper is an activity module. You have to extract it to the 'mod' directory.
If the directory name is something like "moodle_mod_mootyper" you have to change
that to just "mootyper". So for example, the path should be like this:
Than go to Site Administration -> Notifications and click on the button to start
the install.
Right after an install or upgrade of the new MooTyper 3.6.1, you will then see
the settings page. You can now set the date display format for the grade views.
You can also set colors for grade views, the background of the new keyboard
layouts, and the color for keytops that are not home row keys. This allows you
to color coordinate MooTyper with your theme color scheme.
- USING MOOTYPER
Using MooTyper activity module is very simple. An instance can be added as a
new activity in a course like Lesson or Quiz. The simplest way to setup a
MooTyper, is select MooTyper from the list, Add an activity or resource.
Add the name you want to use for this activity. I recommend adding the
lesson name as part of the activity name. Add a description if you desire.
Then, add Availability times, if desired, then click, Save and display.
Yes, that's right! Don't bother with any other options as they will then be
available on the, Setup link.
Thanks to Mary Cooch from moodle.org we have this video, which shows how
to add exercises, create mootyper instance, and then view grades.
It's a little outdated (one of the first versions of mootyper), but I
guess everything still holds:
- ADDITIONAL KEYBOARD LAYOUTS
This MooTyper currently includes keyboard layouts to support many languages.
If you do not see one that need, please let the maintainer know.
Note: There are two special layouts, English(USV6) that includes both the normal
keys and the number keypad, and numberKeypadOnly(V1), which shows ONLY the
number keypad.
To implement any other layout you have to:
Create a php file with keyboard layout defined with HTML. Create a javascript
file (with the same name and .js extension) that implements the logic of the keyboard
layout. If you have any mistakes in your js file the module won't work, so in
this case try to validate your code with a tool like this...
http://www.javascriptlint.com/online_lint.php
- SAVING YOUR OWN OR MODIFIED LESSONS
In previous versions of MooTyper, if you created your own lessons there was
no built in way to export a copy for backup purposes or for safekeeping.
Once installed, there was no way to add additional lessons to MooTyper
unless you used the built in editing capability, which is not as convenient
as it would be to create lessons in a word processing program. If you wanted
to add lessons to MooTyper without using the built in editor, you had to do
a completely new installation of MooTyper which meant you would lose all
student progress and grades.
As of version 3.1.0, MooTyper now supports Import and Export of MooTyper Lessons
via links in the Administration block, which overcomes these limitations.
- NEW IN THIS RELEASE
There is now a new key top text color setting. This will allow you to now
have a layout with dark colored keys, with white text, or some other light
colored text.
There is now a new time limit setting that can be used for any Mode.
There is now a new required WPM rate setting that can be used for any Mode.
Information labels on the pages for view.php, gview.php, and owngrades.php
now include the new time limit, Required precision, and the new Required WPM.
You can now set a typing time limit from 0:00 (not used) to 10:00 minutes.
However, you will need to make sure each exercise is long enough, character
count wise, so that your fastest typer will NOT run out of something to type.
You can now set a required Word Per Minute rate. Failure to achieve the
posted rate, is treated just the same as failing to achieve the required
precision.
You can mix and match the time limit, precision, and wpm.
A zero timelimit lets the student type all the way to the end of the exercise,
just as it always has. If a time limit is set, the exercise is halted when
time expires.
A zero required precision means the grade will NOT be shown with a red
background no matter the precision achieved for the exercise. Any other
required precision is treated as before.
A zero required WPM rate means the grade will NOT be shown with a red
background no matter the WPM rate achieved for the exercise. Any other
required precision like the required precision rate. Red grade background
for not exceeding the required WPM. Green if it is exceeded.
If using both a required precision and required WPM, they must both be
exceeded to get a green "passed" background. If one is exceeded and one
is not, the grade background will be red.
- OTHER IMPORTANT CAPABILITIES
There are four settings that affect the typing modes.
1.The original mode - This mode requires you to type the correct letter before
you can move to the next letter. Extra spaces are ignored. Mistyped letters
are counted as mistakes.
2. Count mistyped spaces - Same as the original mode, but counts mistyped spaces
as well as mistyped letters.
3. Continuous typing - In this mode you do not have to type the correct letter
before moving to the next letter. All mistyped letters and space are counted
as mistakes.
4. Count all keystrokes - If you mistype the same key multiple times, you have the
option of counting it as one mistake, or counting all of them.
If a user clicks, View my grades, depending on the Moodle version, they will now
see a horizontal bar chart beneath their grade table that charts Hits per minute,
Precision, and WPM results. If a non-editing teacher, teacher, manager, or admin,
clicks on, 'View all grades, depending on the Moodle version, they will see the
normal grade table as well as horizontal bar charts showing Hits per minute,
Precision, and WPM for each exercise for each student.
For more info please visit the plugins wiki on github:
https://github.com/drachels/moodle-mod_mootyper/wiki
4.2.7 (Build: 2024013100) (2024013100)
4.2.7 (Build: 2024013100)
Plugin type: Activities
Frankenstyle component name: mod_mootyper
Version build number: 2024013100
Version release name: 4.2.7 (Build: 2024013100)
Maturity: Stable
Supported Moodle versions: 3.11, 4.0, 4.1, 4.2, 4.3
Repository URL (Git): https://github.com/drachels/moodle-mod_mootyper
Repository branch:
Repository tag: v4.2.7
Issue/bug tracker URL: https://github.com/drachels/moodle-mod_mootyper/issues
Moodle Mootyper module
- Moodle tracker component: https://github.com/drachels/moodle-mod_mootyper/issues
- Documentation: https://github.com/drachels/moodle-mod_mootyper/wiki
- Source Code: https://github.com/drachels/moodle-mod_mootyper
- License: http://www.gnu.org/licenses/gpl.txt
Install from git
- Navigate to Moodle root folder
- git clone git://github.com/drachels/moodle-mod_mootyper.git mod/mootyper
- cd mootyper
- git checkout MOODLE_XY_STABLE (where XY is the moodle version, e.g: MOODLE_30_STABLE, MOODLE_28_STABLE...)
- Click the 'Notifications' link on the frontpage administration block or php admin/cli/upgrade.php if you have access to a command line interpreter.
Install from a compressed file
- Extract the compressed file data
- Rename the main folder to mootyper
- Copy to the Moodle mod/ folder
- Click the 'Notifications' link on the frontpage administration block or php admin/cli/upgrade.php if you have access to a command line interpreter.
This is the README file for the MooTyper project. MooTyper is
a moodle extension, that adds the 'typing instructor' functionallity to Moodle.
The plugin url is: https://moodle.org/plugins/view.php?plugin=mod_mootyper
MooTyper is free software, the same as Moodle.
- REQUIREMENTS
The MooTyper module uses javascript which is not welcome in Moodle but it is a
requirement for the use of the module. The typing procedure cannot be done without
the client side logic.
It creates some new tables in a moodle database and inserts some sample
typing exercises. This is all done automaticaly through the intstallation,
but real lessons and exercises should be added by teachers afterwards.
- INSTALLATION
MooTyper is an activity module. You have to extract it to the 'mod' directory.
If the directory name is something like "moodle_mod_mootyper" you have to change
that to just "mootyper". So for example, the path should be like this:
Than go to Site Administration -> Notifications and click on the button to start
the install.
Right after an install or upgrade of the new MooTyper 3.6.1, you will then see
the settings page. You can now set the date display format for the grade views.
You can also set colors for grade views, the background of the new keyboard
layouts, and the color for keytops that are not home row keys. This allows you
to color coordinate MooTyper with your theme color scheme.
- USING MOOTYPER
Using MooTyper activity module is very simple. An instance can be added as a
new activity in a course like Lesson or Quiz. The simplest way to setup a
MooTyper, is select MooTyper from the list, Add an activity or resource.
Add the name you want to use for this activity. I recommend adding the
lesson name as part of the activity name. Add a description if you desire.
Then, add Availability times, if desired, then click, Save and display.
Yes, that's right! Don't bother with any other options as they will then be
available on the, Setup link.
Thanks to Mary Cooch from moodle.org we have this video, which shows how
to add exercises, create mootyper instance, and then view grades.
It's a little outdated (one of the first versions of mootyper), but I
guess everything still holds:
- ADDITIONAL KEYBOARD LAYOUTS
This MooTyper currently includes keyboard layouts to support many languages.
If you do not see one that need, please let the maintainer know.
Note: There are two special layouts, English(USV6) that includes both the normal
keys and the number keypad, and numberKeypadOnly(V1), which shows ONLY the
number keypad.
To implement any other layout you have to:
Create a php file with keyboard layout defined with HTML. Create a javascript
file (with the same name and .js extension) that implements the logic of the keyboard
layout. If you have any mistakes in your js file the module won't work, so in
this case try to validate your code with a tool like this...
http://www.javascriptlint.com/online_lint.php
- SAVING YOUR OWN OR MODIFIED LESSONS
In previous versions of MooTyper, if you created your own lessons there was
no built in way to export a copy for backup purposes or for safekeeping.
Once installed, there was no way to add additional lessons to MooTyper
unless you used the built in editing capability, which is not as convenient
as it would be to create lessons in a word processing program. If you wanted
to add lessons to MooTyper without using the built in editor, you had to do
a completely new installation of MooTyper which meant you would lose all
student progress and grades.
As of version 3.1.0, MooTyper now supports Import and Export of MooTyper Lessons
via links in the Administration block, which overcomes these limitations.
- NEW IN THIS RELEASE
There is now a new key top text color setting. This will allow you to now
have a layout with dark colored keys, with white text, or some other light
colored text.
There is now a new time limit setting that can be used for any Mode.
There is now a new required WPM rate setting that can be used for any Mode.
Information labels on the pages for view.php, gview.php, and owngrades.php
now include the new time limit, Required precision, and the new Required WPM.
You can now set a typing time limit from 0:00 (not used) to 10:00 minutes.
However, you will need to make sure each exercise is long enough, character
count wise, so that your fastest typer will NOT run out of something to type.
You can now set a required Word Per Minute rate. Failure to achieve the
posted rate, is treated just the same as failing to achieve the required
precision.
You can mix and match the time limit, precision, and wpm.
A zero timelimit lets the student type all the way to the end of the exercise,
just as it always has. If a time limit is set, the exercise is halted when
time expires.
A zero required precision means the grade will NOT be shown with a red
background no matter the precision achieved for the exercise. Any other
required precision is treated as before.
A zero required WPM rate means the grade will NOT be shown with a red
background no matter the WPM rate achieved for the exercise. Any other
required precision like the required precision rate. Red grade background
for not exceeding the required WPM. Green if it is exceeded.
If using both a required precision and required WPM, they must both be
exceeded to get a green "passed" background. If one is exceeded and one
is not, the grade background will be red.
- OTHER IMPORTANT CAPABILITIES
There are four settings that affect the typing modes.
1.The original mode - This mode requires you to type the correct letter before
you can move to the next letter. Extra spaces are ignored. Mistyped letters
are counted as mistakes.
2. Count mistyped spaces - Same as the original mode, but counts mistyped spaces
as well as mistyped letters.
3. Continuous typing - In this mode you do not have to type the correct letter
before moving to the next letter. All mistyped letters and space are counted
as mistakes.
4. Count all keystrokes - If you mistype the same key multiple times, you have the
option of counting it as one mistake, or counting all of them.
If a user clicks, View my grades, depending on the Moodle version, they will now
see a horizontal bar chart beneath their grade table that charts Hits per minute,
Precision, and WPM results. If a non-editing teacher, teacher, manager, or admin,
clicks on, 'View all grades, depending on the Moodle version, they will see the
normal grade table as well as horizontal bar charts showing Hits per minute,
Precision, and WPM for each exercise for each student.
For more info please visit the plugins wiki on github:
https://github.com/drachels/moodle-mod_mootyper/wiki
4.2.6 (Build: 2023121000) (2023121000)
4.2.6 (Build: 2023121000)
Plugin type: Activities
Frankenstyle component name: mod_mootyper
Version build number: 2023121000
Version release name: 4.2.6 (Build: 2023121000)
Maturity: Stable
Supported Moodle versions: 3.11, 4.0, 4.1, 4.2, 4.3
Repository URL (Git): https://github.com/drachels/moodle-mod_mootyper
Repository branch:
Repository tag: v4.2.6
Issue/bug tracker URL: https://github.com/drachels/moodle-mod_mootyper/issues
Moodle Mootyper module
- Moodle tracker component: https://github.com/drachels/moodle-mod_mootyper/issues
- Documentation: https://github.com/drachels/moodle-mod_mootyper/wiki
- Source Code: https://github.com/drachels/moodle-mod_mootyper
- License: http://www.gnu.org/licenses/gpl.txt
Install from git
- Navigate to Moodle root folder
- git clone git://github.com/drachels/moodle-mod_mootyper.git mod/mootyper
- cd mootyper
- git checkout MOODLE_XY_STABLE (where XY is the moodle version, e.g: MOODLE_30_STABLE, MOODLE_28_STABLE...)
- Click the 'Notifications' link on the frontpage administration block or php admin/cli/upgrade.php if you have access to a command line interpreter.
Install from a compressed file
- Extract the compressed file data
- Rename the main folder to mootyper
- Copy to the Moodle mod/ folder
- Click the 'Notifications' link on the frontpage administration block or php admin/cli/upgrade.php if you have access to a command line interpreter.
This is the README file for the MooTyper project. MooTyper is
a moodle extension, that adds the 'typing instructor' functionallity to Moodle.
The plugin url is: https://moodle.org/plugins/view.php?plugin=mod_mootyper
MooTyper is free software, the same as Moodle.
- REQUIREMENTS
The MooTyper module uses javascript which is not welcome in Moodle but it is a
requirement for the use of the module. The typing procedure cannot be done without
the client side logic.
It creates some new tables in a moodle database and inserts some sample
typing exercises. This is all done automaticaly through the intstallation,
but real lessons and exercises should be added by teachers afterwards.
- INSTALLATION
MooTyper is an activity module. You have to extract it to the 'mod' directory.
If the directory name is something like "moodle_mod_mootyper" you have to change
that to just "mootyper". So for example, the path should be like this:
Than go to Site Administration -> Notifications and click on the button to start
the install.
Right after an install or upgrade of the new MooTyper 3.6.1, you will then see
the settings page. You can now set the date display format for the grade views.
You can also set colors for grade views, the background of the new keyboard
layouts, and the color for keytops that are not home row keys. This allows you
to color coordinate MooTyper with your theme color scheme.
- USING MOOTYPER
Using MooTyper activity module is very simple. An instance can be added as a
new activity in a course like Lesson or Quiz. The simplest way to setup a
MooTyper, is select MooTyper from the list, Add an activity or resource.
Add the name you want to use for this activity. I recommend adding the
lesson name as part of the activity name. Add a description if you desire.
Then, add Availability times, if desired, then click, Save and display.
Yes, that's right! Don't bother with any other options as they will then be
available on the, Setup link.
Thanks to Mary Cooch from moodle.org we have this video, which shows how
to add exercises, create mootyper instance, and then view grades.
It's a little outdated (one of the first versions of mootyper), but I
guess everything still holds:
- ADDITIONAL KEYBOARD LAYOUTS
This MooTyper currently includes keyboard layouts to support many languages.
If you do not see one that need, please let the maintainer know.
Note: There are two special layouts, English(USV6) that includes both the normal
keys and the number keypad, and numberKeypadOnly(V1), which shows ONLY the
number keypad.
To implement any other layout you have to:
Create a php file with keyboard layout defined with HTML. Create a javascript
file (with the same name and .js extension) that implements the logic of the keyboard
layout. If you have any mistakes in your js file the module won't work, so in
this case try to validate your code with a tool like this...
http://www.javascriptlint.com/online_lint.php
- SAVING YOUR OWN OR MODIFIED LESSONS
In previous versions of MooTyper, if you created your own lessons there was
no built in way to export a copy for backup purposes or for safekeeping.
Once installed, there was no way to add additional lessons to MooTyper
unless you used the built in editing capability, which is not as convenient
as it would be to create lessons in a word processing program. If you wanted
to add lessons to MooTyper without using the built in editor, you had to do
a completely new installation of MooTyper which meant you would lose all
student progress and grades.
As of version 3.1.0, MooTyper now supports Import and Export of MooTyper Lessons
via links in the Administration block, which overcomes these limitations.
- NEW IN THIS RELEASE
There is now a new key top text color setting. This will allow you to now
have a layout with dark colored keys, with white text, or some other light
colored text.
There is now a new time limit setting that can be used for any Mode.
There is now a new required WPM rate setting that can be used for any Mode.
Information labels on the pages for view.php, gview.php, and owngrades.php
now include the new time limit, Required precision, and the new Required WPM.
You can now set a typing time limit from 0:00 (not used) to 10:00 minutes.
However, you will need to make sure each exercise is long enough, character
count wise, so that your fastest typer will NOT run out of something to type.
You can now set a required Word Per Minute rate. Failure to achieve the
posted rate, is treated just the same as failing to achieve the required
precision.
You can mix and match the time limit, precision, and wpm.
A zero timelimit lets the student type all the way to the end of the exercise,
just as it always has. If a time limit is set, the exercise is halted when
time expires.
A zero required precision means the grade will NOT be shown with a red
background no matter the precision achieved for the exercise. Any other
required precision is treated as before.
A zero required WPM rate means the grade will NOT be shown with a red
background no matter the WPM rate achieved for the exercise. Any other
required precision like the required precision rate. Red grade background
for not exceeding the required WPM. Green if it is exceeded.
If using both a required precision and required WPM, they must both be
exceeded to get a green "passed" background. If one is exceeded and one
is not, the grade background will be red.
- OTHER IMPORTANT CAPABILITIES
There are four settings that affect the typing modes.
1.The original mode - This mode requires you to type the correct letter before
you can move to the next letter. Extra spaces are ignored. Mistyped letters
are counted as mistakes.
2. Count mistyped spaces - Same as the original mode, but counts mistyped spaces
as well as mistyped letters.
3. Continuous typing - In this mode you do not have to type the correct letter
before moving to the next letter. All mistyped letters and space are counted
as mistakes.
4. Count all keystrokes - If you mistype the same key multiple times, you have the
option of counting it as one mistake, or counting all of them.
If a user clicks, View my grades, depending on the Moodle version, they will now
see a horizontal bar chart beneath their grade table that charts Hits per minute,
Precision, and WPM results. If a non-editing teacher, teacher, manager, or admin,
clicks on, 'View all grades, depending on the Moodle version, they will see the
normal grade table as well as horizontal bar charts showing Hits per minute,
Precision, and WPM for each exercise for each student.
For more info please visit the plugins wiki on github:
https://github.com/drachels/moodle-mod_mootyper/wiki
4.2.5 (Build: 2023120600) (2023120600)
4.2.5 (Build: 2023120600)
Plugin type: Activities
Frankenstyle component name: mod_mootyper
Version build number: 2023120600
Version release name: 4.2.5 (Build: 2023120600)
Maturity: Stable
Supported Moodle versions: 3.11, 4.0, 4.1, 4.2, 4.3
Repository URL (Git): https://github.com/drachels/moodle-mod_mootyper
Repository branch:
Repository tag: v4.2.5
Issue/bug tracker URL: https://github.com/drachels/moodle-mod_mootyper/issues
Moodle Mootyper module
- Moodle tracker component: https://github.com/drachels/moodle-mod_mootyper/issues
- Documentation: https://github.com/drachels/moodle-mod_mootyper/wiki
- Source Code: https://github.com/drachels/moodle-mod_mootyper
- License: http://www.gnu.org/licenses/gpl.txt
Install from git
- Navigate to Moodle root folder
- git clone git://github.com/drachels/moodle-mod_mootyper.git mod/mootyper
- cd mootyper
- git checkout MOODLE_XY_STABLE (where XY is the moodle version, e.g: MOODLE_30_STABLE, MOODLE_28_STABLE...)
- Click the 'Notifications' link on the frontpage administration block or php admin/cli/upgrade.php if you have access to a command line interpreter.
Install from a compressed file
- Extract the compressed file data
- Rename the main folder to mootyper
- Copy to the Moodle mod/ folder
- Click the 'Notifications' link on the frontpage administration block or php admin/cli/upgrade.php if you have access to a command line interpreter.
This is the README file for the MooTyper project. MooTyper is
a moodle extension, that adds the 'typing instructor' functionallity to Moodle.
The plugin url is: https://moodle.org/plugins/view.php?plugin=mod_mootyper
MooTyper is free software, the same as Moodle.
- REQUIREMENTS
The MooTyper module uses javascript which is not welcome in Moodle but it is a
requirement for the use of the module. The typing procedure cannot be done without
the client side logic.
It creates some new tables in a moodle database and inserts some sample
typing exercises. This is all done automaticaly through the intstallation,
but real lessons and exercises should be added by teachers afterwards.
- INSTALLATION
MooTyper is an activity module. You have to extract it to the 'mod' directory.
If the directory name is something like "moodle_mod_mootyper" you have to change
that to just "mootyper". So for example, the path should be like this:
Than go to Site Administration -> Notifications and click on the button to start
the install.
Right after an install or upgrade of the new MooTyper 3.6.1, you will then see
the settings page. You can now set the date display format for the grade views.
You can also set colors for grade views, the background of the new keyboard
layouts, and the color for keytops that are not home row keys. This allows you
to color coordinate MooTyper with your theme color scheme.
- USING MOOTYPER
Using MooTyper activity module is very simple. An instance can be added as a
new activity in a course like Lesson or Quiz. The simplest way to setup a
MooTyper, is select MooTyper from the list, Add an activity or resource.
Add the name you want to use for this activity. I recommend adding the
lesson name as part of the activity name. Add a description if you desire.
Then, add Availability times, if desired, then click, Save and display.
Yes, that's right! Don't bother with any other options as they will then be
available on the, Setup link.
Thanks to Mary Cooch from moodle.org we have this video, which shows how
to add exercises, create mootyper instance, and then view grades.
It's a little outdated (one of the first versions of mootyper), but I
guess everything still holds:
- ADDITIONAL KEYBOARD LAYOUTS
This MooTyper currently includes keyboard layouts to support many languages.
If you do not see one that need, please let the maintainer know.
Note: There are two special layouts, English(USV6) that includes both the normal
keys and the number keypad, and numberKeypadOnly(V1), which shows ONLY the
number keypad.
To implement any other layout you have to:
Create a php file with keyboard layout defined with HTML. Create a javascript
file (with the same name and .js extension) that implements the logic of the keyboard
layout. If you have any mistakes in your js file the module won't work, so in
this case try to validate your code with a tool like this...
http://www.javascriptlint.com/online_lint.php
- SAVING YOUR OWN OR MODIFIED LESSONS
In previous versions of MooTyper, if you created your own lessons there was
no built in way to export a copy for backup purposes or for safekeeping.
Once installed, there was no way to add additional lessons to MooTyper
unless you used the built in editing capability, which is not as convenient
as it would be to create lessons in a word processing program. If you wanted
to add lessons to MooTyper without using the built in editor, you had to do
a completely new installation of MooTyper which meant you would lose all
student progress and grades.
As of version 3.1.0, MooTyper now supports Import and Export of MooTyper Lessons
via links in the Administration block, which overcomes these limitations.
- NEW IN THIS RELEASE
There is now a new key top text color setting. This will allow you to now
have a layout with dark colored keys, with white text, or some other light
colored text.
There is now a new time limit setting that can be used for any Mode.
There is now a new required WPM rate setting that can be used for any Mode.
Information labels on the pages for view.php, gview.php, and owngrades.php
now include the new time limit, Required precision, and the new Required WPM.
You can now set a typing time limit from 0:00 (not used) to 10:00 minutes.
However, you will need to make sure each exercise is long enough, character
count wise, so that your fastest typer will NOT run out of something to type.
You can now set a required Word Per Minute rate. Failure to achieve the
posted rate, is treated just the same as failing to achieve the required
precision.
You can mix and match the time limit, precision, and wpm.
A zero timelimit lets the student type all the way to the end of the exercise,
just as it always has. If a time limit is set, the exercise is halted when
time expires.
A zero required precision means the grade will NOT be shown with a red
background no matter the precision achieved for the exercise. Any other
required precision is treated as before.
A zero required WPM rate means the grade will NOT be shown with a red
background no matter the WPM rate achieved for the exercise. Any other
required precision like the required precision rate. Red grade background
for not exceeding the required WPM. Green if it is exceeded.
If using both a required precision and required WPM, they must both be
exceeded to get a green "passed" background. If one is exceeded and one
is not, the grade background will be red.
- OTHER IMPORTANT CAPABILITIES
There are four settings that affect the typing modes.
1.The original mode - This mode requires you to type the correct letter before
you can move to the next letter. Extra spaces are ignored. Mistyped letters
are counted as mistakes.
2. Count mistyped spaces - Same as the original mode, but counts mistyped spaces
as well as mistyped letters.
3. Continuous typing - In this mode you do not have to type the correct letter
before moving to the next letter. All mistyped letters and space are counted
as mistakes.
4. Count all keystrokes - If you mistype the same key multiple times, you have the
option of counting it as one mistake, or counting all of them.
If a user clicks, View my grades, depending on the Moodle version, they will now
see a horizontal bar chart beneath their grade table that charts Hits per minute,
Precision, and WPM results. If a non-editing teacher, teacher, manager, or admin,
clicks on, 'View all grades, depending on the Moodle version, they will see the
normal grade table as well as horizontal bar charts showing Hits per minute,
Precision, and WPM for each exercise for each student.
For more info please visit the plugins wiki on github:
https://github.com/drachels/moodle-mod_mootyper/wiki
4.2.4 (Build: 2023110200) (2023110200)
4.2.4 (Build: 2023110200)
Plugin type: Activities
Frankenstyle component name: mod_mootyper
Version build number: 2023110200
Version release name: 4.2.4 (Build: 2023110200)
Maturity: Stable
Supported Moodle versions: 3.11, 4.0, 4.1, 4.2, 4.3
Repository URL (Git): https://github.com/drachels/moodle-mod_mootyper
Repository branch:
Repository tag: v4.2.4
Issue/bug tracker URL: https://github.com/drachels/moodle-mod_mootyper/issues
Moodle Mootyper module
- Moodle tracker component: https://github.com/drachels/moodle-mod_mootyper/issues
- Documentation: https://github.com/drachels/moodle-mod_mootyper/wiki
- Source Code: https://github.com/drachels/moodle-mod_mootyper
- License: http://www.gnu.org/licenses/gpl.txt
Install from git
- Navigate to Moodle root folder
- git clone git://github.com/drachels/moodle-mod_mootyper.git mod/mootyper
- cd mootyper
- git checkout MOODLE_XY_STABLE (where XY is the moodle version, e.g: MOODLE_30_STABLE, MOODLE_28_STABLE...)
- Click the 'Notifications' link on the frontpage administration block or php admin/cli/upgrade.php if you have access to a command line interpreter.
Install from a compressed file
- Extract the compressed file data
- Rename the main folder to mootyper
- Copy to the Moodle mod/ folder
- Click the 'Notifications' link on the frontpage administration block or php admin/cli/upgrade.php if you have access to a command line interpreter.
This is the README file for the MooTyper project. MooTyper is
a moodle extension, that adds the 'typing instructor' functionallity to Moodle.
The plugin url is: https://moodle.org/plugins/view.php?plugin=mod_mootyper
MooTyper is free software, the same as Moodle.
- REQUIREMENTS
The MooTyper module uses javascript which is not welcome in Moodle but it is a
requirement for the use of the module. The typing procedure cannot be done without
the client side logic.
It creates some new tables in a moodle database and inserts some sample
typing exercises. This is all done automaticaly through the intstallation,
but real lessons and exercises should be added by teachers afterwards.
- INSTALLATION
MooTyper is an activity module. You have to extract it to the 'mod' directory.
If the directory name is something like "moodle_mod_mootyper" you have to change
that to just "mootyper". So for example, the path should be like this:
Than go to Site Administration -> Notifications and click on the button to start
the install.
Right after an install or upgrade of the new MooTyper 3.6.1, you will then see
the settings page. You can now set the date display format for the grade views.
You can also set colors for grade views, the background of the new keyboard
layouts, and the color for keytops that are not home row keys. This allows you
to color coordinate MooTyper with your theme color scheme.
- USING MOOTYPER
Using MooTyper activity module is very simple. An instance can be added as a
new activity in a course like Lesson or Quiz. The simplest way to setup a
MooTyper, is select MooTyper from the list, Add an activity or resource.
Add the name you want to use for this activity. I recommend adding the
lesson name as part of the activity name. Add a description if you desire.
Then, add Availability times, if desired, then click, Save and display.
Yes, that's right! Don't bother with any other options as they will then be
available on the, Setup link.
Thanks to Mary Cooch from moodle.org we have this video, which shows how
to add exercises, create mootyper instance, and then view grades.
It's a little outdated (one of the first versions of mootyper), but I
guess everything still holds:
- ADDITIONAL KEYBOARD LAYOUTS
This MooTyper currently includes keyboard layouts to support many languages.
If you do not see one that need, please let the maintainer know.
Note: There are two special layouts, English(USV6) that includes both the normal
keys and the number keypad, and numberKeypadOnly(V1), which shows ONLY the
number keypad.
To implement any other layout you have to:
Create a php file with keyboard layout defined with HTML. Create a javascript
file (with the same name and .js extension) that implements the logic of the keyboard
layout. If you have any mistakes in your js file the module won't work, so in
this case try to validate your code with a tool like this...
http://www.javascriptlint.com/online_lint.php
- SAVING YOUR OWN OR MODIFIED LESSONS
In previous versions of MooTyper, if you created your own lessons there was
no built in way to export a copy for backup purposes or for safekeeping.
Once installed, there was no way to add additional lessons to MooTyper
unless you used the built in editing capability, which is not as convenient
as it would be to create lessons in a word processing program. If you wanted
to add lessons to MooTyper without using the built in editor, you had to do
a completely new installation of MooTyper which meant you would lose all
student progress and grades.
As of version 3.1.0, MooTyper now supports Import and Export of MooTyper Lessons
via links in the Administration block, which overcomes these limitations.
- NEW IN THIS RELEASE
There is now a new key top text color setting. This will allow you to now
have a layout with dark colored keys, with white text, or some other light
colored text.
There is now a new time limit setting that can be used for any Mode.
There is now a new required WPM rate setting that can be used for any Mode.
Information labels on the pages for view.php, gview.php, and owngrades.php
now include the new time limit, Required precision, and the new Required WPM.
You can now set a typing time limit from 0:00 (not used) to 10:00 minutes.
However, you will need to make sure each exercise is long enough, character
count wise, so that your fastest typer will NOT run out of something to type.
You can now set a required Word Per Minute rate. Failure to achieve the
posted rate, is treated just the same as failing to achieve the required
precision.
You can mix and match the time limit, precision, and wpm.
A zero timelimit lets the student type all the way to the end of the exercise,
just as it always has. If a time limit is set, the exercise is halted when
time expires.
A zero required precision means the grade will NOT be shown with a red
background no matter the precision achieved for the exercise. Any other
required precision is treated as before.
A zero required WPM rate means the grade will NOT be shown with a red
background no matter the WPM rate achieved for the exercise. Any other
required precision like the required precision rate. Red grade background
for not exceeding the required WPM. Green if it is exceeded.
If using both a required precision and required WPM, they must both be
exceeded to get a green "passed" background. If one is exceeded and one
is not, the grade background will be red.
- OTHER IMPORTANT CAPABILITIES
There are four settings that affect the typing modes.
1.The original mode - This mode requires you to type the correct letter before
you can move to the next letter. Extra spaces are ignored. Mistyped letters
are counted as mistakes.
2. Count mistyped spaces - Same as the original mode, but counts mistyped spaces
as well as mistyped letters.
3. Continuous typing - In this mode you do not have to type the correct letter
before moving to the next letter. All mistyped letters and space are counted
as mistakes.
4. Count all keystrokes - If you mistype the same key multiple times, you have the
option of counting it as one mistake, or counting all of them.
If a user clicks, View my grades, depending on the Moodle version, they will now
see a horizontal bar chart beneath their grade table that charts Hits per minute,
Precision, and WPM results. If a non-editing teacher, teacher, manager, or admin,
clicks on, 'View all grades, depending on the Moodle version, they will see the
normal grade table as well as horizontal bar charts showing Hits per minute,
Precision, and WPM for each exercise for each student.
For more info please visit the plugins wiki on github:
https://github.com/drachels/moodle-mod_mootyper/wiki
4.2.3+ (Build: 2023041001) (2023041001)
4.2.3+ (Build: 2023041001)
Plugin type: Activities
Frankenstyle component name: mod_mootyper
Version build number: 2023041001
Version release name: 4.2.3+ (Build: 2023041001)
Maturity: Stable
Supported Moodle versions: 3.11, 4.0, 4.1, 4.2, 4.3
Repository URL (Git): https://github.com/drachels/moodle-mod_mootyper
Repository branch:
Repository tag: v4.2.3.01+
Issue/bug tracker URL: https://github.com/drachels/moodle-mod_mootyper/issues
Moodle Mootyper module
- Moodle tracker component: https://github.com/drachels/moodle-mod_mootyper/issues
- Documentation: https://github.com/drachels/moodle-mod_mootyper/wiki
- Source Code: https://github.com/drachels/moodle-mod_mootyper
- License: http://www.gnu.org/licenses/gpl.txt
Install from git
- Navigate to Moodle root folder
- git clone git://github.com/drachels/moodle-mod_mootyper.git mod/mootyper
- cd mootyper
- git checkout MOODLE_XY_STABLE (where XY is the moodle version, e.g: MOODLE_30_STABLE, MOODLE_28_STABLE...)
- Click the 'Notifications' link on the frontpage administration block or php admin/cli/upgrade.php if you have access to a command line interpreter.
Install from a compressed file
- Extract the compressed file data
- Rename the main folder to mootyper
- Copy to the Moodle mod/ folder
- Click the 'Notifications' link on the frontpage administration block or php admin/cli/upgrade.php if you have access to a command line interpreter.
This is the README file for the MooTyper project. MooTyper is
a moodle extension, that adds the 'typing instructor' functionallity to Moodle.
The plugin url is: https://moodle.org/plugins/view.php?plugin=mod_mootyper
MooTyper is free software, the same as Moodle.
- REQUIREMENTS
The MooTyper module uses javascript which is not welcome in Moodle but it is a
requirement for the use of the module. The typing procedure cannot be done without
the client side logic.
It creates some new tables in a moodle database and inserts some sample
typing exercises. This is all done automaticaly through the intstallation,
but real lessons and exercises should be added by teachers afterwards.
- INSTALLATION
MooTyper is an activity module. You have to extract it to the 'mod' directory.
If the directory name is something like "moodle_mod_mootyper" you have to change
that to just "mootyper". So for example, the path should be like this:
/mod/mootyper/view.php
Than go to Site Administration -> Notifications and click on the button to start
the install.
Right after an install or upgrade of the new MooTyper 3.6.1, you will then see
the settings page. You can now set the date display format for the grade views.
You can also set colors for grade views, the background of the new keyboard
layouts, and the color for keytops that are not home row keys. This allows you
to color coordinate MooTyper with your theme color scheme.
- USING MOOTYPER
Using MooTyper activity module is very simple. An instance can be added as a
new activity in a course like Lesson or Quiz. The simplest way to setup a
MooTyper, is select MooTyper from the list, Add an activity or resource.
Add the name you want to use for this activity. I recommend adding the
lesson name as part of the activity name. Add a description if you desire.
Then, add Availability times, if desired, then click, Save and display.
Yes, that's right! Don't bother with any other options as they will then be
available on the, Setup link.
Thanks to Mary Cooch from moodle.org we have this video, which shows how
to add exercises, create mootyper instance, and then view grades.
It's a little outdated (one of the first versions of mootyper), but I
guess everything still holds:
- ADDITIONAL KEYBOARD LAYOUTS
This MooTyper currently includes keyboard layouts to support many languages.
If you do not see one that need, please let the maintainer know.
Note: There are two special layouts, English(USV6) that includes both the normal
keys and the number keypad, and numberKeypadOnly(V1), which shows ONLY the
number keypad.
To implement any other layout you have to:
Create a php file with keyboard layout defined with HTML. Create a javascript
file (with the same name and .js extension) that implements the logic of the keyboard
layout. If you have any mistakes in your js file the module won't work, so in
this case try to validate your code with a tool like this...
http://www.javascriptlint.com/online_lint.php
- SAVING YOUR OWN OR MODIFIED LESSONS
In previous versions of MooTyper, if you created your own lessons there was
no built in way to export a copy for backup purposes or for safekeeping.
Once installed, there was no way to add additional lessons to MooTyper
unless you used the built in editing capability, which is not as convenient
as it would be to create lessons in a word processing program. If you wanted
to add lessons to MooTyper without using the built in editor, you had to do
a completely new installation of MooTyper which meant you would lose all
student progress and grades.
As of version 3.1.0, MooTyper now supports Import and Export of MooTyper Lessons
via links in the Administration block, which overcomes these limitations.
- NEW IN THIS RELEASE
There is now a new key top text color setting. This will allow you to now
have a layout with dark colored keys, with white text, or some other light
colored text.
There is now a new time limit setting that can be used for any Mode.
There is now a new required WPM rate setting that can be used for any Mode.
Information labels on the pages for view.php, gview.php, and owngrades.php
now include the new time limit, Required precision, and the new Required WPM.
You can now set a typing time limit from 0:00 (not used) to 10:00 minutes.
However, you will need to make sure each exercise is long enough, character
count wise, so that your fastest typer will NOT run out of something to type.
You can now set a required Word Per Minute rate. Failure to achieve the
posted rate, is treated just the same as failing to achieve the required
precision.
You can mix and match the time limit, precision, and wpm.
A zero timelimit lets the student type all the way to the end of the exercise,
just as it always has. If a time limit is set, the exercise is halted when
time expires.
A zero required precision means the grade will NOT be shown with a red
background no matter the precision achieved for the exercise. Any other
required precision is treated as before.
A zero required WPM rate means the grade will NOT be shown with a red
background no matter the WPM rate achieved for the exercise. Any other
required precision like the required precision rate. Red grade background
for not exceeding the required WPM. Green if it is exceeded.
If using both a required precision and required WPM, they must both be
exceeded to get a green "passed" background. If one is exceeded and one
is not, the grade background will be red.
- OTHER IMPORTANT CAPABILITIES
There are four settings that affect the typing modes.
1.The original mode - This mode requires you to type the correct letter before
you can move to the next letter. Extra spaces are ignored. Mistyped letters
are counted as mistakes.
2. Count mistyped spaces - Same as the original mode, but counts mistyped spaces
as well as mistyped letters.
3. Continuous typing - In this mode you do not have to type the correct letter
before moving to the next letter. All mistyped letters and space are counted
as mistakes.
4. Count all keystrokes - If you mistype the same key multiple times, you have the
option of counting it as one mistake, or counting all of them.
If a user clicks, View my grades, depending on the Moodle version, they will now
see a horizontal bar chart beneath their grade table that charts Hits per minute,
Precision, and WPM results. If a non-editing teacher, teacher, manager, or admin,
clicks on, 'View all grades, depending on the Moodle version, they will see the
normal grade table as well as horizontal bar charts showing Hits per minute,
Precision, and WPM for each exercise for each student.
For more info please visit the plugins wiki on github:
https://github.com/drachels/moodle-mod_mootyper/wiki
4.2.3 (Build: 2023041000) (2023041000)
4.2.3 (Build: 2023041000)
Plugin type: Activities
Frankenstyle component name: mod_mootyper
Version build number: 2023041000
Version release name: 4.2.3 (Build: 2023041000)
Maturity: Stable
Supported Moodle versions: 3.11, 4.0, 4.1, 4.2
Repository URL (Git): https://github.com/drachels/moodle-mod_mootyper
Repository branch:
Repository tag: v4.2.3
Issue/bug tracker URL: https://github.com/drachels/moodle-mod_mootyper/issues
Moodle Mootyper module
- Moodle tracker component: https://github.com/drachels/moodle-mod_mootyper/issues
- Documentation: https://github.com/drachels/moodle-mod_mootyper/wiki
- Source Code: https://github.com/drachels/moodle-mod_mootyper
- License: http://www.gnu.org/licenses/gpl.txt
Install from git
- Navigate to Moodle root folder
- git clone git://github.com/drachels/moodle-mod_mootyper.git mod/mootyper
- cd mootyper
- git checkout MOODLE_XY_STABLE (where XY is the moodle version, e.g: MOODLE_30_STABLE, MOODLE_28_STABLE...)
- Click the 'Notifications' link on the frontpage administration block or php admin/cli/upgrade.php if you have access to a command line interpreter.
Install from a compressed file
- Extract the compressed file data
- Rename the main folder to mootyper
- Copy to the Moodle mod/ folder
- Click the 'Notifications' link on the frontpage administration block or php admin/cli/upgrade.php if you have access to a command line interpreter.
This is the README file for the MooTyper project. MooTyper is
a moodle extension, that adds the 'typing instructor' functionallity to Moodle.
The plugin url is: https://moodle.org/plugins/view.php?plugin=mod_mootyper
MooTyper is free software, the same as Moodle.
- REQUIREMENTS
The MooTyper module uses javascript which is not welcome in Moodle but it is a
requirement for the use of the module. The typing procedure cannot be done without
the client side logic.
It creates some new tables in a moodle database and inserts some sample
typing exercises. This is all done automaticaly through the intstallation,
but real lessons and exercises should be added by teachers afterwards.
- INSTALLATION
MooTyper is an activity module. You have to extract it to the 'mod' directory.
If the directory name is something like "moodle_mod_mootyper" you have to change
that to just "mootyper". So for example, the path should be like this:
Than go to Site Administration -> Notifications and click on the button to start
the install.
Right after an install or upgrade of the new MooTyper 3.6.1, you will then see
the settings page. You can now set the date display format for the grade views.
You can also set colors for grade views, the background of the new keyboard
layouts, and the color for keytops that are not home row keys. This allows you
to color coordinate MooTyper with your theme color scheme.
- USING MOOTYPER
Using MooTyper activity module is very simple. An instance can be added as a
new activity in a course like Lesson or Quiz. The simplest way to setup a
MooTyper, is select MooTyper from the list, Add an activity or resource.
Add the name you want to use for this activity. I recommend adding the
lesson name as part of the activity name. Add a description if you desire.
Then, add Availability times, if desired, then click, Save and display.
Yes, that's right! Don't bother with any other options as they will then be
available on the, Setup link.
Thanks to Mary Cooch from moodle.org we have this video, which shows how
to add exercises, create mootyper instance, and then view grades.
It's a little outdated (one of the first versions of mootyper), but I
guess everything still holds:
- ADDITIONAL KEYBOARD LAYOUTS
This MooTyper currently includes keyboard layouts to support many languages.
If you do not see one that need, please let the maintainer know.
Note: There are two special layouts, English(USV6) that includes both the normal
keys and the number keypad, and numberKeypadOnly(V1), which shows ONLY the
number keypad.
To implement any other layout you have to:
Create a php file with keyboard layout defined with HTML. Create a javascript
file (with the same name and .js extension) that implements the logic of the keyboard
layout. If you have any mistakes in your js file the module won't work, so in
this case try to validate your code with a tool like this...
http://www.javascriptlint.com/online_lint.php
- SAVING YOUR OWN OR MODIFIED LESSONS
In previous versions of MooTyper, if you created your own lessons there was
no built in way to export a copy for backup purposes or for safekeeping.
Once installed, there was no way to add additional lessons to MooTyper
unless you used the built in editing capability, which is not as convenient
as it would be to create lessons in a word processing program. If you wanted
to add lessons to MooTyper without using the built in editor, you had to do
a completely new installation of MooTyper which meant you would lose all
student progress and grades.
As of version 3.1.0, MooTyper now supports Import and Export of MooTyper Lessons
via links in the Administration block, which overcomes these limitations.
- NEW IN THIS RELEASE
There is now a new key top text color setting. This will allow you to now
have a layout with dark colored keys, with white text, or some other light
colored text.
There is now a new time limit setting that can be used for any Mode.
There is now a new required WPM rate setting that can be used for any Mode.
Information labels on the pages for view.php, gview.php, and owngrades.php
now include the new time limit, Required precision, and the new Required WPM.
You can now set a typing time limit from 0:00 (not used) to 10:00 minutes.
However, you will need to make sure each exercise is long enough, character
count wise, so that your fastest typer will NOT run out of something to type.
You can now set a required Word Per Minute rate. Failure to achieve the
posted rate, is treated just the same as failing to achieve the required
precision.
You can mix and match the time limit, precision, and wpm.
A zero timelimit lets the student type all the way to the end of the exercise,
just as it always has. If a time limit is set, the exercise is halted when
time expires.
A zero required precision means the grade will NOT be shown with a red
background no matter the precision achieved for the exercise. Any other
required precision is treated as before.
A zero required WPM rate means the grade will NOT be shown with a red
background no matter the WPM rate achieved for the exercise. Any other
required precision like the required precision rate. Red grade background
for not exceeding the required WPM. Green if it is exceeded.
If using both a required precision and required WPM, they must both be
exceeded to get a green "passed" background. If one is exceeded and one
is not, the grade background will be red.
- OTHER IMPORTANT CAPABILITIES
There are four settings that affect the typing modes.
1.The original mode - This mode requires you to type the correct letter before
you can move to the next letter. Extra spaces are ignored. Mistyped letters
are counted as mistakes.
2. Count mistyped spaces - Same as the original mode, but counts mistyped spaces
as well as mistyped letters.
3. Continuous typing - In this mode you do not have to type the correct letter
before moving to the next letter. All mistyped letters and space are counted
as mistakes.
4. Count all keystrokes - If you mistype the same key multiple times, you have the
option of counting it as one mistake, or counting all of them.
If a user clicks, View my grades, depending on the Moodle version, they will now
see a horizontal bar chart beneath their grade table that charts Hits per minute,
Precision, and WPM results. If a non-editing teacher, teacher, manager, or admin,
clicks on, 'View all grades, depending on the Moodle version, they will see the
normal grade table as well as horizontal bar charts showing Hits per minute,
Precision, and WPM for each exercise for each student.
For more info please visit the plugins wiki on github:
https://github.com/drachels/moodle-mod_mootyper/wiki
4.2.2 (Build: 2023011800) (2023011800)
4.2.2 (Build: 2023011800)
Plugin type: Activities
Frankenstyle component name: mod_mootyper
Version build number: 2023011800
Version release name: 4.2.2 (Build: 2023011800)
Maturity: Stable
Supported Moodle versions: 3.11, 4.0, 4.1
Repository URL (Git): https://github.com/drachels/moodle-mod_mootyper
Repository branch:
Repository tag: v4.2.2
Issue/bug tracker URL: https://github.com/drachels/moodle-mod_mootyper/issues
Moodle Mootyper module
- Moodle tracker component: https://github.com/drachels/moodle-mod_mootyper/issues
- Documentation: https://github.com/drachels/moodle-mod_mootyper/wiki
- Source Code: https://github.com/drachels/moodle-mod_mootyper
- License: http://www.gnu.org/licenses/gpl.txt
Install from git
- Navigate to Moodle root folder
- git clone git://github.com/drachels/moodle-mod_mootyper.git mod/mootyper
- cd mootyper
- git checkout MOODLE_XY_STABLE (where XY is the moodle version, e.g: MOODLE_30_STABLE, MOODLE_28_STABLE...)
- Click the 'Notifications' link on the frontpage administration block or php admin/cli/upgrade.php if you have access to a command line interpreter.
Install from a compressed file
- Extract the compressed file data
- Rename the main folder to mootyper
- Copy to the Moodle mod/ folder
- Click the 'Notifications' link on the frontpage administration block or php admin/cli/upgrade.php if you have access to a command line interpreter.
This is the README file for the MooTyper project. MooTyper is
a moodle extension, that adds the 'typing instructor' functionallity to Moodle.
The plugin url is: https://moodle.org/plugins/view.php?plugin=mod_mootyper
MooTyper is free software, the same as Moodle.
- REQUIREMENTS
The MooTyper module uses javascript which is not welcome in Moodle but it is a
requirement for the use of the module. The typing procedure cannot be done without
the client side logic.
It creates some new tables in a moodle database and inserts some sample
typing exercises. This is all done automaticaly through the intstallation,
but real lessons and exercises should be added by teachers afterwards.
- INSTALLATION
MooTyper is an activity module. You have to extract it to the 'mod' directory.
If the directory name is something like "moodle_mod_mootyper" you have to change
that to just "mootyper". So for example, the path should be like this:
Than go to Site Administration -> Notifications and click on the button to start
the install.
Right after an install or upgrade of the new MooTyper 3.6.1, you will then see
the settings page. You can now set the date display format for the grade views.
You can also set colors for grade views, the background of the new keyboard
layouts, and the color for keytops that are not home row keys. This allows you
to color coordinate MooTyper with your theme color scheme.
- USING MOOTYPER
Using MooTyper activity module is very simple. An instance can be added as a
new activity in a course like Lesson or Quiz. The simplest way to setup a
MooTyper, is select MooTyper from the list, Add an activity or resource.
Add the name you want to use for this activity. I recommend adding the
lesson name as part of the activity name. Add a description if you desire.
Then, add Availability times, if desired, then click, Save and display.
Yes, that's right! Don't bother with any other options as they will then be
available on the, Setup link.
Thanks to Mary Cooch from moodle.org we have this video, which shows how
to add exercises, create mootyper instance, and then view grades.
It's a little outdated (one of the first versions of mootyper), but I
guess everything still holds:
- ADDITIONAL KEYBOARD LAYOUTS
This MooTyper currently includes keyboard layouts to support many languages.
If you do not see one that need, please let the maintainer know.
Note: There are two special layouts, English(USV6) that includes both the normal
keys and the number keypad, and numberKeypadOnly(V1), which shows ONLY the
number keypad.
To implement any other layout you have to:
Create a php file with keyboard layout defined with HTML. Create a javascript
file (with the same name and .js extension) that implements the logic of the keyboard
layout. If you have any mistakes in your js file the module won't work, so in
this case try to validate your code with a tool like this...
http://www.javascriptlint.com/online_lint.php
- SAVING YOUR OWN OR MODIFIED LESSONS
In previous versions of MooTyper, if you created your own lessons there was
no built in way to export a copy for backup purposes or for safekeeping.
Once installed, there was no way to add additional lessons to MooTyper
unless you used the built in editing capability, which is not as convenient
as it would be to create lessons in a word processing program. If you wanted
to add lessons to MooTyper without using the built in editor, you had to do
a completely new installation of MooTyper which meant you would lose all
student progress and grades.
As of version 3.1.0, MooTyper now supports Import and Export of MooTyper Lessons
via links in the Administration block, which overcomes these limitations.
- NEW IN THIS RELEASE
There is now a new key top text color setting. This will allow you to now
have a layout with dark colored keys, with white text, or some other light
colored text.
There is now a new time limit setting that can be used for any Mode.
There is now a new required WPM rate setting that can be used for any Mode.
Information labels on the pages for view.php, gview.php, and owngrades.php
now include the new time limit, Required precision, and the new Required WPM.
You can now set a typing time limit from 0:00 (not used) to 10:00 minutes.
However, you will need to make sure each exercise is long enough, character
count wise, so that your fastest typer will NOT run out of something to type.
You can now set a required Word Per Minute rate. Failure to achieve the
posted rate, is treated just the same as failing to achieve the required
precision.
You can mix and match the time limit, precision, and wpm.
A zero timelimit lets the student type all the way to the end of the exercise,
just as it always has. If a time limit is set, the exercise is halted when
time expires.
A zero required precision means the grade will NOT be shown with a red
background no matter the precision achieved for the exercise. Any other
required precision is treated as before.
A zero required WPM rate means the grade will NOT be shown with a red
background no matter the WPM rate achieved for the exercise. Any other
required precision like the required precision rate. Red grade background
for not exceeding the required WPM. Green if it is exceeded.
If using both a required precision and required WPM, they must both be
exceeded to get a green "passed" background. If one is exceeded and one
is not, the grade background will be red.
- OTHER IMPORTANT CAPABILITIES
There are four settings that affect the typing modes.
1.The original mode - This mode requires you to type the correct letter before
you can move to the next letter. Extra spaces are ignored. Mistyped letters
are counted as mistakes.
2. Count mistyped spaces - Same as the original mode, but counts mistyped spaces
as well as mistyped letters.
3. Continuous typing - In this mode you do not have to type the correct letter
before moving to the next letter. All mistyped letters and space are counted
as mistakes.
4. Count all keystrokes - If you mistype the same key multiple times, you have the
option of counting it as one mistake, or counting all of them.
If a user clicks, View my grades, depending on the Moodle version, they will now
see a horizontal bar chart beneath their grade table that charts Hits per minute,
Precision, and WPM results. If a non-editing teacher, teacher, manager, or admin,
clicks on, 'View all grades, depending on the Moodle version, they will see the
normal grade table as well as horizontal bar charts showing Hits per minute,
Precision, and WPM for each exercise for each student.
For more info please visit the plugins wiki on github:
https://github.com/drachels/moodle-mod_mootyper/wiki
4.2.1 (Build: 2022120700) (2022120700)
4.2.1 (Build: 2022120700)
Plugin type: Activities
Frankenstyle component name: mod_mootyper
Version build number: 2022120700
Version release name: 4.2.1 (Build: 2022120700)
Maturity: Stable
Supported Moodle versions: 3.11, 4.0, 4.1
Repository URL (Git): https://github.com/drachels/moodle-mod_mootyper
Repository branch:
Repository tag: v4.2.1
Issue/bug tracker URL: https://github.com/drachels/moodle-mod_mootyper/issues
Moodle Mootyper module
- Moodle tracker component: https://github.com/drachels/moodle-mod_mootyper/issues
- Documentation: https://github.com/drachels/moodle-mod_mootyper/wiki
- Source Code: https://github.com/drachels/moodle-mod_mootyper
- License: http://www.gnu.org/licenses/gpl.txt
Install from git
- Navigate to Moodle root folder
- git clone git://github.com/drachels/moodle-mod_mootyper.git mod/mootyper
- cd mootyper
- git checkout MOODLE_XY_STABLE (where XY is the moodle version, e.g: MOODLE_30_STABLE, MOODLE_28_STABLE...)
- Click the 'Notifications' link on the frontpage administration block or php admin/cli/upgrade.php if you have access to a command line interpreter.
Install from a compressed file
- Extract the compressed file data
- Rename the main folder to mootyper
- Copy to the Moodle mod/ folder
- Click the 'Notifications' link on the frontpage administration block or php admin/cli/upgrade.php if you have access to a command line interpreter.
This is the README file for the MooTyper project. MooTyper is
a moodle extension, that adds the 'typing instructor' functionallity to Moodle.
The plugin url is: https://moodle.org/plugins/view.php?plugin=mod_mootyper
MooTyper is free software, the same as Moodle.
- REQUIREMENTS
The MooTyper module uses javascript which is not welcome in Moodle but it is a
requirement for the use of the module. The typing procedure cannot be done without
the client side logic.
It creates some new tables in a moodle database and inserts some sample
typing exercises. This is all done automaticaly through the intstallation,
but real lessons and exercises should be added by teachers afterwards.
- INSTALLATION
MooTyper is an activity module. You have to extract it to the 'mod' directory.
If the directory name is something like "moodle_mod_mootyper" you have to change
that to just "mootyper". So for example, the path should be like this:
Than go to Site Administration -> Notifications and click on the button to start
the install.
Right after an install or upgrade of the new MooTyper 3.6.1, you will then see
the settings page. You can now set the date display format for the grade views.
You can also set colors for grade views, the background of the new keyboard
layouts, and the color for keytops that are not home row keys. This allows you
to color coordinate MooTyper with your theme color scheme.
- USING MOOTYPER
Using MooTyper activity module is very simple. An instance can be added as a
new activity in a course like Lesson or Quiz. The simplest way to setup a
MooTyper, is select MooTyper from the list, Add an activity or resource.
Add the name you want to use for this activity. I recommend adding the
lesson name as part of the activity name. Add a description if you desire.
Then, add Availability times, if desired, then click, Save and display.
Yes, that's right! Don't bother with any other options as they will then be
available on the, Setup link.
Thanks to Mary Cooch from moodle.org we have this video, which shows how
to add exercises, create mootyper instance, and then view grades.
It's a little outdated (one of the first versions of mootyper), but I
guess everything still holds:
- ADDITIONAL KEYBOARD LAYOUTS
This MooTyper currently includes keyboard layouts to support many languages.
If you do not see one that need, please let the maintainer know.
Note: There are two special layouts, English(USV6) that includes both the normal
keys and the number keypad, and numberKeypadOnly(V1), which shows ONLY the
number keypad.
To implement any other layout you have to:
Create a php file with keyboard layout defined with HTML. Create a javascript
file (with the same name and .js extension) that implements the logic of the keyboard
layout. If you have any mistakes in your js file the module won't work, so in
this case try to validate your code with a tool like this...
http://www.javascriptlint.com/online_lint.php
- SAVING YOUR OWN OR MODIFIED LESSONS
In previous versions of MooTyper, if you created your own lessons there was
no built in way to export a copy for backup purposes or for safekeeping.
Once installed, there was no way to add additional lessons to MooTyper
unless you used the built in editing capability, which is not as convenient
as it would be to create lessons in a word processing program. If you wanted
to add lessons to MooTyper without using the built in editor, you had to do
a completely new installation of MooTyper which meant you would lose all
student progress and grades.
As of version 3.1.0, MooTyper now supports Import and Export of MooTyper Lessons
via links in the Administration block, which overcomes these limitations.
- NEW IN THIS RELEASE
There is now a new key top text color setting. This will allow you to now
have a layout with dark colored keys, with white text, or some other light
colored text.
There is now a new time limit setting that can be used for any Mode.
There is now a new required WPM rate setting that can be used for any Mode.
Information labels on the pages for view.php, gview.php, and owngrades.php
now include the new time limit, Required precision, and the new Required WPM.
You can now set a typing time limit from 0:00 (not used) to 10:00 minutes.
However, you will need to make sure each exercise is long enough, character
count wise, so that your fastest typer will NOT run out of something to type.
You can now set a required Word Per Minute rate. Failure to achieve the
posted rate, is treated just the same as failing to achieve the required
precision.
You can mix and match the time limit, precision, and wpm.
A zero timelimit lets the student type all the way to the end of the exercise,
just as it always has. If a time limit is set, the exercise is halted when
time expires.
A zero required precision means the grade will NOT be shown with a red
background no matter the precision achieved for the exercise. Any other
required precision is treated as before.
A zero required WPM rate means the grade will NOT be shown with a red
background no matter the WPM rate achieved for the exercise. Any other
required precision like the required precision rate. Red grade background
for not exceeding the required WPM. Green if it is exceeded.
If using both a required precision and required WPM, they must both be
exceeded to get a green "passed" background. If one is exceeded and one
is not, the grade background will be red.
- OTHER IMPORTANT CAPABILITIES
There are four settings that affect the typing modes.
1.The original mode - This mode requires you to type the correct letter before
you can move to the next letter. Extra spaces are ignored. Mistyped letters
are counted as mistakes.
2. Count mistyped spaces - Same as the original mode, but counts mistyped spaces
as well as mistyped letters.
3. Continuous typing - In this mode you do not have to type the correct letter
before moving to the next letter. All mistyped letters and space are counted
as mistakes.
4. Count all keystrokes - If you mistype the same key multiple times, you have the
option of counting it as one mistake, or counting all of them.
If a user clicks, View my grades, depending on the Moodle version, they will now
see a horizontal bar chart beneath their grade table that charts Hits per minute,
Precision, and WPM results. If a non-editing teacher, teacher, manager, or admin,
clicks on, 'View all grades, depending on the Moodle version, they will see the
normal grade table as well as horizontal bar charts showing Hits per minute,
Precision, and WPM for each exercise for each student.
For more info please visit the plugins wiki on github:
https://github.com/drachels/moodle-mod_mootyper/wiki
4.2.0 (Build: 2022040300) (2022040300)
4.2.0 (Build: 2022040300)
Plugin type: Activities
Frankenstyle component name: mod_mootyper
Version build number: 2022040300
Version release name: 4.2.0 (Build: 2022040300)
Maturity: Stable
Supported Moodle versions: 3.10, 3.11, 3.6, 3.7, 3.8, 3.9, 4.0
Repository URL (Git): https://github.com/drachels/moodle-mod_mootyper
Repository branch:
Repository tag: v4.1.2
Issue/bug tracker URL: https://github.com/drachels/moodle-mod_mootyper/issues
Moodle Mootyper module
- Moodle tracker component: https://github.com/drachels/moodle-mod_mootyper/issues
- Documentation: https://github.com/drachels/moodle-mod_mootyper/wiki
- Source Code: https://github.com/drachels/moodle-mod_mootyper
- License: http://www.gnu.org/licenses/gpl.txt
Install from git
- Navigate to Moodle root folder
- git clone git://github.com/drachels/moodle-mod_mootyper.git mod/mootyper
- cd mootyper
- git checkout MOODLE_XY_STABLE (where XY is the moodle version, e.g: MOODLE_30_STABLE, MOODLE_28_STABLE...)
- Click the 'Notifications' link on the frontpage administration block or php admin/cli/upgrade.php if you have access to a command line interpreter.
Install from a compressed file
- Extract the compressed file data
- Rename the main folder to mootyper
- Copy to the Moodle mod/ folder
- Click the 'Notifications' link on the frontpage administration block or php admin/cli/upgrade.php if you have access to a command line interpreter.
This is the README file for the MooTyper project. MooTyper is
a moodle extension, that adds the 'typing instructor' functionallity to Moodle.
The plugin url is: https://moodle.org/plugins/view.php?plugin=mod_mootyper
MooTyper is free software, the same as Moodle.
- REQUIREMENTS
The MooTyper module uses javascript which is not welcome in Moodle but it is a
requirement for the use of the module. The typing procedure cannot be done without
the client side logic.
It creates some new tables in a moodle database and inserts some sample
typing exercises. This is all done automaticaly through the intstallation,
but real lessons and exercises should be added by teachers afterwards.
- INSTALLATION
MooTyper is an activity module. You have to extract it to the 'mod' directory.
If the directory name is something like "moodle_mod_mootyper" you have to change
that to just "mootyper". So for example, the path should be like this:
Than go to Site Administration -> Notifications and click on the button to start
the install.
Right after an install or upgrade of the new MooTyper 3.6.1, you will then see
the settings page. You can now set the date display format for the grade views.
You can also set colors for grade views, the background of the new keyboard
layouts, and the color for keytops that are not home row keys. This allows you
to color coordinate MooTyper with your theme color scheme.
- USING MOOTYPER
Using MooTyper activity module is very simple. An instance can be added as a
new activity in a course like Lesson or Quiz. The simplest way to setup a
MooTyper, is select MooTyper from the list, Add an activity or resource.
Add the name you want to use for this activity. I recommend adding the
lesson name as part of the activity name. Add a description if you desire.
Then, add Availability times, if desired, then click, Save and display.
Yes, that's right! Don't bother with any other options as they will then be
available on the, Setup link.
Thanks to Mary Cooch from moodle.org we have this video, which shows how
to add exercises, create mootyper instance, and then view grades.
It's a little outdated (one of the first versions of mootyper), but I
guess everything still holds:
- ADDITIONAL KEYBOARD LAYOUTS
This MooTyper currently includes keyboard layouts to support many languages.
If you do not see one that need, please let the maintainer know.
Note: There are two special layouts, English(USV6) that includes both the normal
keys and the number keypad, and numberKeypadOnly(V1), which shows ONLY the
number keypad.
To implement any other layout you have to:
Create a php file with keyboard layout defined with HTML. Create a javascript
file (with the same name and .js extension) that implements the logic of the keyboard
layout. If you have any mistakes in your js file the module won't work, so in
this case try to validate your code with a tool like this...
http://www.javascriptlint.com/online_lint.php
- SAVING YOUR OWN OR MODIFIED LESSONS
In previous versions of MooTyper, if you created your own lessons there was
no built in way to export a copy for backup purposes or for safekeeping.
Once installed, there was no way to add additional lessons to MooTyper
unless you used the built in editing capability, which is not as convenient
as it would be to create lessons in a word processing program. If you wanted
to add lessons to MooTyper without using the built in editor, you had to do
a completely new installation of MooTyper which meant you would lose all
student progress and grades.
As of version 3.1.0, MooTyper now supports Import and Export of MooTyper Lessons
via links in the Administration block, which overcomes these limitations.
- NEW IN THIS RELEASE
There is now a new key top text color setting. This will allow you to now
have a layout with dark colored keys, with white text, or some other light
colored text.
There is now a new time limit setting that can be used for any Mode.
There is now a new required WPM rate setting that can be used for any Mode.
Information labels on the pages for view.php, gview.php, and owngrades.php
now include the new time limit, Required precision, and the new Required WPM.
You can now set a typing time limit from 0:00 (not used) to 10:00 minutes.
However, you will need to make sure each exercise is long enough, character
count wise, so that your fastest typer will NOT run out of something to type.
You can now set a required Word Per Minute rate. Failure to achieve the
posted rate, is treated just the same as failing to achieve the required
precision.
You can mix and match the time limit, precision, and wpm.
A zero timelimit lets the student type all the way to the end of the exercise,
just as it always has. If a time limit is set, the exercise is halted when
time expires.
A zero required precision means the grade will NOT be shown with a red
background no matter the precision achieved for the exercise. Any other
required precision is treated as before.
A zero required WPM rate means the grade will NOT be shown with a red
background no matter the WPM rate achieved for the exercise. Any other
required precision like the required precision rate. Red grade background
for not exceeding the required WPM. Green if it is exceeded.
If using both a required precision and required WPM, they must both be
exceeded to get a green "passed" background. If one is exceeded and one
is not, the grade background will be red.
- OTHER IMPORTANT CAPABILITIES
There are four settings that affect the typing modes.
1.The original mode - This mode requires you to type the correct letter before
you can move to the next letter. Extra spaces are ignored. Mistyped letters
are counted as mistakes.
2. Count mistyped spaces - Same as the original mode, but counts mistyped spaces
as well as mistyped letters.
3. Continuous typing - In this mode you do not have to type the correct letter
before moving to the next letter. All mistyped letters and space are counted
as mistakes.
4. Count all keystrokes - If you mistype the same key multiple times, you have the
option of counting it as one mistake, or counting all of them.
If a user clicks, View my grades, depending on the Moodle version, they will now
see a horizontal bar chart beneath their grade table that charts Hits per minute,
Precision, and WPM results. If a non-editing teacher, teacher, manager, or admin,
clicks on, 'View all grades, depending on the Moodle version, they will see the
normal grade table as well as horizontal bar charts showing Hits per minute,
Precision, and WPM for each exercise for each student.
For more info please visit the plugins wiki on github:
https://github.com/drachels/moodle-mod_mootyper/wiki
4.1.1 (Build: 2022012700) (2022012700)
4.1.1 (Build: 2022012700)
Plugin type: Activities
Frankenstyle component name: mod_mootyper
Version build number: 2022012700
Version release name: 4.1.1 (Build: 2022012700)
Maturity: Stable
Supported Moodle versions: 3.10, 3.11, 3.4, 3.5, 3.6, 3.7, 3.8, 3.9
Repository URL (Git): https://github.com/drachels/moodle-mod_mootyper
Repository branch:
Repository tag: v4.1.1
Issue/bug tracker URL: https://github.com/drachels/moodle-mod_mootyper/issues
Moodle Mootyper module
- Moodle tracker component: https://github.com/drachels/moodle-mod_mootyper/issues
- Documentation: https://github.com/drachels/moodle-mod_mootyper/wiki
- Source Code: https://github.com/drachels/moodle-mod_mootyper
- License: http://www.gnu.org/licenses/gpl.txt
Install from git
- Navigate to Moodle root folder
- git clone git://github.com/drachels/moodle-mod_mootyper.git mod/mootyper
- cd mootyper
- git checkout MOODLE_XY_STABLE (where XY is the moodle version, e.g: MOODLE_30_STABLE, MOODLE_28_STABLE...)
- Click the 'Notifications' link on the frontpage administration block or php admin/cli/upgrade.php if you have access to a command line interpreter.
Install from a compressed file
- Extract the compressed file data
- Rename the main folder to mootyper
- Copy to the Moodle mod/ folder
- Click the 'Notifications' link on the frontpage administration block or php admin/cli/upgrade.php if you have access to a command line interpreter.
This is the README file for the MooTyper project. MooTyper is
a moodle extension, that adds the 'typing instructor' functionallity to Moodle.
The plugin url is: https://moodle.org/plugins/view.php?plugin=mod_mootyper
MooTyper is free software, the same as Moodle.
- REQUIREMENTS
The MooTyper module uses javascript which is not welcome in Moodle but it is a
requirement for the use of the module. The typing procedure cannot be done without
the client side logic.
It creates some new tables in a moodle database and inserts some sample
typing exercises. This is all done automaticaly through the intstallation,
but real lessons and exercises should be added by teachers afterwards.
- INSTALLATION
MooTyper is an activity module. You have to extract it to the 'mod' directory.
If the directory name is something like "moodle_mod_mootyper" you have to change
that to just "mootyper". So for example, the path should be like this:
Than go to Site Administration -> Notifications and click on the button to start
the install.
Right after an install or upgrade of the new MooTyper 3.6.1, you will then see
the settings page. You can now set the date display format for the grade views.
You can also set colors for grade views, the background of the new keyboard
layouts, and the color for keytops that are not home row keys. This allows you
to color coordinate MooTyper with your theme color scheme.
- USING MOOTYPER
Using MooTyper activity module is very simple. An instance can be added as a
new activity in a course like Lesson or Quiz. The simplest way to setup a
MooTyper, is select MooTyper from the list, Add an activity or resource.
Add the name you want to use for this activity. I recommend adding the
lesson name as part of the activity name. Add a description if you desire.
Then, add Availability times, if desired, then click, Save and display.
Yes, that's right! Don't bother with any other options as they will then be
available on the, Setup link.
Thanks to Mary Cooch from moodle.org we have this video, which shows how
to add exercises, create mootyper instance, and then view grades.
It's a little outdated (one of the first versions of mootyper), but I
guess everything still holds:
- ADDITIONAL KEYBOARD LAYOUTS
This MooTyper currently includes keyboard layouts to support many languages.
If you do not see one that need, please let the maintainer know.
Note: There are two special layouts, English(USV6) that includes both the normal
keys and the number keypad, and numberKeypadOnly(V1), which shows ONLY the
number keypad.
To implement any other layout you have to:
Create a php file with keyboard layout defined with HTML. Create a javascript
file (with the same name and .js extension) that implements the logic of the keyboard
layout. If you have any mistakes in your js file the module won't work, so in
this case try to validate your code with a tool like this...
http://www.javascriptlint.com/online_lint.php
- SAVING YOUR OWN OR MODIFIED LESSONS
In previous versions of MooTyper, if you created your own lessons there was
no built in way to export a copy for backup purposes or for safekeeping.
Once installed, there was no way to add additional lessons to MooTyper
unless you used the built in editing capability, which is not as convenient
as it would be to create lessons in a word processing program. If you wanted
to add lessons to MooTyper without using the built in editor, you had to do
a completely new installation of MooTyper which meant you would lose all
student progress and grades.
As of version 3.1.0, MooTyper now supports Import and Export of MooTyper Lessons
via links in the Administration block, which overcomes these limitations.
- NEW IN THIS RELEASE
There is now a new key top text color setting. This will allow you to now
have a layout with dark colored keys, with white text, or some other light
colored text.
There is now a new time limit setting that can be used for any Mode.
There is now a new required WPM rate setting that can be used for any Mode.
Information labels on the pages for view.php, gview.php, and owngrades.php
now include the new time limit, Required precision, and the new Required WPM.
You can now set a typing time limit from 0:00 (not used) to 10:00 minutes.
However, you will need to make sure each exercise is long enough, character
count wise, so that your fastest typer will NOT run out of something to type.
You can now set a required Word Per Minute rate. Failure to achieve the
posted rate, is treated just the same as failing to achieve the required
precision.
You can mix and match the time limit, precision, and wpm.
A zero timelimit lets the student type all the way to the end of the exercise,
just as it always has. If a time limit is set, the exercise is halted when
time expires.
A zero required precision means the grade will NOT be shown with a red
background no matter the precision achieved for the exercise. Any other
required precision is treated as before.
A zero required WPM rate means the grade will NOT be shown with a red
background no matter the WPM rate achieved for the exercise. Any other
required precision like the required precision rate. Red grade background
for not exceeding the required WPM. Green if it is exceeded.
If using both a required precision and required WPM, they must both be
exceeded to get a green "passed" background. If one is exceeded and one
is not, the grade background will be red.
- OTHER IMPORTANT CAPABILITIES
There are four settings that affect the typing modes.
1.The original mode - This mode requires you to type the correct letter before
you can move to the next letter. Extra spaces are ignored. Mistyped letters
are counted as mistakes.
2. Count mistyped spaces - Same as the original mode, but counts mistyped spaces
as well as mistyped letters.
3. Continuous typing - In this mode you do not have to type the correct letter
before moving to the next letter. All mistyped letters and space are counted
as mistakes.
4. Count all keystrokes - If you mistype the same key multiple times, you have the
option of counting it as one mistake, or counting all of them.
If a user clicks, View my grades, depending on the Moodle version, they will now
see a horizontal bar chart beneath their grade table that charts Hits per minute,
Precision, and WPM results. If a non-editing teacher, teacher, manager, or admin,
clicks on, 'View all grades, depending on the Moodle version, they will see the
normal grade table as well as horizontal bar charts showing Hits per minute,
Precision, and WPM for each exercise for each student.
For more info please visit the plugins wiki on github:
https://github.com/drachels/moodle-mod_mootyper/wiki
4.1.0 (Build: 2022011700) (2022011700)
4.1.0 (Build: 2022011700)
Plugin type: Activities
Frankenstyle component name: mod_mootyper
Version build number: 2022011700
Version release name: 4.1.0 (Build: 2022011700)
Maturity: Stable
Supported Moodle versions: 3.10, 3.11, 3.4, 3.5, 3.6, 3.7, 3.8, 3.9
Repository URL (Git): https://github.com/drachels/moodle-mod_mootyper
Repository branch:
Repository tag: v4.1.0
Issue/bug tracker URL: https://github.com/drachels/moodle-mod_mootyper/issues
Moodle Mootyper module
- Moodle tracker component: https://github.com/drachels/moodle-mod_mootyper/issues
- Documentation: https://github.com/drachels/moodle-mod_mootyper/wiki
- Source Code: https://github.com/drachels/moodle-mod_mootyper
- License: http://www.gnu.org/licenses/gpl.txt
Install from git
- Navigate to Moodle root folder
- git clone git://github.com/drachels/moodle-mod_mootyper.git mod/mootyper
- cd mootyper
- git checkout MOODLE_XY_STABLE (where XY is the moodle version, e.g: MOODLE_30_STABLE, MOODLE_28_STABLE...)
- Click the 'Notifications' link on the frontpage administration block or php admin/cli/upgrade.php if you have access to a command line interpreter.
Install from a compressed file
- Extract the compressed file data
- Rename the main folder to mootyper
- Copy to the Moodle mod/ folder
- Click the 'Notifications' link on the frontpage administration block or php admin/cli/upgrade.php if you have access to a command line interpreter.
This is the README file for the MooTyper project. MooTyper is
a moodle extension, that adds the 'typing instructor' functionallity to Moodle.
The plugin url is: https://moodle.org/plugins/view.php?plugin=mod_mootyper
MooTyper is free software, the same as Moodle.
- REQUIREMENTS
The MooTyper module uses javascript which is not welcome in Moodle but it is a
requirement for the use of the module. The typing procedure cannot be done without
the client side logic.
It creates some new tables in a moodle database and inserts some sample
typing exercises. This is all done automaticaly through the intstallation,
but real lessons and exercises should be added by teachers afterwards.
- INSTALLATION
MooTyper is an activity module. You have to extract it to the 'mod' directory.
If the directory name is something like "moodle_mod_mootyper" you have to change
that to just "mootyper". So for example, the path should be like this:
/mod/mootyper/view.php
Than go to Site Administration -> Notifications and click on the button to start
the install.
Right after an install or upgrade of the new MooTyper 3.6.1, you will then see
the settings page. You can now set the date display format for the grade views.
You can also set colors for grade views, the background of the new keyboard
layouts, and the color for keytops that are not home row keys. This allows you
to color coordinate MooTyper with your theme color scheme.
- USING MOOTYPER
Using MooTyper activity module is very simple. An instance can be added as a
new activity in a course like Lesson or Quiz. The simplest way to setup a
MooTyper, is select MooTyper from the list, Add an activity or resource.
Add the name you want to use for this activity. I recommend adding the
lesson name as part of the activity name. Add a description if you desire.
Then, add Availability times, if desired, then click, Save and display.
Yes, that's right! Don't bother with any other options as they will then be
available on the, Setup link.
Thanks to Mary Cooch from moodle.org we have this video, which shows how
to add exercises, create mootyper instance, and then view grades.
It's a little outdated (one of the first versions of mootyper), but I
guess everything still holds:
- ADDITIONAL KEYBOARD LAYOUTS
This MooTyper currently includes keyboard layouts to support many languages.
If you do not see one that need, please let the maintainer know.
Note: There are two special layouts, English(USV6) that includes both the normal
keys and the number keypad, and numberKeypadOnly(V1), which shows ONLY the
number keypad.
To implement any other layout you have to:
Create a php file with keyboard layout defined with HTML. Create a javascript
file (with the same name and .js extension) that implements the logic of the keyboard
layout. If you have any mistakes in your js file the module won't work, so in
this case try to validate your code with a tool like this...
http://www.javascriptlint.com/online_lint.php
- SAVING YOUR OWN OR MODIFIED LESSONS
In previous versions of MooTyper, if you created your own lessons there was
no built in way to export a copy for backup purposes or for safekeeping.
Once installed, there was no way to add additional lessons to MooTyper
unless you used the built in editing capability, which is not as convenient
as it would be to create lessons in a word processing program. If you wanted
to add lessons to MooTyper without using the built in editor, you had to do
a completely new installation of MooTyper which meant you would lose all
student progress and grades.
As of version 3.1.0, MooTyper now supports Import and Export of MooTyper Lessons
via links in the Administration block, which overcomes these limitations.
- NEW IN THIS RELEASE
The database no longer uses absolute paths for the keyboard layout files.
There is now a new key top text color setting. This will allow you to now
have a layout with dark colored keys, with white text, or some other light
colored text.
There is now a new time limit setting that can be used for any Mode.
There is now a new required WPM rate setting that can be used for any Mode.
Information labels on the pages for view.php, gview.php, and owngrades.php
now include the new time limit, Required precision, and the new Required WPM.
You can now set a typing time limit from 0:00 (not used) to 10:00 minutes.
However, you will need to make sure each exercise is long enough, character
count wise, so that your fastest typer will NOT run out of something to type.
You can now set a required Word Per Minute rate. Failure to achieve the
posted rate, is treated just the same as failing to achieve the required
precision.
You can mix and match the time limit, precision, and wpm.
A zero timelimit lets the student type all the way to the end of the exercise,
just as it always has. If a time limit is set, the exercise is halted when
time expires.
A zero required precision means the grade will NOT be shown with a red
background no matter the precision achieved for the exercise. Any other
required precision is treated as before.
A zero required WPM rate means the grade will NOT be shown with a red
background no matter the WPM rate achieved for the exercise. Any other
required precision like the required precision rate. Red grade background
for not exceeding the required WPM. Green if it is exceeded.
If using both a required precision and required WPM, they must both be
exceeded to get a green "passed" background. If one is exceeded and one
is not, the grade background will be red.
- OTHER IMPORTANT CAPABILITIES
There are four settings that affect the typing modes.
1.The original mode - This mode requires you to type the correct letter before
you can move to the next letter. Extra spaces are ignored. Mistyped letters
are counted as mistakes.
2. Count mistyped spaces - Same as the original mode, but counts mistyped spaces
as well as mistyped letters.
3. Continuous typing - In this mode you do not have to type the correct letter
before moving to the next letter. All mistyped letters and space are counted
as mistakes.
4. Count all keystrokes - If you mistype the same key multiple times, you have the
option of counting it as one mistake, or counting all of them.
If a user clicks, View my grades, depending on the Moodle version, they will now
see a horizontal bar chart beneath their grade table that charts Hits per minute,
Precision, and WPM results. If a non-editing teacher, teacher, manager, or admin,
clicks on, 'View all grades, depending on the Moodle version, they will see the
normal grade table as well as horizontal bar charts showing Hits per minute,
Precision, and WPM for each exercise for each student.
For more info please visit the plugins wiki on github:
https://github.com/drachels/moodle-mod_mootyper/wiki
4.0.1 (Build: 2021072200) (2021072200)
4.0.1 (Build: 2021072200)
Plugin type: Activities
Frankenstyle component name: mod_mootyper
Version build number: 2021072200
Version release name: 4.0.1 (Build: 2021072200)
Maturity: Stable
Supported Moodle versions: 3.10, 3.11, 3.4, 3.5, 3.6, 3.7, 3.8, 3.9
Repository URL (Git): https://github.com/drachels/moodle-mod_mootyper
Repository branch:
Repository tag: v4.0.1
Issue/bug tracker URL: https://github.com/drachels/moodle-mod_mootyper/issues
Moodle Mootyper module
- Moodle tracker component: https://github.com/drachels/moodle-mod_mootyper/issues
- Documentation: https://github.com/drachels/moodle-mod_mootyper/wiki
- Source Code: https://github.com/drachels/moodle-mod_mootyper
- License: http://www.gnu.org/licenses/gpl.txt
Install from git
- Navigate to Moodle root folder
- git clone git://github.com/drachels/moodle-mod_mootyper.git mod/mootyper
- cd mootyper
- git checkout MOODLE_XY_STABLE (where XY is the moodle version, e.g: MOODLE_30_STABLE, MOODLE_28_STABLE...)
- Click the 'Notifications' link on the frontpage administration block or php admin/cli/upgrade.php if you have access to a command line interpreter.
Install from a compressed file
- Extract the compressed file data
- Rename the main folder to mootyper
- Copy to the Moodle mod/ folder
- Click the 'Notifications' link on the frontpage administration block or php admin/cli/upgrade.php if you have access to a command line interpreter.
This is the README file for the MooTyper project. MooTyper is
a moodle extension, that adds the 'typing instructor' functionallity to Moodle.
The plugin url is: https://moodle.org/plugins/view.php?plugin=mod_mootyper
MooTyper is free software, the same as Moodle.
- REQUIREMENTS
The MooTyper module uses javascript which is not welcome in Moodle but it is a
requirement for the use of the module. The typing procedure cannot be done without
the client side logic.
It creates some new tables in a moodle database and inserts some sample
typing exercises. This is all done automaticaly through the intstallation,
but real lessons and exercises should be added by teachers afterwards.
- INSTALLATION
MooTyper is an activity module. You have to extract it to the 'mod' directory.
If the directory name is something like "moodle_mod_mootyper" you have to change
that to just "mootyper". So for example, the path should be like this:
Than go to Site Administration -> Notifications and click on the button to start
the install.
Right after an install or upgrade of the new MooTyper 3.6.1, you will then see
the settings page. You can now set the date display format for the grade views.
You can also set colors for grade views, the background of the new keyboard
layouts, and the color for keytops that are not home row keys. This allows you
to color coordinate MooTyper with your theme color scheme.
- USING MOOTYPER
Using MooTyper activity module is very simple. An instance can be added as a
new activity in a course like Lesson or Quiz. The simplest way to setup a
MooTyper, is select MooTyper from the list, Add an activity or resource.
Add the name you want to use for this activity. I recommend adding the
lesson name as part of the activity name. Add a description if you desire.
Then, add Availability times, if desired, then click, Save and display.
Yes, that's right! Don't bother with any other options as they will then be
available on the, Setup link.
Thanks to Mary Cooch from moodle.org we have this video, which shows how
to add exercises, create mootyper instance, and then view grades.
It's a little outdated (one of the first versions of mootyper), but I
guess everything still holds:
- ADDITIONAL KEYBOARD LAYOUTS
This MooTyper currently includes keyboard layouts to support many languages.
If you do not see one that need, please let the maintainer know.
Note: There are two special layouts, English(USV6) that includes both the normal
keys and the number keypad, and numberKeypadOnly(V1), which shows ONLY the
number keypad.
To implement any other layout you have to:
Create a php file with keyboard layout defined with HTML. Create a javascript
file (with the same name and .js extension) that implements the logic of the keyboard
layout. If you have any mistakes in your js file the module won't work, so in
this case try to validate your code with a tool like this...
http://www.javascriptlint.com/online_lint.php
- SAVING YOUR OWN OR MODIFIED LESSONS
In previous versions of MooTyper, if you created your own lessons there was
no built in way to export a copy for backup purposes or for safekeeping.
Once installed, there was no way to add additional lessons to MooTyper
unless you used the built in editing capability, which is not as convenient
as it would be to create lessons in a word processing program. If you wanted
to add lessons to MooTyper without using the built in editor, you had to do
a completely new installation of MooTyper which meant you would lose all
student progress and grades.
As of version 3.1.0, MooTyper now supports Import and Export of MooTyper Lessons
via links in the Administration block, which overcomes these limitations.
- NEW IN THIS RELEASE
There is now a new key top text color setting. This will allow you to now
have a layout with dark colored keys, with white text, or some other light
colored text.
There is now a new time limit setting that can be used for any Mode.
There is now a new required WPM rate setting that can be used for any Mode.
Information labels on the pages for view.php, gview.php, and owngrades.php
now include the new time limit, Required precision, and the new Required WPM.
You can now set a typing time limit from 0:00 (not used) to 10:00 minutes.
However, you will need to make sure each exercise is long enough, character
count wise, so that your fastest typer will NOT run out of something to type.
You can now set a required Word Per Minute rate. Failure to achieve the
posted rate, is treated just the same as failing to achieve the required
precision.
You can mix and match the time limit, precision, and wpm.
A zero timelimit lets the student type all the way to the end of the exercise,
just as it always has. If a time limit is set, the exercise is halted when
time expires.
A zero required precision means the grade will NOT be shown with a red
background no matter the precision achieved for the exercise. Any other
required precision is treated as before.
A zero required WPM rate means the grade will NOT be shown with a red
background no matter the WPM rate achieved for the exercise. Any other
required precision like the required precision rate. Red grade background
for not exceeding the required WPM. Green if it is exceeded.
If using both a required precision and required WPM, they must both be
exceeded to get a green "passed" background. If one is exceeded and one
is not, the grade background will be red.
- OTHER IMPORTANT CAPABILITIES
There are four settings that affect the typing modes.
1.The original mode - This mode requires you to type the correct letter before
you can move to the next letter. Extra spaces are ignored. Mistyped letters
are counted as mistakes.
2. Count mistyped spaces - Same as the original mode, but counts mistyped spaces
as well as mistyped letters.
3. Continuous typing - In this mode you do not have to type the correct letter
before moving to the next letter. All mistyped letters and space are counted
as mistakes.
4. Count all keystrokes - If you mistype the same key multiple times, you have the
option of counting it as one mistake, or counting all of them.
If a user clicks, View my grades, depending on the Moodle version, they will now
see a horizontal bar chart beneath their grade table that charts Hits per minute,
Precision, and WPM results. If a non-editing teacher, teacher, manager, or admin,
clicks on, 'View all grades, depending on the Moodle version, they will see the
normal grade table as well as horizontal bar charts showing Hits per minute,
Precision, and WPM for each exercise for each student.
For more info please visit the plugins wiki on github:
https://github.com/drachels/moodle-mod_mootyper/wiki
4.0.0 (Build: 2021041600) (2021041600)
4.0.0 (Build: 2021041600)
Plugin type: Activities
Frankenstyle component name: mod_mootyper
Version build number: 2021041600
Version release name: 4.0.0 (Build: 2021041600)
Maturity: Stable
Supported Moodle versions: 3.10, 3.11, 3.4, 3.5, 3.6, 3.7, 3.8, 3.9
Repository URL (Git): https://github.com/drachels/moodle-mod_mootyper
Repository branch:
Repository tag: v4.0.0
Issue/bug tracker URL: https://github.com/drachels/moodle-mod_mootyper/issues
Moodle Mootyper module
- Moodle tracker component: https://github.com/drachels/moodle-mod_mootyper/issues
- Documentation: https://github.com/drachels/moodle-mod_mootyper/wiki
- Source Code: https://github.com/drachels/moodle-mod_mootyper
- License: http://www.gnu.org/licenses/gpl.txt
Install from git
- Navigate to Moodle root folder
- git clone git://github.com/drachels/moodle-mod_mootyper.git mod/mootyper
- cd mootyper
- git checkout MOODLE_XY_STABLE (where XY is the moodle version, e.g: MOODLE_30_STABLE, MOODLE_28_STABLE...)
- Click the 'Notifications' link on the frontpage administration block or php admin/cli/upgrade.php if you have access to a command line interpreter.
Install from a compressed file
- Extract the compressed file data
- Rename the main folder to mootyper
- Copy to the Moodle mod/ folder
- Click the 'Notifications' link on the frontpage administration block or php admin/cli/upgrade.php if you have access to a command line interpreter.
This is the README file for the MooTyper project. MooTyper is
a moodle extension, that adds the 'typing instructor' functionallity to Moodle.
The plugin url is: https://moodle.org/plugins/view.php?plugin=mod_mootyper
MooTyper is free software, the same as Moodle.
- REQUIREMENTS
The MooTyper module uses javascript which is not welcome in Moodle but it is a
requirement for the use of the module. The typing procedure cannot be done without
the client side logic.
It creates some new tables in a moodle database and inserts some sample
typing exercises. This is all done automaticaly through the intstallation,
but real lessons and exercises should be added by teachers afterwards.
This version requires PHP 7.1 or higher.
- INSTALLATION
MooTyper is an activity module. You have to extract it to the 'mod' directory.
If the directory name is something like "moodle_mod_mootyper" you have to change
that to just "mootyper". So for example, the path should be like this:
/mod/mootyper/view.php
Than go to Site Administration -> Notifications and click on the button to start
the install.
Right after an install or upgrade of the new MooTyper 3.6.1, you will then see
the settings page. You can now set the date display format for the grade views.
You can also set colors for grade views, the background of the new keyboard
layouts, and the color for keytops that are not home row keys. This allows you
to color coordinate MooTyper with your theme color scheme.
- USING MOOTYPER
Using MooTyper activity module is very simple. An instance can be added as a
new activity in a course like Lesson or Quiz. The simplest way to setup a
MooTyper, is select MooTyper from the list, Add an activity or resource.
Add the name you want to use for this activity. I recommend adding the
lesson name as part of the activity name. Add a description if you desire.
Then, add Availability times, if desired, then click, Save and display.
Yes, that's right! Don't bother with any other options as they will then be
available on the, Setup link.
Thanks to Mary Cooch from moodle.org we have this video, which shows how
to add exercises, create mootyper instance, and then view grades.
It's a little outdated (one of the first versions of mootyper), but I
guess everything still holds:
- ADDITIONAL KEYBOARD LAYOUTS
This MooTyper currently includes keyboard layouts to support many languages.
If you do not see one that need, please let the maintainer know.
Note: There are two special layouts, English(USV6) that includes both the normal
keys and the number keypad, and numberKeypadOnly(V1), which shows ONLY the
number keypad.
To implement any other layout you have to:
Create a php file with keyboard layout defined with HTML. Create a javascript
file (with the same name and .js extension) that implements the logic of the keyboard
layout. If you have any mistakes in your js file the module won't work, so in
this case try to validate your code with a tool like this...
http://www.javascriptlint.com/online_lint.php
- SAVING YOUR OWN OR MODIFIED LESSONS
In previous versions of MooTyper, if you created your own lessons there was
no built in way to export a copy for backup purposes or for safekeeping.
Once installed, there was no way to add additional lessons to MooTyper
unless you used the built in editing capability, which is not as convenient
as it would be to create lessons in a word processing program. If you wanted
to add lessons to MooTyper without using the built in editor, you had to do
a completely new installation of MooTyper which meant you would lose all
student progress and grades.
As of version 3.1.0, MooTyper now supports Import and Export of MooTyper Lessons
via links in the Administration block, which overcomes these limitations.
NEW IN THIS RELEASE
Slight change to the information displayed ... it now also shows the exercise name.
Anyone who can edit a lesson can now edit the lesson name.
Anyone who can edit a lesson or exercise can add an exercise name.
Anyone who can edit an exercise can now edit the exercise name.
OTHER IMPORTANT CAPABILITIES
There are four settings that affect the typing modes.
1.The original mode - This mode requires you to type the correct letter before
you can move to the next letter. Extra spaces are ignored. Mistyped letters
are counted as mistakes.
2. Count mistyped spaces - Same as the original mode, but counts mistyped spaces
as well as mistyped letters.
3. Continuous typing - In this mode you do not have to type the correct letter
before moving to the next letter. All mistyped letters and space are counted
as mistakes.
4. Count all keystrokes - If you mistype the same key multiple times, you have the
option of counting it as one mistake, or counting all of them.
If a user clicks, View my grades, depending on the Moodle version, they will now
see a horizontal bar chart beneath their grade table that charts Hits per minute,
Precision, and WPM results. If a non-editing teacher, teacher, manager, or admin,
clicks on, 'View all grades, depending on the Moodle version, they will see the
normal grade table as well as horizontal bar charts showing Hits per minute,
Precision, and WPM for each exercise for each student.
For more info please visit the plugins wiki on github:
https://github.com/drachels/moodle-mod_mootyper/wiki
3.9.6 (Build: 2021032000) (2021032000)
3.9.6 (Build: 2021032000)
Plugin type: Activities
Frankenstyle component name: mod_mootyper
Version build number: 2021032000
Version release name: 3.9.6 (Build: 2021032000)
Maturity: Stable
Supported Moodle versions: 3.10, 3.4, 3.5, 3.6, 3.7, 3.8, 3.9
Repository URL (Git): https://github.com/drachels/moodle-mod_mootyper
Repository branch:
Repository tag: v3.9.6
Issue/bug tracker URL: https://github.com/drachels/moodle-mod_mootyper/issues
Moodle Mootyper module
- Moodle tracker component: https://github.com/drachels/moodle-mod_mootyper/issues
- Documentation: https://github.com/drachels/moodle-mod_mootyper/wiki
- Source Code: https://github.com/drachels/moodle-mod_mootyper
- License: http://www.gnu.org/licenses/gpl.txt
Install from git
- Navigate to Moodle root folder
- git clone git://github.com/drachels/moodle-mod_mootyper.git mod/mootyper
- cd mootyper
- git checkout MOODLE_XY_STABLE (where XY is the moodle version, e.g: MOODLE_30_STABLE, MOODLE_28_STABLE...)
- Click the 'Notifications' link on the frontpage administration block or php admin/cli/upgrade.php if you have access to a command line interpreter.
Install from a compressed file
- Extract the compressed file data
- Rename the main folder to mootyper
- Copy to the Moodle mod/ folder
- Click the 'Notifications' link on the frontpage administration block or php admin/cli/upgrade.php if you have access to a command line interpreter.
This is the README file for the MooTyper project. MooTyper is
a moodle extension, that adds the 'typing instructor' functionallity to Moodle.
The plugin url is: https://moodle.org/plugins/view.php?plugin=mod_mootyper
MooTyper is free software, the same as Moodle.
- REQUIREMENTS
The MooTyper module uses javascript which is not welcome in Moodle but it is a
requirement for the use of the module. The typing procedure cannot be done without
the client side logic.
It creates some new tables in a moodle database and inserts some sample
typing exercises. This is all done automaticaly through the intstallation,
but real lessons and exercises should be added by teachers afterwards.
- INSTALLATION
MooTyper is an activity module. You have to extract it to the 'mod' directory.
If the directory name is something like "moodle_mod_mootyper" you have to change
that to just "mootyper". So for example, the path should be like this:
Than go to Site Administration -> Notifications and click on the button to start
the install.
Right after an install or upgrade of the new MooTyper 3.6.1, you will then see
the settings page. You can now set the date display format for the grade views.
You can also set colors for grade views, the background of the new keyboard
layouts, and the color for keytops that are not home row keys. This allows you
to color coordinate MooTyper with your theme color scheme.
- USING MOOTYPER
Using MooTyper activity module is very simple. An instance can be added as a
new activity in a course like Lesson or Quiz. The simplest way to setup a
MooTyper, is select MooTyper from the list, Add an activity or resource.
Add the name you want to use for this activity. I recommend adding the
lesson name as part of the activity name. Add a description if you desire.
Then, add Availability times, if desired, then click, Save and display.
Yes, that's right! Don't bother with any other options as they will then be
available on the, Setup link.
Thanks to Mary Cooch from moodle.org we have this video, which shows how
to add exercises, create mootyper instance, and then view grades.
It's a little outdated (one of the first versions of mootyper), but I
guess everything still holds:
- ADDITIONAL KEYBOARD LAYOUTS
This MooTyper currently includes keyboard layouts to support many languages.
If you do not see one that need, please let the maintainer know.
Note: There are two special layouts, English(USV6) that includes both the normal
keys and the number keypad, and numberKeypadOnly(V1), which shows ONLY the
number keypad.
To implement any other layout you have to:
Create a php file with keyboard layout defined with HTML. Create a javascript
file (with the same name and .js extension) that implements the logic of the keyboard
layout. If you have any mistakes in your js file the module won't work, so in
this case try to validate your code with a tool like this...
http://www.javascriptlint.com/online_lint.php
- SAVING YOUR OWN OR MODIFIED LESSONS
In previous versions of MooTyper, if you created your own lessons there was
no built in way to export a copy for backup purposes or for safekeeping.
Once installed, there was no way to add additional lessons to MooTyper
unless you used the built in editing capability, which is not as convenient
as it would be to create lessons in a word processing program. If you wanted
to add lessons to MooTyper without using the built in editor, you had to do
a completely new installation of MooTyper which meant you would lose all
student progress and grades.
As of version 3.1.0, MooTyper now supports Import and Export of MooTyper Lessons
via links in the Administration block, which overcomes these limitations.
- NEW IN THIS RELEASE
There is now a new key top text color setting. This will allow you to now
have a layout with dark colored keys, with white text, or some other light
colored text.
There is now a new time limit setting that can be used for any Mode.
There is now a new required WPM rate setting that can be used for any Mode.
Information labels on the pages for view.php, gview.php, and owngrades.php
now include the new time limit, Required precision, and the new Required WPM.
You can now set a typing time limit from 0:00 (not used) to 10:00 minutes.
However, you will need to make sure each exercise is long enough, character
count wise, so that your fastest typer will NOT run out of something to type.
You can now set a required Word Per Minute rate. Failure to achieve the
posted rate, is treated just the same as failing to achieve the required
precision.
You can mix and match the time limit, precision, and wpm.
A zero timelimit lets the student type all the way to the end of the exercise,
just as it always has. If a time limit is set, the exercise is halted when
time expires.
A zero required precision means the grade will NOT be shown with a red
background no matter the precision achieved for the exercise. Any other
required precision is treated as before.
A zero required WPM rate means the grade will NOT be shown with a red
background no matter the WPM rate achieved for the exercise. Any other
required precision like the required precision rate. Red grade background
for not exceeding the required WPM. Green if it is exceeded.
If using both a required precision and required WPM, they must both be
exceeded to get a green "passed" background. If one is exceeded and one
is not, the grade background will be red.
- OTHER IMPORTANT CAPABILITIES
There are four settings that affect the typing modes.
1.The original mode - This mode requires you to type the correct letter before
you can move to the next letter. Extra spaces are ignored. Mistyped letters
are counted as mistakes.
2. Count mistyped spaces - Same as the original mode, but counts mistyped spaces
as well as mistyped letters.
3. Continuous typing - In this mode you do not have to type the correct letter
before moving to the next letter. All mistyped letters and space are counted
as mistakes.
4. Count all keystrokes - If you mistype the same key multiple times, you have the
option of counting it as one mistake, or counting all of them.
If a user clicks, View my grades, depending on the Moodle version, they will now
see a horizontal bar chart beneath their grade table that charts Hits per minute,
Precision, and WPM results. If a non-editing teacher, teacher, manager, or admin,
clicks on, 'View all grades, depending on the Moodle version, they will see the
normal grade table as well as horizontal bar charts showing Hits per minute,
Precision, and WPM for each exercise for each student.
For more info please visit the plugins wiki on github:
https://github.com/drachels/moodle-mod_mootyper/wiki
3.9.5 (Build: 2020111000) (2020111000)
3.9.5 (Build: 2020111000)
Plugin type: Activities
Frankenstyle component name: mod_mootyper
Version build number: 2020111000
Version release name: 3.9.5 (Build: 2020111000)
Maturity: Stable
Supported Moodle versions: 3.10, 3.4, 3.5, 3.6, 3.7, 3.8, 3.9
Repository URL (Git): https://github.com/drachels/moodle-mod_mootyper
Repository branch:
Repository tag: v3.9.5
Issue/bug tracker URL: https://github.com/drachels/moodle-mod_mootyper/issues
Moodle Mootyper module
- Moodle tracker component: https://github.com/drachels/moodle-mod_mootyper/issues
- Documentation: https://github.com/drachels/moodle-mod_mootyper/wiki
- Source Code: https://github.com/drachels/moodle-mod_mootyper
- License: http://www.gnu.org/licenses/gpl.txt
Install from git
- Navigate to Moodle root folder
- git clone git://github.com/drachels/moodle-mod_mootyper.git mod/mootyper
- cd mootyper
- git checkout MOODLE_XY_STABLE (where XY is the moodle version, e.g: MOODLE_30_STABLE, MOODLE_28_STABLE...)
- Click the 'Notifications' link on the frontpage administration block or php admin/cli/upgrade.php if you have access to a command line interpreter.
Install from a compressed file
- Extract the compressed file data
- Rename the main folder to mootyper
- Copy to the Moodle mod/ folder
- Click the 'Notifications' link on the frontpage administration block or php admin/cli/upgrade.php if you have access to a command line interpreter.
This is the README file for the MooTyper project. MooTyper is
a moodle extension, that adds the 'typing instructor' functionallity to Moodle.
The plugin url is: https://moodle.org/plugins/view.php?plugin=mod_mootyper
MooTyper is free software, the same as Moodle.
- REQUIREMENTS
The MooTyper module uses javascript which is not welcome in Moodle but it is a
requirement for the use of the module. The typing procedure cannot be done without
the client side logic.
It creates some new tables in a moodle database and inserts some sample
typing exercises. This is all done automaticaly through the intstallation,
but real lessons and exercises should be added by teachers afterwards.
- INSTALLATION
MooTyper is an activity module. You have to extract it to the 'mod' directory.
If the directory name is something like "moodle_mod_mootyper" you have to change
that to just "mootyper". So for example, the path should be like this:
Than go to Site Administration -> Notifications and click on the button to start
the install.
Right after an install or upgrade of the new MooTyper 3.6.1, you will then see
the settings page. You can now set the date display format for the grade views.
You can also set colors for grade views, the background of the new keyboard
layouts, and the color for keytops that are not home row keys. This allows you
to color coordinate MooTyper with your theme color scheme.
- USING MOOTYPER
Using MooTyper activity module is very simple. An instance can be added as a
new activity in a course like Lesson or Quiz. The simplest way to setup a
MooTyper, is select MooTyper from the list, Add an activity or resource.
Add the name you want to use for this activity. I recommend adding the
lesson name as part of the activity name. Add a description if you desire.
Then, add Availability times, if desired, then click, Save and display.
Yes, that's right! Don't bother with any other options as they will then be
available on the, Setup link.
Thanks to Mary Cooch from moodle.org we have this video, which shows how
to add exercises, create mootyper instance, and then view grades.
It's a little outdated (one of the first versions of mootyper), but I
guess everything still holds:
- ADDITIONAL KEYBOARD LAYOUTS
This MooTyper currently includes keyboard layouts to support many languages.
If you do not see one that need, please let the maintainer know.
Note: There are two special layouts, English(USV6) that includes both the normal
keys and the number keypad, and numberKeypadOnly(V1), which shows ONLY the
number keypad.
To implement any other layout you have to:
Create a php file with keyboard layout defined with HTML. Create a javascript
file (with the same name and .js extension) that implements the logic of the keyboard
layout. If you have any mistakes in your js file the module won't work, so in
this case try to validate your code with a tool like this...
http://www.javascriptlint.com/online_lint.php
- SAVING YOUR OWN OR MODIFIED LESSONS
In previous versions of MooTyper, if you created your own lessons there was
no built in way to export a copy for backup purposes or for safekeeping.
Once installed, there was no way to add additional lessons to MooTyper
unless you used the built in editing capability, which is not as convenient
as it would be to create lessons in a word processing program. If you wanted
to add lessons to MooTyper without using the built in editor, you had to do
a completely new installation of MooTyper which meant you would lose all
student progress and grades.
As of version 3.1.0, MooTyper now supports Import and Export of MooTyper Lessons
via links in the Administration block, which overcomes these limitations.
- NEW IN THIS RELEASE
There is now a new key top text color setting. This will allow you to now
have a layout with dark colored keys, with white text, or some other light
colored text.
There is now a new time limit setting that can be used for any Mode.
There is now a new required WPM rate setting that can be used for any Mode.
Information labels on the pages for view.php, gview.php, and owngrades.php
now include the new time limit, Required precision, and the new Required WPM.
You can now set a typing time limit from 0:00 (not used) to 10:00 minutes.
However, you will need to make sure each exercise is long enough, character
count wise, so that your fastest typer will NOT run out of something to type.
You can now set a required Word Per Minute rate. Failure to achieve the
posted rate, is treated just the same as failing to achieve the required
precision.
You can mix and match the time limit, precision, and wpm.
A zero timelimit lets the student type all the way to the end of the exercise,
just as it always has. If a time limit is set, the exercise is halted when
time expires.
A zero required precision means the grade will NOT be shown with a red
background no matter the precision achieved for the exercise. Any other
required precision is treated as before.
A zero required WPM rate means the grade will NOT be shown with a red
background no matter the WPM rate achieved for the exercise. Any other
required precision like the required precision rate. Red grade background
for not exceeding the required WPM. Green if it is exceeded.
If using both a required precision and required WPM, they must both be
exceeded to get a green "passed" background. If one is exceeded and one
is not, the grade background will be red.
- OTHER IMPORTANT CAPABILITIES
There are four settings that affect the typing modes.
1.The original mode - This mode requires you to type the correct letter before
you can move to the next letter. Extra spaces are ignored. Mistyped letters
are counted as mistakes.
2. Count mistyped spaces - Same as the original mode, but counts mistyped spaces
as well as mistyped letters.
3. Continuous typing - In this mode you do not have to type the correct letter
before moving to the next letter. All mistyped letters and space are counted
as mistakes.
4. Count all keystrokes - If you mistype the same key multiple times, you have the
option of counting it as one mistake, or counting all of them.
If a user clicks, View my grades, depending on the Moodle version, they will now
see a horizontal bar chart beneath their grade table that charts Hits per minute,
Precision, and WPM results. If a non-editing teacher, teacher, manager, or admin,
clicks on, 'View all grades, depending on the Moodle version, they will see the
normal grade table as well as horizontal bar charts showing Hits per minute,
Precision, and WPM for each exercise for each student.
For more info please visit the plugins wiki on github:
https://github.com/drachels/moodle-mod_mootyper/wiki
3.9.4 (Build: 2020110100) (2020110100)
3.9.4 (Build: 2020110100)
Plugin type: Activities
Frankenstyle component name: mod_mootyper
Version build number: 2020110100
Version release name: 3.9.4 (Build: 2020110100)
Maturity: Stable
Supported Moodle versions: 3.10, 3.4, 3.5, 3.6, 3.7, 3.8, 3.9
Repository URL (Git): https://github.com/drachels/moodle-mod_mootyper
Repository branch:
Repository tag: v3.9.4
Issue/bug tracker URL: https://github.com/drachels/moodle-mod_mootyper/issues
Moodle Mootyper module
- Moodle tracker component: https://github.com/drachels/moodle-mod_mootyper/issues
- Documentation: https://github.com/drachels/moodle-mod_mootyper/wiki
- Source Code: https://github.com/drachels/moodle-mod_mootyper
- License: http://www.gnu.org/licenses/gpl.txt
Install from git
- Navigate to Moodle root folder
- git clone git://github.com/drachels/moodle-mod_mootyper.git mod/mootyper
- cd mootyper
- git checkout MOODLE_XY_STABLE (where XY is the moodle version, e.g: MOODLE_30_STABLE, MOODLE_28_STABLE...)
- Click the 'Notifications' link on the frontpage administration block or php admin/cli/upgrade.php if you have access to a command line interpreter.
Install from a compressed file
- Extract the compressed file data
- Rename the main folder to mootyper
- Copy to the Moodle mod/ folder
- Click the 'Notifications' link on the frontpage administration block or php admin/cli/upgrade.php if you have access to a command line interpreter.
This is the README file for the MooTyper project. MooTyper is
a moodle extension, that adds the 'typing instructor' functionallity to Moodle.
The plugin url is: https://moodle.org/plugins/view.php?plugin=mod_mootyper
MooTyper is free software, the same as Moodle.
- REQUIREMENTS
The MooTyper module uses javascript which is not welcome in Moodle but it is a
requirement for the use of the module. The typing procedure cannot be done without
the client side logic.
It creates some new tables in a moodle database and inserts some sample
typing exercises. This is all done automaticaly through the intstallation,
but real lessons and exercises should be added by teachers afterwards.
- INSTALLATION
MooTyper is an activity module. You have to extract it to the 'mod' directory.
If the directory name is something like "moodle_mod_mootyper" you have to change
that to just "mootyper". So for example, the path should be like this:
Than go to Site Administration -> Notifications and click on the button to start
the install.
Right after an install or upgrade of the new MooTyper 3.6.1, you will then see
the settings page. You can now set the date display format for the grade views.
You can also set colors for grade views, the background of the new keyboard
layouts, and the color for keytops that are not home row keys. This allows you
to color coordinate MooTyper with your theme color scheme.
- USING MOOTYPER
Using MooTyper activity module is very simple. An instance can be added as a
new activity in a course like Lesson or Quiz. The simplest way to setup a
MooTyper, is select MooTyper from the list, Add an activity or resource.
Add the name you want to use for this activity. I recommend adding the
lesson name as part of the activity name. Add a description if you desire.
Then, add Availability times, if desired, then click, Save and display.
Yes, that's right! Don't bother with any other options as they will then be
available on the, Setup link.
Thanks to Mary Cooch from moodle.org we have this video, which shows how
to add exercises, create mootyper instance, and then view grades.
It's a little outdated (one of the first versions of mootyper), but I
guess everything still holds:
- ADDITIONAL KEYBOARD LAYOUTS
This MooTyper currently includes keyboard layouts to support many languages.
If you do not see one that need, please let the maintainer know.
Note: There are two special layouts, English(USV6) that includes both the normal
keys and the number keypad, and numberKeypadOnly(V1), which shows ONLY the
number keypad.
To implement any other layout you have to:
Create a php file with keyboard layout defined with HTML. Create a javascript
file (with the same name and .js extension) that implements the logic of the keyboard
layout. If you have any mistakes in your js file the module won't work, so in
this case try to validate your code with a tool like this...
http://www.javascriptlint.com/online_lint.php
- SAVING YOUR OWN OR MODIFIED LESSONS
In previous versions of MooTyper, if you created your own lessons there was
no built in way to export a copy for backup purposes or for safekeeping.
Once installed, there was no way to add additional lessons to MooTyper
unless you used the built in editing capability, which is not as convenient
as it would be to create lessons in a word processing program. If you wanted
to add lessons to MooTyper without using the built in editor, you had to do
a completely new installation of MooTyper which meant you would lose all
student progress and grades.
As of version 3.1.0, MooTyper now supports Import and Export of MooTyper Lessons
via links in the Administration block, which overcomes these limitations.
- NEW IN THIS RELEASE
There is now a new key top text color setting. This will allow you to now
have a layout with dark colored keys, with white text, or some other light
colored text.
There is now a new time limit setting that can be used for any Mode.
There is now a new required WPM rate setting that can be used for any Mode.
Information labels on the pages for view.php, gview.php, and owngrades.php
now include the new time limit, Required precision, and the new Required WPM.
You can now set a typing time limit from 0:00 (not used) to 10:00 minutes.
However, you will need to make sure each exercise is long enough, character
count wise, so that your fastest typer will NOT run out of something to type.
You can now set a required Word Per Minute rate. Failure to achieve the
posted rate, is treated just the same as failing to achieve the required
precision.
You can mix and match the time limit, precision, and wpm.
A zero timelimit lets the student type all the way to the end of the exercise,
just as it always has. If a time limit is set, the exercise is halted when
time expires.
A zero required precision means the grade will NOT be shown with a red
background no matter the precision achieved for the exercise. Any other
required precision is treated as before.
A zero required WPM rate means the grade will NOT be shown with a red
background no matter the WPM rate achieved for the exercise. Any other
required precision like the required precision rate. Red grade background
for not exceeding the required WPM. Green if it is exceeded.
If using both a required precision and required WPM, they must both be
exceeded to get a green "passed" background. If one is exceeded and one
is not, the grade background will be red.
- OTHER IMPORTANT CAPABILITIES
There are four settings that affect the typing modes.
1.The original mode - This mode requires you to type the correct letter before
you can move to the next letter. Extra spaces are ignored. Mistyped letters
are counted as mistakes.
2. Count mistyped spaces - Same as the original mode, but counts mistyped spaces
as well as mistyped letters.
3. Continuous typing - In this mode you do not have to type the correct letter
before moving to the next letter. All mistyped letters and space are counted
as mistakes.
4. Count all keystrokes - If you mistype the same key multiple times, you have the
option of counting it as one mistake, or counting all of them.
If a user clicks, View my grades, depending on the Moodle version, they will now
see a horizontal bar chart beneath their grade table that charts Hits per minute,
Precision, and WPM results. If a non-editing teacher, teacher, manager, or admin,
clicks on, 'View all grades, depending on the Moodle version, they will see the
normal grade table as well as horizontal bar charts showing Hits per minute,
Precision, and WPM for each exercise for each student.
For more info please visit the plugins wiki on github:
https://github.com/drachels/moodle-mod_mootyper/wiki
3.9.1+ (Build: 2020070801) (2020070801)
3.9.1+ (Build: 2020070801)
Plugin type: Activities
Frankenstyle component name: mod_mootyper
Version build number: 2020070801
Version release name: 3.9.1+ (Build: 2020070801)
Maturity: Stable
Supported Moodle versions: 2.7, 2.8, 2.9, 3.0, 3.1, 3.2, 3.3, 3.4, 3.5, 3.6, 3.7, 3.8, 3.9
Repository URL (Git): https://github.com/drachels/moodle-mod_mootyper
Repository branch:
Repository tag:
Issue/bug tracker URL: https://github.com/drachels/moodle-mod_mootyper/issues
Moodle Mootyper module
- Moodle tracker component: https://github.com/drachels/moodle-mod_mootyper/issues
- Documentation: https://github.com/drachels/moodle-mod_mootyper/wiki
- Source Code: https://github.com/drachels/moodle-mod_mootyper
- License: http://www.gnu.org/licenses/gpl.txt
Install from git
- Navigate to Moodle root folder
- git clone git://github.com/drachels/moodle-mod_mootyper.git mod/mootyper
- cd mootyper
- git checkout MOODLE_XY_STABLE (where XY is the moodle version, e.g: MOODLE_30_STABLE, MOODLE_28_STABLE...)
- Click the 'Notifications' link on the frontpage administration block or php admin/cli/upgrade.php if you have access to a command line interpreter.
Install from a compressed file
- Extract the compressed file data
- Rename the main folder to mootyper
- Copy to the Moodle mod/ folder
- Click the 'Notifications' link on the frontpage administration block or php admin/cli/upgrade.php if you have access to a command line interpreter.
This is the README file for the MooTyper project. MooTyper is
a moodle extension, that adds the 'typing instructor' functionallity to Moodle.
The plugin url is: https://moodle.org/plugins/view.php?plugin=mod_mootyper
MooTyper is free software, the same as Moodle.
- REQUIREMENTS
The MooTyper module uses javascript which is not welcome in Moodle but it is a
requirement for the use of the module. The typing procedure cannot be done without
the client side logic.
It creates some new tables in a moodle database and inserts some sample
typing exercises. This is all done automaticaly through the intstallation,
but real lessons and exercises should be added by teachers afterwards.
- INSTALLATION
MooTyper is an activity module. You have to extract it to the 'mod' directory.
If the directory name is something like "moodle_mod_mootyper" you have to change
that to just "mootyper". So for example, the path should be like this:
Than go to Site Administration -> Notifications and click on the button to start
the install.
Right after an install or upgrade of the new MooTyper 3.6.1, you will then see
the settings page. You can now set the date display format for the grade views.
You can also set colors for grade views, the background of the new keyboard
layouts, and the color for keytops that are not home row keys. This allows you
to color coordinate MooTyper with your theme color scheme.
- USING MOOTYPER
Using MooTyper activity module is very simple. An instance can be added as a
new activity in a course like Lesson or Quiz. The simplest way to setup a
MooTyper, is select MooTyper from the list, Add an activity or resource.
Add the name you want to use for this activity. I recommend adding the
lesson name as part of the activity name. Add a description if you desire.
Then, add Availability times, if desired, then click, Save and display.
Yes, that's right! Don't bother with any other options as they will then be
available on the, Setup link.
Thanks to Mary Cooch from moodle.org we have this video, which shows how
to add exercises, create mootyper instance, and then view grades.
It's a little outdated (one of the first versions of mootyper), but I
guess everything still holds:
- ADDITIONAL KEYBOARD LAYOUTS
This MooTyper currently includes keyboard layouts to support many languages.
If you do not see one that need, please let the maintainer know.
Note: There are two special layouts, English(USV6) that includes both the normal
keys and the number keypad, and numberKeypadOnly(V1), which shows ONLY the
number keypad.
To implement any other layout you have to:
Create a php file with keyboard layout defined with HTML. Create a javascript
file (with the same name and .js extension) that implements the logic of the keyboard
layout. If you have any mistakes in your js file the module won't work, so in
this case try to validate your code with a tool like this...
http://www.javascriptlint.com/online_lint.php
- SAVING YOUR OWN OR MODIFIED LESSONS
In previous versions of MooTyper, if you created your own lessons there was
no built in way to export a copy for backup purposes or for safekeeping.
Once installed, there was no way to add additional lessons to MooTyper
unless you used the built in editing capability, which is not as convenient
as it would be to create lessons in a word processing program. If you wanted
to add lessons to MooTyper without using the built in editor, you had to do
a completely new installation of MooTyper which meant you would lose all
student progress and grades.
As of version 3.1.0, MooTyper now supports Import and Export of MooTyper Lessons
via links in the Administration block, which overcomes these limitations.
- NEW IN THIS RELEASE
There is now a new key top text color setting. This will allow you to now
have a layout with dark colored keys, with white text, or some other light
colored text.
There is now a new time limit setting that can be used for any Mode.
There is now a new required WPM rate setting that can be used for any Mode.
Information labels on the pages for view.php, gview.php, and owngrades.php
now include the new time limit, Required precision, and the new Required WPM.
You can now set a typing time limit from 0:00 (not used) to 10:00 minutes.
However, you will need to make sure each exercise is long enough, character
count wise, so that your fastest typer will NOT run out of something to type.
You can now set a required Word Per Minute rate. Failure to achieve the
posted rate, is treated just the same as failing to achieve the required
precision.
You can mix and match the time limit, precision, and wpm.
A zero timelimit lets the student type all the way to the end of the exercise,
just as it always has. If a time limit is set, the exercise is halted when
time expires.
A zero required precision means the grade will NOT be shown with a red
background no matter the precision achieved for the exercise. Any other
required precision is treated as before.
A zero required WPM rate means the grade will NOT be shown with a red
background no matter the WPM rate achieved for the exercise. Any other
required precision like the required precision rate. Red grade background
for not exceeding the required WPM. Green if it is exceeded.
If using both a required precision and required WPM, they must both be
exceeded to get a green "passed" background. If one is exceeded and one
is not, the grade background will be red.
- OTHER IMPORTANT CAPABILITIES
There are four settings that affect the typing modes.
1.The original mode - This mode requires you to type the correct letter before
you can move to the next letter. Extra spaces are ignored. Mistyped letters
are counted as mistakes.
2. Count mistyped spaces - Same as the original mode, but counts mistyped spaces
as well as mistyped letters.
3. Continuous typing - In this mode you do not have to type the correct letter
before moving to the next letter. All mistyped letters and space are counted
as mistakes.
4. Count all keystrokes - If you mistype the same key multiple times, you have the
option of counting it as one mistake, or counting all of them.
If a user clicks, View my grades, depending on the Moodle version, they will now
see a horizontal bar chart beneath their grade table that charts Hits per minute,
Precision, and WPM results. If a non-editing teacher, teacher, manager, or admin,
clicks on, 'View all grades, depending on the Moodle version, they will see the
normal grade table as well as horizontal bar charts showing Hits per minute,
Precision, and WPM for each exercise for each student.
For more info please visit the plugins wiki on github:
https://github.com/drachels/moodle-mod_mootyper/wiki
3.9.1 (Build: 2020070800) (2020070800)
3.9.1 (Build: 2020070800)
Plugin type: Activities
Frankenstyle component name: mod_mootyper
Version build number: 2020070800
Version release name: 3.9.1 (Build: 2020070800)
Maturity: Stable
Supported Moodle versions: 2.7, 2.8, 2.9, 3.0, 3.1, 3.2, 3.3, 3.4, 3.5, 3.6, 3.7, 3.8, 3.9
Repository URL (Git): https://github.com/drachels/moodle-mod_mootyper
Repository branch:
Repository tag: v3.9.1
Issue/bug tracker URL: https://github.com/drachels/moodle-mod_mootyper/issues
Moodle Mootyper module
- Moodle tracker component: https://github.com/drachels/moodle-mod_mootyper/issues
- Documentation: https://github.com/drachels/moodle-mod_mootyper/wiki
- Source Code: https://github.com/drachels/moodle-mod_mootyper
- License: http://www.gnu.org/licenses/gpl.txt
Install from git
- Navigate to Moodle root folder
- git clone git://github.com/drachels/moodle-mod_mootyper.git mod/mootyper
- cd mootyper
- git checkout MOODLE_XY_STABLE (where XY is the moodle version, e.g: MOODLE_30_STABLE, MOODLE_28_STABLE...)
- Click the 'Notifications' link on the frontpage administration block or php admin/cli/upgrade.php if you have access to a command line interpreter.
Install from a compressed file
- Extract the compressed file data
- Rename the main folder to mootyper
- Copy to the Moodle mod/ folder
- Click the 'Notifications' link on the frontpage administration block or php admin/cli/upgrade.php if you have access to a command line interpreter.
This is the README file for the MooTyper project. MooTyper is
a moodle extension, that adds the 'typing instructor' functionallity to Moodle.
The plugin url is: https://moodle.org/plugins/view.php?plugin=mod_mootyper
MooTyper is free software, the same as Moodle.
- REQUIREMENTS
The MooTyper module uses javascript which is not welcome in Moodle but it is a
requirement for the use of the module. The typing procedure cannot be done without
the client side logic.
It creates some new tables in a moodle database and inserts some sample
typing exercises. This is all done automaticaly through the intstallation,
but real lessons and exercises should be added by teachers afterwards.
- INSTALLATION
MooTyper is an activity module. You have to extract it to the 'mod' directory.
If the directory name is something like "moodle_mod_mootyper" you have to change
that to just "mootyper". So for example, the path should be like this:
Than go to Site Administration -> Notifications and click on the button to start
the install.
Right after an install or upgrade of the new MooTyper 3.6.1, you will then see
the settings page. You can now set the date display format for the grade views.
You can also set colors for grade views, the background of the new keyboard
layouts, and the color for keytops that are not home row keys. This allows you
to color coordinate MooTyper with your theme color scheme.
- USING MOOTYPER
Using MooTyper activity module is very simple. An instance can be added as a
new activity in a course like Lesson or Quiz. The simplest way to setup a
MooTyper, is select MooTyper from the list, Add an activity or resource.
Add the name you want to use for this activity. I recommend adding the
lesson name as part of the activity name. Add a description if you desire.
Then, add Availability times, if desired, then click, Save and display.
Yes, that's right! Don't bother with any other options as they will then be
available on the, Setup link.
Thanks to Mary Cooch from moodle.org we have this video, which shows how
to add exercises, create mootyper instance, and then view grades.
It's a little outdated (one of the first versions of mootyper), but I
guess everything still holds:
- ADDITIONAL KEYBOARD LAYOUTS
This MooTyper currently includes keyboard layouts to support many languages.
If you do not see one that need, please let the maintainer know.
Note: There are two special layouts, English(USV6) that includes both the normal
keys and the number keypad, and numberKeypadOnly(V1), which shows ONLY the
number keypad.
To implement any other layout you have to:
Create a php file with keyboard layout defined with HTML. Create a javascript
file (with the same name and .js extension) that implements the logic of the keyboard
layout. If you have any mistakes in your js file the module won't work, so in
this case try to validate your code with a tool like this...
http://www.javascriptlint.com/online_lint.php
- SAVING YOUR OWN OR MODIFIED LESSONS
In previous versions of MooTyper, if you created your own lessons there was
no built in way to export a copy for backup purposes or for safekeeping.
Once installed, there was no way to add additional lessons to MooTyper
unless you used the built in editing capability, which is not as convenient
as it would be to create lessons in a word processing program. If you wanted
to add lessons to MooTyper without using the built in editor, you had to do
a completely new installation of MooTyper which meant you would lose all
student progress and grades.
As of version 3.1.0, MooTyper now supports Import and Export of MooTyper Lessons
via links in the Administration block, which overcomes these limitations.
NEW IN THIS RELEASE
Multiple security enhancements with just a couple of visual items added.
OTHER IMPORTANT CAPABILITIES
There are four settings that affect the typing modes.
1.The original mode - This mode requires you to type the correct letter before
you can move to the next letter. Extra spaces are ignored. Mistyped letters
are counted as mistakes.
2. Count mistyped spaces - Same as the original mode, but counts mistyped spaces
as well as mistyped letters.
3. Continuous typing - In this mode you do not have to type the correct letter
before moving to the next letter. All mistyped letters and space are counted
as mistakes.
4. Count all keystrokes - If you mistype the same key multiple times, you have the
option of counting it as one mistake, or counting all of them.
If a user clicks, View my grades, depending on the Moodle version, they will now
see a horizontal bar chart beneath their grade table that charts Hits per minute,
Precision, and WPM results. If a non-editing teacher, teacher, manager, or admin,
clicks on, 'View all grades, depending on the Moodle version, they will see the
normal grade table as well as horizontal bar charts showing Hits per minute,
Precision, and WPM for each exercise for each student.
For more info please visit the plugins wiki on github:
https://github.com/drachels/moodle-mod_mootyper/wiki
3.9.0 (Build: 2020062003) (2020062003)
3.9.0 (Build: 2020062003)
Plugin type: Activities
Frankenstyle component name: mod_mootyper
Version build number: 2020062003
Version release name: 3.9.0 (Build: 2020062003)
Maturity: Stable
Supported Moodle versions: 2.7, 2.8, 2.9, 3.0, 3.1, 3.2, 3.3, 3.4, 3.5, 3.6, 3.7, 3.8, 3.9
Repository URL (Git): https://github.com/drachels/moodle-mod_mootyper
Repository branch:
Repository tag:
Issue/bug tracker URL: https://github.com/drachels/moodle-mod_mootyper/issues
Moodle Mootyper module
- Moodle tracker component: https://github.com/drachels/moodle-mod_mootyper/issues
- Documentation: https://github.com/drachels/moodle-mod_mootyper/wiki
- Source Code: https://github.com/drachels/moodle-mod_mootyper
- License: http://www.gnu.org/licenses/gpl.txt
Install from git
- Navigate to Moodle root folder
- git clone git://github.com/drachels/moodle-mod_mootyper.git mod/mootyper
- cd mootyper
- git checkout MOODLE_XY_STABLE (where XY is the moodle version, e.g: MOODLE_30_STABLE, MOODLE_28_STABLE...)
- Click the 'Notifications' link on the frontpage administration block or php admin/cli/upgrade.php if you have access to a command line interpreter.
Install from a compressed file
- Extract the compressed file data
- Rename the main folder to mootyper
- Copy to the Moodle mod/ folder
- Click the 'Notifications' link on the frontpage administration block or php admin/cli/upgrade.php if you have access to a command line interpreter.
This is the README file for the MooTyper project. MooTyper is
a moodle extension, that adds the 'typing instructor' functionallity to Moodle.
The plugin url is: https://moodle.org/plugins/view.php?plugin=mod_mootyper
MooTyper is free software, the same as Moodle.
- REQUIREMENTS
The MooTyper module uses javascript which is not welcome in Moodle but it is a
requirement for the use of the module. The typing procedure cannot be done without
the client side logic.
It creates some new tables in a moodle database and inserts some sample
typing exercises. This is all done automaticaly through the intstallation,
but real lessons and exercises should be added by teachers afterwards.
- INSTALLATION
MooTyper is an activity module. You have to extract it to the 'mod' directory.
If the directory name is something like "moodle_mod_mootyper" you have to change
that to just "mootyper". So for example, the path should be like this:
Than go to Site Administration -> Notifications and click on the button to start
the install.
Right after an install or upgrade of the new MooTyper 3.9.0, you will then see
the settings page. You can now set the date display format for the grade views.
You can also set colors for grade views, the background of the new keyboard
layouts, and the color for keytops that are not home row keys. This allows you
to color coordinate MooTyper with your theme color scheme.
- USING MOOTYPER
Using MooTyper activity module is very simple. An instance can be added as a
new activity in a course like Lesson or Quiz. The simplest way to setup a
MooTyper, is select MooTyper from the list, Add an activity or resource.
Add the name you want to use for this activity. I recommend adding the
lesson name as part of the activity name. Add a description if you desire.
Then, add Availability times, if desired, then click, Save and display.
Yes, that's right! Don't bother with any other options as they will then be
available on the, Setup link.
Thanks to Mary Cooch from moodle.org we have this video, which shows how
to add exercises, create mootyper instance, and then view grades.
It's a little outdated (one of the first versions of mootyper), but I
guess everything still holds:
- ADDITIONAL KEYBOARD LAYOUTS
This MooTyper currently includes keyboard layouts to support many languages.
If you do not see one that need, please let the maintainer know.
Note: There are two special layouts, English(USV6) that includes both the normal
keys and the number keypad, and numberKeypadOnly(V1), which shows ONLY the
number keypad.
To implement any other layout you have to:
Create a php file with keyboard layout defined with HTML. Create a javascript
file (with the same name and .js extension) that implements the logic of the keyboard
layout. If you have any mistakes in your js file the module won't work, so in
this case try to validate your code with a tool like this...
http://www.javascriptlint.com/online_lint.php
- SAVING YOUR OWN OR MODIFIED LESSONS
In previous versions of MooTyper, if you created your own lessons there was
no built in way to export a copy for backup purposes or for safekeeping.
Once installed, there was no way to add additional lessons to MooTyper
unless you used the built in editing capability, which is not as convenient
as it would be to create lessons in a word processing program. If you wanted
to add lessons to MooTyper without using the built in editor, you had to do
a completely new installation of MooTyper which meant you would lose all
student progress and grades.
As of version 3.1.0, MooTyper now supports Import and Export of MooTyper Lessons
via links in the Administration block, which overcomes these limitations.
- NEW IN THIS RELEASE
There is now a new key top text color setting. This will allow you to now
have a layout with dark colored keys, with white text, or some other light
colored text.
There is now a new time limit setting that can be used for any Mode.
There is now a new required WPM rate setting that can be used for any Mode.
Information labels on the pages for view.php, gview.php, and owngrades.php
now include the new time limit, Required precision, and the new Required WPM.
You can now set a typing time limit from 0:00 (not used) to 10:00 minutes.
However, you will need to make sure each exercise is long enough, character
count wise, so that your fastest typer will NOT run out of something to type.
You can now set a required Word Per Minute rate. Failure to achieve the
posted rate, is treated just the same as failing to achieve the required
precision.
You can mix and match the time limit, precision, and wpm.
A zero timelimit lets the student type all the way to the end of the exercise,
just as it always has. If a time limit is set, the exercise is halted when
time expires.
A zero required precision means the grade will NOT be shown with a red
background no matter the precision achieved for the exercise. Any other
required precision is treated as before.
A zero required WPM rate means the grade will NOT be shown with a red
background no matter the WPM rate achieved for the exercise. Any other
required precision like the required precision rate. Red grade background
for not exceeding the required WPM. Green if it is exceeded.
If using both a required precision and required WPM, they must both be
exceeded to get a green "passed" background. If one is exceeded and one
is not, the grade background will be red.
- OTHER IMPORTANT CAPABILITIES
There are four settings that affect the typing modes.
1.The original mode - This mode requires you to type the correct letter before
you can move to the next letter. Extra spaces are ignored. Mistyped letters
are counted as mistakes.
2. Count mistyped spaces - Same as the original mode, but counts mistyped spaces
as well as mistyped letters.
3. Continuous typing - In this mode you do not have to type the correct letter
before moving to the next letter. All mistyped letters and space are counted
as mistakes.
4. Count all keystrokes - If you mistype the same key multiple times, you have the
option of counting it as one mistake, or counting all of them.
If a user clicks, View my grades, depending on the Moodle version, they will now
see a horizontal bar chart beneath their grade table that charts Hits per minute,
Precision, and WPM results. If a non-editing teacher, teacher, manager, or admin,
clicks on, 'View all grades, depending on the Moodle version, they will see the
normal grade table as well as horizontal bar charts showing Hits per minute,
Precision, and WPM for each exercise for each student.
For more info please visit the plugins wiki on github:
https://github.com/drachels/moodle-mod_mootyper/wiki
3.8.3 (Build: 2019123002) (2019123002)
3.8.3 (Build: 2019123002)
Plugin type: Activities
Frankenstyle component name: mod_mootyper
Version build number: 2019123002
Version release name: 3.8.3 (Build: 2019123002)
Maturity: Stable
Supported Moodle versions: 2.7, 2.8, 2.9, 3.0, 3.1, 3.2, 3.3, 3.4, 3.5, 3.6, 3.7, 3.8, 3.9
Repository URL (Git): https://github.com/drachels/moodle-mod_mootyper
Repository branch:
Repository tag:
Issue/bug tracker URL: https://github.com/drachels/moodle-mod_mootyper/issues
Moodle Mootyper module
- Moodle tracker component: https://github.com/drachels/moodle-mod_mootyper/issues
- Documentation: https://github.com/drachels/moodle-mod_mootyper/wiki
- Source Code: https://github.com/drachels/moodle-mod_mootyper
- License: http://www.gnu.org/licenses/gpl.txt
Install from git
- Navigate to Moodle root folder
- git clone git://github.com/drachels/moodle-mod_mootyper.git mod/mootyper
- cd mootyper
- git checkout MOODLE_XY_STABLE (where XY is the moodle version, e.g: MOODLE_30_STABLE, MOODLE_28_STABLE...)
- Click the 'Notifications' link on the frontpage administration block or php admin/cli/upgrade.php if you have access to a command line interpreter.
Install from a compressed file
- Extract the compressed file data
- Rename the main folder to mootyper
- Copy to the Moodle mod/ folder
- Click the 'Notifications' link on the frontpage administration block or php admin/cli/upgrade.php if you have access to a command line interpreter.
This is the README file for the MooTyper project. MooTyper is
a moodle extension, that adds the 'typing instructor' functionallity to Moodle.
The plugin url is: https://moodle.org/plugins/view.php?plugin=mod_mootyper
MooTyper is free software, the same as Moodle.
- REQUIREMENTS
The MooTyper module uses javascript which is not welcome in Moodle but it is a
requirement for the use of the module. The typing procedure cannot be done without
the client side logic.
It creates some new tables in a moodle database and inserts some sample
typing exercises. This is all done automaticaly through the intstallation,
but real lessons and exercises should be added by teachers afterwards.
- INSTALLATION
MooTyper is an activity module. You have to extract it to the 'mod' directory.
If the directory name is something like "moodle_mod_mootyper" you have to change
that to just "mootyper". So for example, the path should be like this:
/mod/mootyper/view.php
Than go to Site Administration -> Notifications and click on the button to start
the install.
Right after an install or upgrade of the new MooTyper 3.6.1, you will then see
the settings page. You can now set the date display format for the grade views.
You can also set colors for grade views, the background of the new keyboard
layouts, and the color for keytops that are not home row keys. This allows you
to color coordinate MooTyper with your theme color scheme.
- USING MOOTYPER
Using MooTyper activity module is very simple. An instance can be added as a
new activity in a course like Lesson or Quiz. The simplest way to setup a
MooTyper, is select MooTyper from the list, Add an activity or resource.
Add the name you want to use for this activity. I recommend adding the
lesson name as part of the activity name. Add a description if you desire.
Then, add Availability times, if desired, then click, Save and display.
Yes, that's right! Don't bother with any other options as they will then be
available on the, Setup link.
Thanks to Mary Cooch from moodle.org we have this video, which shows how
to add exercises, create mootyper instance, and then view grades.
It's a little outdated (one of the first versions of mootyper), but I
guess everything still holds:
- ADDITIONAL KEYBOARD LAYOUTS
This MooTyper currently includes keyboard layouts to support many languages.
If you do not see one that need, please let the maintainer know.
Note: There are two special layouts, English(USV6) that includes both the normal
keys and the number keypad, and numberKeypadOnly(V1), which shows ONLY the
number keypad.
To implement any other layout you have to:
Create a php file with keyboard layout defined with HTML. Create a javascript
file (with the same name and .js extension) that implements the logic of the keyboard
layout. If you have any mistakes in your js file the module won't work, so in
this case try to validate your code with a tool like this...
http://www.javascriptlint.com/online_lint.php
- SAVING YOUR OWN OR MODIFIED LESSONS
In previous versions of MooTyper, if you created your own lessons there was
no built in way to export a copy for backup purposes or for safekeeping.
Once installed, there was no way to add additional lessons to MooTyper
unless you used the built in editing capability, which is not as convenient
as it would be to create lessons in a word processing program. If you wanted
to add lessons to MooTyper without using the built in editor, you had to do
a completely new installation of MooTyper which meant you would lose all
student progress and grades.
As of version 3.1.0, MooTyper now supports Import and Export of MooTyper Lessons
via links in the Administration block, which overcomes these limitations.
- NEW IN THIS RELEASE
Mistake details are now shown to the student between the status bar and the
text to type. Teachers can see the Mistake details, in the Mistakes column of
the grades table on the View all grades page. Each user can also see their
Mistake details in the Mistakes column of the grades table on the View My
Grades page.
Mistake details are now included in the Export to .csv file download.
The former Export to .csv, link is now a button.
- OTHER IMPORTANT CAPABILITIES
There is now a new key top text color setting. This will allow you to now
have a layout with dark colored keys, with white text, or some other light
colored text.
There is now a new time limit setting that can be used for any Mode.
There is now a new required WPM rate setting that can be used for any Mode.
Information labels on the pages for view.php, gview.php, and owngrades.php
now include the new time limit, Required precision, and the new Required WPM.
You can now set a typing time limit from 0:00 (not used) to 10:00 minutes.
However, you will need to make sure each exercise is long enough, character
count wise, so that your fastest typer will NOT run out of something to type.
You can now set a required Word Per Minute rate. Failure to achieve the
posted rate, is treated just the same as failing to achieve the required
precision.
You can mix and match the time limit, precision, and wpm.
A zero timelimit lets the student type all the way to the end of the exercise,
just as it always has. If a time limit is set, the exercise is halted when
time expires.
A zero required precision means the grade will NOT be shown with a red
background no matter the precision achieved for the exercise. Any other
required precision is treated as before.
A zero required WPM rate means the grade will NOT be shown with a red
background no matter the WPM rate achieved for the exercise. Any other
required precision like the required precision rate. Red grade background
for not exceeding the required WPM. Green if it is exceeded.
If using both a required precision and required WPM, they must both be
exceeded to get a green "passed" background. If one is exceeded and one
is not, the grade background will be red.
There are four settings that affect the typing modes.
1.The original mode - This mode requires you to type the correct letter before
you can move to the next letter. Extra spaces are ignored. Mistyped letters
are counted as mistakes.
2. Count mistyped spaces - Same as the original mode, but counts mistyped spaces
as well as mistyped letters.
3. Continuous typing - In this mode you do not have to type the correct letter
before moving to the next letter. All mistyped letters and space are counted
as mistakes.
4. Count all keystrokes - If you mistype the same key multiple times, you have the
option of counting it as one mistake, or counting all of them.
If a user clicks, View my grades, depending on the Moodle version, they will now
see a horizontal bar chart beneath their grade table that charts Hits per minute,
Precision, and WPM results. If a non-editing teacher, teacher, manager, or admin,
clicks on, 'View all grades, depending on the Moodle version, they will see the
normal grade table as well as horizontal bar charts showing Hits per minute,
Precision, and WPM for each exercise for each student.
For more info please visit the plugins wiki on github:
https://github.com/drachels/moodle-mod_mootyper/wiki
3.8.2 (Build: 2019122501) (2019122501)
3.8.2 (Build: 2019122501)
Plugin type: Activities
Frankenstyle component name: mod_mootyper
Version build number: 2019122501
Version release name: 3.8.2 (Build: 2019122501)
Maturity: Stable
Supported Moodle versions: 2.7, 2.8, 2.9, 3.0, 3.1, 3.2, 3.3, 3.4, 3.5, 3.6, 3.7, 3.8
Repository URL (Git): https://github.com/drachels/moodle-mod_mootyper
Repository branch:
Repository tag:
Issue/bug tracker URL: https://github.com/drachels/moodle-mod_mootyper/issues
Moodle Mootyper module
- Moodle tracker component: https://github.com/drachels/moodle-mod_mootyper/issues
- Documentation: https://github.com/drachels/moodle-mod_mootyper/wiki
- Source Code: https://github.com/drachels/moodle-mod_mootyper
- License: http://www.gnu.org/licenses/gpl.txt
Install from git
- Navigate to Moodle root folder
- git clone git://github.com/drachels/moodle-mod_mootyper.git mod/mootyper
- cd mootyper
- git checkout MOODLE_XY_STABLE (where XY is the moodle version, e.g: MOODLE_30_STABLE, MOODLE_28_STABLE...)
- Click the 'Notifications' link on the frontpage administration block or php admin/cli/upgrade.php if you have access to a command line interpreter.
Install from a compressed file
- Extract the compressed file data
- Rename the main folder to mootyper
- Copy to the Moodle mod/ folder
- Click the 'Notifications' link on the frontpage administration block or php admin/cli/upgrade.php if you have access to a command line interpreter.
This is the README file for the MooTyper project. MooTyper is
a moodle extension, that adds the 'typing instructor' functionallity to Moodle.
The plugin url is: https://moodle.org/plugins/view.php?plugin=mod_mootyper
MooTyper is free software, the same as Moodle.
- REQUIREMENTS
The MooTyper module uses javascript which is not welcome in Moodle but it is a
requirement for the use of the module. The typing procedure cannot be done without
the client side logic.
It creates some new tables in a moodle database and inserts some sample
typing exercises. This is all done automaticaly through the intstallation,
but real lessons and exercises should be added by teachers afterwards.
- INSTALLATION
MooTyper is an activity module. You have to extract it to the 'mod' directory.
If the directory name is something like "moodle_mod_mootyper" you have to change
that to just "mootyper". So for example, the path should be like this:
Than go to Site Administration -> Notifications and click on the button to start
the install.
Right after an install or upgrade of the new MooTyper 3.8.2, you will then see
the settings page. You can now set the date display format for the grade views.
You can also set colors for grade views, the background of the new keyboard
layouts, and the color for keytops and text that are not home row keys. This allows you
to color coordinate MooTyper with your theme color scheme.
- USING MOOTYPER
Using MooTyper activity module is very simple. An instance can be added as a
new activity in a course like Lesson or Quiz. The simplest way to setup a
MooTyper, is select MooTyper from the list, Add an activity or resource.
Add the name you want to use for this activity. I recommend adding the
lesson name as part of the activity name. Add a description if you desire.
Then, add Availability times, if desired, then click, Save and display.
Yes, that's right! Don't bother with any other options as they will then be
available on the, Setup link.
Thanks to Mary Cooch from moodle.org we have this video, which shows how
to add exercises, create mootyper instance, and then view grades.
It's a little outdated (one of the first versions of mootyper), but I
guess everything still holds:
- ADDITIONAL KEYBOARD LAYOUTS
This MooTyper currently includes keyboard layouts to support many languages.
If you do not see one that need, please let the maintainer know.
Note: There are two special layouts, English(USV6) that includes both the normal
keys and the number keypad, and numberKeypadOnly(V1), which shows ONLY the
number keypad.
To implement any other layout you have to:
Create a php file with keyboard layout defined with HTML. Create a javascript
file (with the same name and .js extension) that implements the logic of the keyboard
layout. If you have any mistakes in your js file the module won't work, so in
this case try to validate your code with a tool like this...
http://www.javascriptlint.com/online_lint.php
- SAVING YOUR OWN OR MODIFIED LESSONS
In previous versions of MooTyper, if you created your own lessons there was
no built in way to export a copy for backup purposes or for safekeeping.
Once installed, there was no way to add additional lessons to MooTyper
unless you used the built in editing capability, which is not as convenient
as it would be to create lessons in a word processing program. If you wanted
to add lessons to MooTyper without using the built in editor, you had to do
a completely new installation of MooTyper which meant you would lose all
student progress and grades.
As of version 3.1.0, MooTyper now supports Import and Export of MooTyper Lessons
via links in the Administration block, which overcomes these limitations.
- NEW IN THIS RELEASE
There is now a new key top text color setting. This will allow you to now
have a layout with dark colored keys, with white text, or some other light
colored text.
There is now a new time limit setting that can be used for any Mode.
There is now a new required WPM rate setting that can be used for any Mode.
Information labels on the pages for view.php, gview.php, and owngrades.php
now include the new time limit, Required precision, and the new Required WPM.
You can now set a typing time limit from 0:00 (not used) to 10:00 minutes.
However, you will need to make sure each exercise is long enough, character
count wise, so that your fastest typer will NOT run out of something to type.
You can now set a required Word Per Minute rate. Failure to achieve the
posted rate, is treated just the same as failing to achieve the required
precision.
You can mix and match the time limit, precision, and wpm.
A zero timelimit lets the student type all the way to the end of the exercise,
just as it always has. If a time limit is set, the exercise is halted when
time expires.
A zero required precision means the grade will NOT be shown with a red
background no matter the precision achieved for the exercise. Any other
required precision is treated as before.
A zero required WPM rate means the grade will NOT be shown with a red
background no matter the WPM rate achieved for the exercise. Any other
required precision like the required precision rate. Red grade background
for not exceeding the required WPM. Green if it is exceeded.
If using both a required precision and required WPM, they must both be
exceeded to get a green "passed" background. If one is exceeded and one
is not, the grade background will be red.
- OTHER IMPORTANT CAPABILITIES
There are four settings that affect the typing modes.
1.The original mode - This mode requires you to type the correct letter before
you can move to the next letter. Extra spaces are ignored. Mistyped letters
are counted as mistakes.
2. Count mistyped spaces - Same as the original mode, but counts mistyped spaces
as well as mistyped letters.
3. Continuous typing - In this mode you do not have to type the correct letter
before moving to the next letter. All mistyped letters and space are counted
as mistakes.
4. Count all keystrokes - If you mistype the same key multiple times, you have the
option of counting it as one mistake, or counting all of them.
If a user clicks, View my grades, depending on the Moodle version, they will now
see a horizontal bar chart beneath their grade table that charts Hits per minute,
Precision, and WPM results. If a non-editing teacher, teacher, manager, or admin,
clicks on, 'View all grades, depending on the Moodle version, they will see the
normal grade table as well as horizontal bar charts showing Hits per minute,
Precision, and WPM for each exercise for each student.
For more info please visit the plugins wiki on github:
https://github.com/drachels/moodle-mod_mootyper/wiki
3.8.1 (Build: 2019120800) (2019120800)
3.8.1 (Build: 2019120800)
Plugin type: Activities
Frankenstyle component name: mod_mootyper
Version build number: 2019120800
Version release name: 3.8.1 (Build: 2019120800)
Maturity: Stable
Supported Moodle versions: 2.7, 2.8, 2.9, 3.0, 3.1, 3.2, 3.3, 3.4, 3.5, 3.6, 3.7, 3.8
Repository URL (Git): https://github.com/drachels/moodle-mod_mootyper
Repository branch:
Repository tag:
Issue/bug tracker URL: https://github.com/drachels/moodle-mod_mootyper/issues
Moodle Mootyper module
- Moodle tracker component: https://github.com/drachels/moodle-mod_mootyper/issues
- Documentation: https://github.com/drachels/moodle-mod_mootyper/wiki
- Source Code: https://github.com/drachels/moodle-mod_mootyper
- License: http://www.gnu.org/licenses/gpl.txt
Install from git
- Navigate to Moodle root folder
- git clone git://github.com/drachels/moodle-mod_mootyper.git mod/mootyper
- cd mootyper
- git checkout MOODLE_XY_STABLE (where XY is the moodle version, e.g: MOODLE_30_STABLE, MOODLE_28_STABLE...)
- Click the 'Notifications' link on the frontpage administration block or php admin/cli/upgrade.php if you have access to a command line interpreter.
Install from a compressed file
- Extract the compressed file data
- Rename the main folder to mootyper
- Copy to the Moodle mod/ folder
- Click the 'Notifications' link on the frontpage administration block or php admin/cli/upgrade.php if you have access to a command line interpreter.
This is the README file for the MooTyper project. MooTyper is
a moodle extension, that adds the 'typing instructor' functionallity to Moodle.
The plugin url is: https://moodle.org/plugins/view.php?plugin=mod_mootyper
MooTyper is free software, the same as Moodle.
- REQUIREMENTS
The MooTyper module uses javascript which is not welcome in Moodle but it is a
requirement for the use of the module. The typing procedure cannot be done without
the client side logic.
It creates some new tables in a moodle database and inserts some sample
typing exercises. This is all done automaticaly through the intstallation,
but real lessons and exercises should be added by teachers afterwards.
- INSTALLATION
MooTyper is an activity module. You have to extract it to the 'mod' directory.
If the directory name is something like "moodle_mod_mootyper" you have to change
that to just "mootyper". So for example, the path should be like this:
Than go to Site Administration -> Notifications and click on the button to start
the install.
Right after an install or upgrade of the new MooTyper 3.6.1, you will then see
the settings page. You can now set the date display format for the grade views.
You can also set colors for grade views, the background of the new keyboard
layouts, and the color for keytops that are not home row keys. This allows you
to color coordinate MooTyper with your theme color scheme.
- USING MOOTYPER
Using MooTyper activity module is very simple. An instance can be added as a
new activity in a course like Lesson or Quiz. The simplest way to setup a
MooTyper, is select MooTyper from the list, Add an activity or resource.
Add the name you want to use for this activity. I recommend adding the
lesson name as part of the activity name. Add a description if you desire.
Then, add Availability times, if desired, then click, Save and display.
Yes, that's right! Don't bother with any other options as they will then be
available on the, Setup link.
Thanks to Mary Cooch from moodle.org we have this video, which shows how
to add exercises, create mootyper instance, and then view grades.
It's a little outdated (one of the first versions of mootyper), but I
guess everything still holds:
- ADDITIONAL KEYBOARD LAYOUTS
This MooTyper currently includes keyboard layouts to support many languages.
If you do not see one that need, please let the maintainer know.
Note: There are two special layouts, English(USV6) that includes both the normal
keys and the number keypad, and numberKeypadOnly(V1), which shows ONLY the
number keypad.
To implement any other layout you have to:
Create a php file with keyboard layout defined with HTML. Create a javascript
file (with the same name and .js extension) that implements the logic of the keyboard
layout. If you have any mistakes in your js file the module won't work, so in
this case try to validate your code with a tool like this...
http://www.javascriptlint.com/online_lint.php
- SAVING YOUR OWN OR MODIFIED LESSONS
In previous versions of MooTyper, if you created your own lessons there was
no built in way to export a copy for backup purposes or for safekeeping.
Once installed, there was no way to add additional lessons to MooTyper
unless you used the built in editing capability, which is not as convenient
as it would be to create lessons in a word processing program. If you wanted
to add lessons to MooTyper without using the built in editor, you had to do
a completely new installation of MooTyper which meant you would lose all
student progress and grades.
As of version 3.1.0, MooTyper now supports Import and Export of MooTyper Lessons
via links in the Administration block, which overcomes these limitations.
- NEW IN THIS RELEASE
Implemented, a some new logging events, code cleanup, and a new German(V5)-icons layout.
- OTHER RECENT NEW CAPABILITIES
There are now four settings that affect the typing modes.
1.The original mode - This mode requires you to type the correct letter before
you can move to the next letter. Extra spaces are ignored. Mistyped letters
are counted as mistakes.
2. Count mistyped spaces - Same as the original mode, but counts mistyped spaces
as well as mistyped letters.
3. Continuous typing - In this mode you do not have to type the correct letter
before moving to the next letter. All mistyped letters and space are counted
as mistakes.
4. Count all keystrokes - If you mistype the same key multiple times, you have the
option of counting it as one mistake, or counting all of them.
If a user clicks, View my grades, depending on the Moodle version, they will now
see a horizontal bar chart beneath their grade table that charts Hits per minute,
Precision, and WPM results. If a non-editing teacher, teacher, manager, or admin,
clicks on, 'View all grades, depending on the Moodle version, they will see the
normal grade table as well as horizontal bar charts showing Hits per minute,
Precision, and WPM for each exercise for each student.
For more info please visit the plugins wiki on github:
https://github.com/drachels/moodle-mod_mootyper/wiki
3.8.0 (Build: 2019111700) (2019111700)
3.8.0 (Build: 2019111700)
Plugin type: Activities
Frankenstyle component name: mod_mootyper
Version build number: 2019111700
Version release name: 3.8.0 (Build: 2019111700)
Maturity: Stable
Supported Moodle versions: 2.7, 2.8, 2.9, 3.0, 3.1, 3.2, 3.3, 3.4, 3.5, 3.6, 3.7, 3.8
Repository URL (Git): https://github.com/drachels/moodle-mod_mootyper
Repository branch:
Repository tag:
Issue/bug tracker URL: https://github.com/drachels/moodle-mod_mootyper/issues
Moodle Mootyper module
- Moodle tracker component: https://github.com/drachels/moodle-mod_mootyper/issues
- Documentation: https://github.com/drachels/moodle-mod_mootyper/wiki
- Source Code: https://github.com/drachels/moodle-mod_mootyper
- License: http://www.gnu.org/licenses/gpl.txt
Install from git
- Navigate to Moodle root folder
- git clone git://github.com/drachels/moodle-mod_mootyper.git mod/mootyper
- cd mootyper
- git checkout MOODLE_XY_STABLE (where XY is the moodle version, e.g: MOODLE_30_STABLE, MOODLE_28_STABLE...)
- Click the 'Notifications' link on the frontpage administration block or php admin/cli/upgrade.php if you have access to a command line interpreter.
Install from a compressed file
- Extract the compressed file data
- Rename the main folder to mootyper
- Copy to the Moodle mod/ folder
- Click the 'Notifications' link on the frontpage administration block or php admin/cli/upgrade.php if you have access to a command line interpreter.
This is the README file for the MooTyper project. MooTyper is
a moodle extension, that adds the 'typing instructor' functionallity to Moodle.
The plugin url is: https://moodle.org/plugins/view.php?plugin=mod_mootyper
MooTyper is free software, the same as Moodle.
- REQUIREMENTS
The MooTyper module uses javascript which is not welcome in Moodle but it is a
requirement for the use of the module. The typing procedure cannot be done without
the client side logic.
It creates some new tables in a moodle database and inserts some sample
typing exercises. This is all done automaticaly through the intstallation,
but real lessons and exercises should be added by teachers afterwards.
- INSTALLATION
MooTyper is an activity module. You have to extract it to the 'mod' directory.
If the directory name is something like "moodle_mod_mootyper" you have to change
that to just "mootyper". So for example, the path should be like this:
Than go to Site Administration -> Notifications and click on the button to start
the install.
Right after an install or upgrade of the new MooTyper 3.6.1, you will then see
the settings page. You can now set the date display format for the grade views.
You can also set colors for grade views, the background of the new keyboard
layouts, and the color for keytops that are not home row keys. This allows you
to color coordinate MooTyper with your theme color scheme.
- USING MOOTYPER
Using MooTyper activity module is very simple. An instance can be added as a
new activity in a course like Lesson or Quiz. The simplest way to setup a
MooTyper, is select MooTyper from the list, Add an activity or resource.
Add the name you want to use for this activity. I recommend adding the
lesson name as part of the activity name. Add a description if you desire.
Then, add Availability times, if desired, then click, Save and display.
Yes, that's right! Don't bother with any other options as they will then be
available on the, Setup link.
Thanks to Mary Cooch from moodle.org we have this video, which shows how
to add exercises, create mootyper instance, and then view grades.
It's a little outdated (one of the first versions of mootyper), but I
guess everything still holds:
- ADDITIONAL KEYBOARD LAYOUTS
This MooTyper currently includes keyboard layouts to support many languages.
If you do not see one that need, please let the maintainer know.
Note: There are two special layouts, English(USV6) that includes both the normal
keys and the number keypad, and numberKeypadOnly(V1), which shows ONLY the
number keypad.
To implement any other layout you have to:
Create a php file with keyboard layout defined with HTML. Create a javascript
file (with the same name and .js extension) that implements the logic of the keyboard
layout. If you have any mistakes in your js file the module won't work, so in
this case try to validate your code with a tool like this...
http://www.javascriptlint.com/online_lint.php
- SAVING YOUR OWN OR MODIFIED LESSONS
In previous versions of MooTyper, if you created your own lessons there was
no built in way to export a copy for backup purposes or for safekeeping.
Once installed, there was no way to add additional lessons to MooTyper
unless you used the built in editing capability, which is not as convenient
as it would be to create lessons in a word processing program. If you wanted
to add lessons to MooTyper without using the built in editor, you had to do
a completely new installation of MooTyper which meant you would lose all
student progress and grades.
As of version 3.1.0, MooTyper now supports Import and Export of MooTyper Lessons
via links in the Administration block, which overcomes these limitations.
NEW IN THIS RELEASE
Lots of "under-the-hood" code changes and additions, some new log events, and a couple of, Cancel, buttons, where needed.
OTHER RECENT NEW CAPABILITIES
There are now four settings that affect the typing modes.
1.The original mode - This mode requires you to type the correct letter before
you can move to the next letter. Extra spaces are ignored. Mistyped letters
are counted as mistakes.
2. Count mistyped spaces - Same as the original mode, but counts mistyped spaces
as well as mistyped letters.
3. Continuous typing - In this mode you do not have to type the correct letter
before moving to the next letter. All mistyped letters and space are counted
as mistakes.
4. Count all keystrokes - If you mistype the same key multiple times, you have the
option of counting it as one mistake, or counting all of them.
If a user clicks, View my grades, depending on the Moodle version, they will now
see a horizontal bar chart beneath their grade table that charts Hits per minute,
Precision, and WPM results. If a non-editing teacher, teacher, manager, or admin,
clicks on, 'View all grades, depending on the Moodle version, they will see the
normal grade table as well as horizontal bar charts showing Hits per minute,
Precision, and WPM for each exercise for each student.
For more info please visit the plugins wiki on github:
https://github.com/drachels/moodle-mod_mootyper/wiki
3.7.0 (Build: 2019102100) (2019102100)
3.7.0 (Build: 2019102100)
Plugin type: Activities
Frankenstyle component name: mod_mootyper
Version build number: 2019102100
Version release name: 3.7.0 (Build: 2019102100)
Maturity: Stable
Supported Moodle versions: 2.7, 2.8, 2.9, 3.0, 3.1, 3.2, 3.3, 3.4, 3.5, 3.6, 3.7
Repository URL (Git): https://github.com/drachels/moodle-mod_mootyper
Repository branch:
Repository tag:
Issue/bug tracker URL: https://github.com/drachels/moodle-mod_mootyper/issues
Moodle Mootyper module
- Moodle tracker component: https://github.com/drachels/moodle-mod_mootyper/issues
- Documentation: https://github.com/drachels/moodle-mod_mootyper/wiki
- Source Code: https://github.com/drachels/moodle-mod_mootyper
- License: http://www.gnu.org/licenses/gpl.txt
Install from git
- Navigate to Moodle root folder
- git clone git://github.com/drachels/moodle-mod_mootyper.git mod/mootyper
- cd mootyper
- git checkout MOODLE_XY_STABLE (where XY is the moodle version, e.g: MOODLE_30_STABLE, MOODLE_28_STABLE...)
- Click the 'Notifications' link on the frontpage administration block or php admin/cli/upgrade.php if you have access to a command line interpreter.
Install from a compressed file
- Extract the compressed file data
- Rename the main folder to mootyper
- Copy to the Moodle mod/ folder
- Click the 'Notifications' link on the frontpage administration block or php admin/cli/upgrade.php if you have access to a command line interpreter.
This is the README file for the MooTyper project. MooTyper is
a moodle extension, that adds the 'typing instructor' functionallity to Moodle.
The plugin url is: https://moodle.org/plugins/view.php?plugin=mod_mootyper
MooTyper is free software, the same as Moodle.
- REQUIREMENTS
The MooTyper module uses javascript which is not welcome in Moodle but it is a
requirement for the use of the module. The typing procedure cannot be done without
the client side logic.
It creates some new tables in a moodle database and inserts some sample
typing exercises. This is all done automaticaly through the intstallation,
but real lessons and exercises should be added by teachers afterwards.
- INSTALLATION
MooTyper is an activity module. You have to extract it to the 'mod' directory.
If the directory name is something like "moodle_mod_mootyper" you have to change
that to just "mootyper". So for example, the path should be like this:
Than go to Site Administration -> Notifications and click on the button to start
the install.
Right after an install or upgrade of the new MooTyper 3.6.1, you will then see
the settings page. You can now set the date display format for the grade views.
You can also set colors for grade views, the background of the new keyboard
layouts, and the color for keytops that are not home row keys. This allows you
to color coordinate MooTyper with your theme color scheme.
- USING MOOTYPER
Using MooTyper activity module is very simple. An instance can be added as a
new activity in a course like Lesson or Quiz. The simplest way to setup a
MooTyper, is select MooTyper from the list, Add an activity or resource.
Add the name you want to use for this activity. I recommend adding the
lesson name as part of the activity name. Add a description if you desire.
Then, add Availability times, if desired, then click, Save and display.
Yes, that's right! Don't bother with any other options as they will then be
available on the, Setup link.
Thanks to Mary Cooch from moodle.org we have this video, which shows how
to add exercises, create mootyper instance, and then view grades.
It's a little outdated (one of the first versions of mootyper), but I
guess everything still holds:
- ADDITIONAL KEYBOARD LAYOUTS
This MooTyper currently includes keyboard layouts to support many languages.
If you do not see one that need, please let the maintainer know.
Note: There are two special layouts, English(USV6) that includes both the normal
keys and the number keypad, and numberKeypadOnly(V1), which shows ONLY the
number keypad.
To implement any other layout you have to:
Create a php file with keyboard layout defined with HTML. Create a javascript
file (with the same name and .js extension) that implements the logic of the keyboard
layout. If you have any mistakes in your js file the module won't work, so in
this case try to validate your code with a tool like this...
http://www.javascriptlint.com/online_lint.php
- SAVING YOUR OWN OR MODIFIED LESSONS
In previous versions of MooTyper, if you created your own lessons there was
no built in way to export a copy for backup purposes or for safekeeping.
Once installed, there was no way to add additional lessons to MooTyper
unless you used the built in editing capability, which is not as convenient
as it would be to create lessons in a word processing program. If you wanted
to add lessons to MooTyper without using the built in editor, you had to do
a completely new installation of MooTyper which meant you would lose all
student progress and grades.
As of version 3.1.0, MooTyper now supports Import and Export of MooTyper Lessons
via links in the Administration block, which overcomes these limitations.
- NEW IN THIS RELEASE
Implemented, a few more keyboard layouts.
- OTHER RECENT NEW CAPABILITIES
There are now four settings that affect the typing modes.
1.The original mode - This mode requires you to type the correct letter before
you can move to the next letter. Extra spaces are ignored. Mistyped letters
are counted as mistakes.
2. Count mistyped spaces - Same as the original mode, but counts mistyped spaces
as well as mistyped letters.
3. Continuous typing - In this mode you do not have to type the correct letter
before moving to the next letter. All mistyped letters and space are counted
as mistakes.
4. Count all keystrokes - If you mistype the same key multiple times, you have the
option of counting it as one mistake, or counting all of them.
If a user clicks, View my grades, depending on the Moodle version, they will now
see a horizontal bar chart beneath their grade table that charts Hits per minute,
Precision, and WPM results. If a non-editing teacher, teacher, manager, or admin,
clicks on, 'View all grades, depending on the Moodle version, they will see the
normal grade table as well as horizontal bar charts showing Hits per minute,
Precision, and WPM for each exercise for each student.
For more info please visit the plugins wiki on github:
https://github.com/drachels/moodle-mod_mootyper/wiki
3.6.1 (Build: 2019051800) (2019051800)
3.6.1 (Build: 2019051800)
Plugin type: Activities
Frankenstyle component name: mod_mootyper
Version build number: 2019051800
Version release name: 3.6.1 (Build: 2019051800)
Maturity: Stable
Supported Moodle versions: 2.7, 2.8, 2.9, 3.0, 3.1, 3.2, 3.3, 3.4, 3.5, 3.6, 3.7
Repository URL (Git): https://github.com/drachels/moodle-mod_mootyper
Repository branch:
Repository tag:
Issue/bug tracker URL: https://github.com/drachels/moodle-mod_mootyper/issues
Moodle Mootyper module
- Moodle tracker component: https://github.com/drachels/moodle-mod_mootyper/issues
- Documentation: https://github.com/drachels/moodle-mod_mootyper/wiki
- Source Code: https://github.com/drachels/moodle-mod_mootyper
- License: http://www.gnu.org/licenses/gpl.txt
Install from git
- Navigate to Moodle root folder
- git clone git://github.com/drachels/moodle-mod_mootyper.git mod/mootyper
- cd mootyper
- git checkout MOODLE_XY_STABLE (where XY is the moodle version, e.g: MOODLE_30_STABLE, MOODLE_28_STABLE...)
- Click the 'Notifications' link on the frontpage administration block or php admin/cli/upgrade.php if you have access to a command line interpreter.
Install from a compressed file
- Extract the compressed file data
- Rename the main folder to mootyper
- Copy to the Moodle mod/ folder
- Click the 'Notifications' link on the frontpage administration block or php admin/cli/upgrade.php if you have access to a command line interpreter.
This is the README file for the MooTyper project. MooTyper is
a moodle extension, that adds the 'typing instructor' functionallity to Moodle.
The plugin url is: https://moodle.org/plugins/view.php?plugin=mod_mootyper
MooTyper is free software, the same as Moodle.
- REQUIREMENTS
The MooTyper module uses javascript which is not welcome in Moodle but it is a
requirement for the use of the module. The typing procedure cannot be done without
the client side logic.
It creates some new tables in a moodle database and inserts some sample
typing exercises. This is all done automaticaly through the intstallation,
but real lessons and exercises should be added by teachers afterwards.
- INSTALLATION
MooTyper is an activity module. You have to extract it to the 'mod' directory.
If the directory name is something like "moodle_mod_mootyper" you have to change
that to just "mootyper". So for example, the path should be like this:
Than go to Site Administration -> Notifications and click on the button to start
the install.
Right after an install or upgrade of the new MooTyper 3.6.1, you will then see
the settings page. You can now set the date display format for the grade views.
You can also set colors for grade views, the background of the new keyboard
layouts, and the color for keytops that are not home row keys. This allows you
to color coordinate MooTyper with your theme color scheme.
- USING MOOTYPER
Using MooTyper activity module is very simple. An instance can be added as a
new activity in a course like Lesson or Quiz. Thanks to Mary Cooch from moodle.org
we have this video, which shows how to add exercises, create mootyper instance,
and then view grades. It's a little outdated (one of the first versions of
mootyper), but I guess everything still holds:
- ADDITIONAL KEYBOARD LAYOUTS
This MooTyper currently includes support for many different language keyboard layouts, that are compatible with both the Boost
theme, as well as the new, Classic.
To implement any other layout you have to:
Create a php file with keyboard layout defined with HTML. Create a javascript
file (with the same name and .js extension) that implements the logic of the keyboard
layout. If you have any mistakes in your js file the module won't work, so in
this case try to validate your code with a tool like this...
http://www.javascriptlint.com/online_lint.php
- SAVING YOUR OWN OR MODIFIED LESSONS
In previous versions of MooTyper, if you created your own lessons there was
no built in way to export a copy for backup purposes or for safekeeping.
Once installed, there was no way to add additional lessons to MooTyper
unless you used the built in editing capability, which is not as convenient
as it would be to create lessons in a word processing program. If you wanted
to add lessons to MooTyper without using the built in editor, you had to do
a completely new installation of MooTyper which meant you would lose all
student progress and grades.
As of version 3.1.0, MooTyper now supports Import and Export of MooTyper Lessons
via links in the Administration block, which overcomes these limitations.
NOTE: Since the text to type is in a scrolling window, you can create any length exercise that you want to. And, just as in word processing, use the enter key ONLY to start new paragraphs.
- NEW IN THIS RELEASE
Completed a lot of code cleanup.
Added a few more keyboard layouts.
Most notable are two that include a number keypad for number entry training:
EnglishWKeypad(USV6) and numberKeypadOnly.
- OTHER RECENT NEW CAPABILITIES
There are now four settings that affect the typing modes.
1.The original mode - This mode requires you to type the correct letter before
you can move to the next letter. Extra spaces are ignored. Mistyped letters
are counted as mistakes.
2. Count mistyped spaces - Same as the original mode, but counts mistyped spaces
as well as mistyped letters.
3. Continuous typing - In this mode you do not have to type the correct letter
before moving to the next letter. All mistyped letters and space are counted
as mistakes.
4. Count all keystrokes - If you mistype the same key multiple times, you have the
option of counting it as one mistake, or counting all of them.
If a user clicks, View my grades, depending on the Moodle version, they will now
see a horizontal bar chart beneath their grade table that charts Hits per minute,
Precision, and WPM results. If a non-editing teacher, teacher, manager, or admin,
clicks on, 'View all grades, depending on the Moodle version, they will see the
normal grade table as well as horizontal bar charts showing Hits per minute,
Precision, and WPM for each exercise for each student.
For more info please visit the plugins wiki on github:
https://github.com/drachels/moodle-mod_mootyper/wiki
3.6.0+ (Build: 2019041200) (2019032801)
3.6.0+ (Build: 2019041200)
Plugin type: Activities
Frankenstyle component name: mod_mootyper
Version build number: 2019032801
Version release name: 3.6.0+ (Build: 2019041200)
Maturity: Stable
Supported Moodle versions: 2.7, 2.8, 2.9, 3.0, 3.1, 3.2, 3.3, 3.4, 3.5, 3.6
Repository URL (Git): https://github.com/drachels/moodle-mod_mootyper
Repository branch:
Repository tag:
Issue/bug tracker URL: https://github.com/drachels/moodle-mod_mootyper/issues
Moodle Mootyper module
- Moodle tracker component: https://github.com/drachels/moodle-mod_mootyper/issues
- Documentation: https://github.com/drachels/moodle-mod_mootyper/wiki
- Source Code: https://github.com/drachels/moodle-mod_mootyper
- License: http://www.gnu.org/licenses/gpl.txt
Install from git
- Navigate to Moodle root folder
- git clone git://github.com/drachels/moodle-mod_mootyper.git mod/mootyper
- cd mootyper
- git checkout MOODLE_XY_STABLE (where XY is the moodle version, e.g: MOODLE_30_STABLE, MOODLE_28_STABLE...)
- Click the 'Notifications' link on the frontpage administration block or php admin/cli/upgrade.php if you have access to a command line interpreter.
Install from a compressed file
- Extract the compressed file data
- Rename the main folder to mootyper
- Copy to the Moodle mod/ folder
- Click the 'Notifications' link on the frontpage administration block or php admin/cli/upgrade.php if you have access to a command line interpreter.
This is the README file for the MooTyper project. MooTyper is
a moodle extension, that adds the 'typing instructor' functionallity to Moodle.
The plugin url is: https://moodle.org/plugins/view.php?plugin=mod_mootyper
MooTyper is free software, the same as Moodle.
- REQUIREMENTS
The MooTyper module uses javascript which is not welcome in Moodle but it is a
requirement for the use of the module. The typing procedure cannot be done without
the client side logic.
It creates some new tables in a moodle database and inserts some sample
typing exercises. This is all done automaticaly through the intstallation,
but real lessons and exercises should be added by teachers afterwards.
- INSTALLATION
MooTyper is an activity module. You have to extract it to the 'mod' directory.
If the directory name is something like "moodle_mod_mootyper" you have to change
that to just "mootyper". So for example, the path should be like this:
Than go to Site Administration -> Notifications and click on the button to start
the install.
Right after an install or upgrade of the new MooTyper 3.4.1, you will then see
the settings page. You can now set the date display format for the grade views.
You can also set colors for grade views, the background of the new keyboard
layouts, and the color for keytops that are not home row keys. This allows you
to color coordinate MooTyper with your theme color scheme.
- USING MOOTYPER
Using MooTyper activity module is very simple. An instance can be added as a
new activity in a course like Lesson or Quiz. Thanks to Mary Cooch from moodle.org
we have this video, which shows how to add exercises, create mootyper instance,
and then view grades. It's a little outdated (one of the first versions of
mootyper), but I guess everything still holds:
- ADDITIONAL KEYBOARD LAYOUTS
This MooTyper currently includes support for Belgium(Dutch), Czech, Danish,
Dvorak, English(UK), English(US), Estonian, French, German(Swiss), German,
Hebrew, Italian, Norwegian, Japanese, Portuguese(Brazil), Portugues(Portugal),
Russian, Serbian, Slovenian, Spanish, Swediah, Thai, Turkish, Ukrainian,
and Vietnamese keyboard layouts, that are compatible with both the new Boost
theme, as well as, Clean.
To implement any other layout you have to:
Create a php file with keyboard layout defined with HTML. Create a javascript
file (with the same name and .js extension) that implements the logic of the keyboard
layout. If you have any mistakes in your js file the module won't work, so in
this case try to validate your code with a tool like this...
http://www.javascriptlint.com/online_lint.php
- SAVING YOUR OWN OR MODIFIED LESSONS
In previous versions of MooTyper, if you created your own lessons there was
no built in way to export a copy for backup purposes or for safekeeping.
Once installed, there was no way to add additional lessons to MooTyper
unless you used the built in editing capability, which is not as convenient
as it would be to create lessons in a word processing program. If you wanted
to add lessons to MooTyper without using the built in editor, you had to do
a completely new installation of MooTyper which meant you would lose all
student progress and grades.
As of version 3.1.0, MooTyper now supports Import and Export of MooTyper Lessons
via links in the Administration block, which overcomes these limitations.
- NEW IN THIS RELEASE
Implemented, Activity Completion for View and it is now
working in this version of MooTyper.
Added a few more keyboard layouts.
- OTHER RECENT NEW CAPABILITIES
There are now four settings that affect the typing modes.
1.The original mode - This mode requires you to type the correct letter before
you can move to the next letter. Extra spaces are ignored. Mistyped letters
are counted as mistakes.
2. Count mistyped spaces - Same as the original mode, but counts mistyped spaces
as well as mistyped letters.
3. Continuous typing - In this mode you do not have to type the correct letter
before moving to the next letter. All mistyped letters and space are counted
as mistakes.
4. Count all keystrokes - If you mistype the same key multiple times, you have the
option of counting it as one mistake, or counting all of them.
If a user clicks, View my grades, depending on the Moodle version, they will now
see a horizontal bar chart beneath their grade table that charts Hits per minute,
Precision, and WPM results. If a non-editing teacher, teacher, manager, or admin,
clicks on, 'View all grades, depending on the Moodle version, they will see the
normal grade table as well as horizontal bar charts showing Hits per minute,
Precision, and WPM for each exercise for each student.
For more info please visit the plugins wiki on github:
https://github.com/drachels/moodle-mod_mootyper/wiki
3.6.0 (Build: 2019032800) (2019032800)
3.6.0 (Build: 2019032800)
Plugin type: Activities
Frankenstyle component name: mod_mootyper
Version build number: 2019032800
Version release name: 3.6.0 (Build: 2019032800)
Maturity: Stable
Supported Moodle versions: 2.7, 2.8, 2.9, 3.0, 3.1, 3.2, 3.3, 3.4, 3.5, 3.6
Repository URL (Git): https://github.com/drachels/moodle-mod_mootyper
Repository branch:
Repository tag:
Issue/bug tracker URL: https://github.com/drachels/moodle-mod_mootyper/issues
Moodle Mootyper module
- Moodle tracker component: https://github.com/drachels/moodle-mod_mootyper/issues
- Documentation: https://github.com/drachels/moodle-mod_mootyper/wiki
- Source Code: https://github.com/drachels/moodle-mod_mootyper
- License: http://www.gnu.org/licenses/gpl.txt
Install from git
- Navigate to Moodle root folder
- git clone git://github.com/drachels/moodle-mod_mootyper.git mod/mootyper
- cd mootyper
- git checkout MOODLE_XY_STABLE (where XY is the moodle version, e.g: MOODLE_30_STABLE, MOODLE_28_STABLE...)
- Click the 'Notifications' link on the frontpage administration block or php admin/cli/upgrade.php if you have access to a command line interpreter.
Install from a compressed file
- Extract the compressed file data
- Rename the main folder to mootyper
- Copy to the Moodle mod/ folder
- Click the 'Notifications' link on the frontpage administration block or php admin/cli/upgrade.php if you have access to a command line interpreter.
This is the README file for the MooTyper project. MooTyper is
a moodle extension, that adds the 'typing instructor' functionallity to Moodle.
The plugin url is: https://moodle.org/plugins/view.php?plugin=mod_mootyper
MooTyper is free software, the same as Moodle.
- REQUIREMENTS
The MooTyper module uses javascript which is not welcome in Moodle but it is a
requirement for the use of the module. The typing procedure cannot be done without
the client side logic.
It creates some new tables in a moodle database and inserts some sample
typing exercises. This is all done automaticaly through the intstallation,
but real lessons and exercises should be added by teachers afterwards.
- INSTALLATION
MooTyper is an activity module. You have to extract it to the 'mod' directory.
If the directory name is something like "moodle_mod_mootyper" you have to change
that to just "mootyper". So for example, the path should be like this:
/mod/mootyper/view.php
Than go to Site Administration -> Notifications and click on the button to start
the install.
Right after an install or upgrade of the new MooTyper 3.4.1, you will then see
the settings page. You can now set the date display format for the grade views.
You can also set colors for grade views, the background of the new keyboard
layouts, and the color for keytops that are not home row keys. This allows you
to color coordinate MooTyper with your theme color scheme.
- USING MOOTYPER
Using MooTyper activity module is very simple. An instance can be added as a
new activity in a course like Lesson or Quiz. Thanks to Mary Cooch from moodle.org
we have this video, which shows how to add exercises, create mootyper instance,
and then view grades. It's a little outdated (one of the first versions of
mootyper), but I guess everything still holds:
- ADDITIONAL KEYBOARD LAYOUTS
This MooTyper currently includes support for Belgium(Dutch), Czech, Danish,
Dvorak, English(UK), English(US), Estonian, French, German(Swiss), German,
Hebrew, Italian, Norwegian, Japanese, Portuguese(Brazil), Portugues(Portugal),
Russian, Serbian, Slovenian, Spanish, Swediah, Thai, Turkish, Ukrainian,
and Vietnamese keyboard layouts, that are compatible with both the new Boost
theme, as well as, Clean.
To implement any other layout you have to:
Create a php file with keyboard layout defined with HTML. Create a javascript
file (with the same name and .js extension) that implements the logic of the keyboard
layout. If you have any mistakes in your js file the module won't work, so in
this case try to validate your code with a tool like this...
http://www.javascriptlint.com/online_lint.php
- SAVING YOUR OWN OR MODIFIED LESSONS
In previous versions of MooTyper, if you created your own lessons there was
no built in way to export a copy for backup purposes or for safekeeping.
Once installed, there was no way to add additional lessons to MooTyper
unless you used the built in editing capability, which is not as convenient
as it would be to create lessons in a word processing program. If you wanted
to add lessons to MooTyper without using the built in editor, you had to do
a completely new installation of MooTyper which meant you would lose all
student progress and grades.
As of version 3.1.0, MooTyper now supports Import and Export of MooTyper Lessons
via links in the Administration block, which overcomes these limitations.
- NEW IN THIS RELEASE
and it is now
working in this version of MooTyper.
Added a few more keyboard layouts.
- OTHER RECENT NEW CAPABILITIES
There are now four settings that affect the typing modes.
1.The original mode - This mode requires you to type the correct letter before
you can move to the next letter. Extra spaces are ignored. Mistyped letters
are counted as mistakes.
2. Count mistyped spaces - Same as the original mode, but counts mistyped spaces
as well as mistyped letters.
3. Continuous typing - In this mode you do not have to type the correct letter
before moving to the next letter. All mistyped letters and space are counted
as mistakes.
4. Count all keystrokes - If you mistype the same key multiple times, you have the
option of counting it as one mistake, or counting all of them.
5. Implemented, Activity Completion for View
If a user clicks, View my grades, depending on the Moodle version, they will now
see a horizontal bar chart beneath their grade table that charts Hits per minute,
Precision, and WPM results. If a non-editing teacher, teacher, manager, or admin,
clicks on, 'View all grades, depending on the Moodle version, they will see the
normal grade table as well as horizontal bar charts showing Hits per minute,
Precision, and WPM for each exercise for each student.
For more info please visit the plugins wiki on github:
https://github.com/drachels/moodle-mod_mootyper/wiki
3.5.4+ (Build: 2019021600) (2019021401)
3.5.4+ (Build: 2019021600)
Plugin type: Activities
Frankenstyle component name: mod_mootyper
Version build number: 2019021401
Version release name: 3.5.4+ (Build: 2019021600)
Maturity: Stable
Supported Moodle versions: 2.7, 2.8, 2.9, 3.0, 3.1, 3.2, 3.3, 3.4, 3.5, 3.6
Repository URL (Git): https://github.com/drachels/moodle-mod_mootyper
Repository branch:
Repository tag:
Issue/bug tracker URL: https://github.com/drachels/moodle-mod_mootyper/issues
Moodle Mootyper module
- Moodle tracker component: https://github.com/drachels/moodle-mod_mootyper/issues
- Documentation: https://github.com/drachels/moodle-mod_mootyper/wiki
- Source Code: https://github.com/drachels/moodle-mod_mootyper
- License: http://www.gnu.org/licenses/gpl.txt
Install from git
- Navigate to Moodle root folder
- git clone git://github.com/drachels/moodle-mod_mootyper.git mod/mootyper
- cd mootyper
- git checkout MOODLE_XY_STABLE (where XY is the moodle version, e.g: MOODLE_30_STABLE, MOODLE_28_STABLE...)
- Click the 'Notifications' link on the frontpage administration block or php admin/cli/upgrade.php if you have access to a command line interpreter.
Install from a compressed file
- Extract the compressed file data
- Rename the main folder to mootyper
- Copy to the Moodle mod/ folder
- Click the 'Notifications' link on the frontpage administration block or php admin/cli/upgrade.php if you have access to a command line interpreter.
This is the README file for the MooTyper project. MooTyper is
a moodle extension, that adds the 'typing instructor' functionallity to Moodle.
The plugin url is: https://moodle.org/plugins/view.php?plugin=mod_mootyper
MooTyper is free software, the same as Moodle.
- REQUIREMENTS
The MooTyper module uses javascript which is not welcome in Moodle but it is a
requirement for the use of the module. The typing procedure cannot be done without
the client side logic.
It creates some new tables in a moodle database and inserts some sample
typing exercises. This is all done automaticaly through the intstallation,
but real lessons and exercises should be added by teachers afterwards.
- INSTALLATION
MooTyper is an activity module. You have to extract it to the 'mod' directory.
If the directory name is something like "moodle_mod_mootyper" you have to change
that to just "mootyper". So for example, the path should be like this:
Than go to Site Administration -> Notifications and click on the button to start
the install.
Right after an install or upgrade of the new MooTyper 3.4.1, you will then see
the settings page. You can now set the date display format for the grade views.
You can also set colors for grade views, the background of the new keyboard
layouts, and the color for keytops that are not home row keys. This allows you
to color coordinate MooTyper with your theme color scheme.
- USING MOOTYPER
Using MooTyper activity module is very simple. An instance can be added as a
new activity in a course like Lesson or Quiz. Thanks to Mary Cooch from moodle.org
we have this video, which shows how to add exercises, create mootyper instance,
and then view grades. It's a little outdated (one of the first versions of
mootyper), but I guess everything still holds:
- ADDITIONAL KEYBOARD LAYOUTS
This MooTyper currently includes support for Belgium(Dutch), Czech, Danish,
Dvorak, English(UK), English(US), Estonian, French, German(Swiss), German,
Hebrew, Italian, Norwegian, Japanese, Portuguese(Brazil), Portugues(Portugal),
Russian, Serbian, Slovenian, Spanish, Swediah, Thai, Turkish, Ukrainian,
and Vietnamese keyboard layouts, that are compatible with both the new Boost
theme, as well as, Clean.
To implement any other layout you have to:
Create a php file with keyboard layout defined with HTML. Create a javascript
file (with the same name and .js extension) that implements the logic of the keyboard
layout. If you have any mistakes in your js file the module won't work, so in
this case try to validate your code with a tool like this...
http://www.javascriptlint.com/online_lint.php
- SAVING YOUR OWN OR MODIFIED LESSONS
In previous versions of MooTyper, if you created your own lessons there was
no built in way to export a copy for backup purposes or for safekeeping.
Once installed, there was no way to add additional lessons to MooTyper
unless you used the built in editing capability, which is not as convenient
as it would be to create lessons in a word processing program. If you wanted
to add lessons to MooTyper without using the built in editor, you had to do
a completely new installation of MooTyper which meant you would lose all
student progress and grades.
As of version 3.1.0, MooTyper now supports Import and Export of MooTyper Lessons
via links in the Administration block, which overcomes these limitations.
- NEW IN THIS RELEASE
Implemented, Activity Completion for View and it is now
working in this version of MooTyper.
Added a few more keyboard layouts.
- OTHER RECENT NEW CAPABILITIES
There are now four settings that affect the typing modes.
1.The original mode - This mode requires you to type the correct letter before
you can move to the next letter. Extra spaces are ignored. Mistyped letters
are counted as mistakes.
2. Count mistyped spaces - Same as the original mode, but counts mistyped spaces
as well as mistyped letters.
3. Continuous typing - In this mode you do not have to type the correct letter
before moving to the next letter. All mistyped letters and space are counted
as mistakes.
4. Count all keystrokes - If you mistype the same key multiple times, you have the
option of counting it as one mistake, or counting all of them.
If a user clicks, View my grades, depending on the Moodle version, they will now
see a horizontal bar chart beneath their grade table that charts Hits per minute,
Precision, and WPM results. If a non-editing teacher, teacher, manager, or admin,
clicks on, 'View all grades, depending on the Moodle version, they will see the
normal grade table as well as horizontal bar charts showing Hits per minute,
Precision, and WPM for each exercise for each student.
For more info please visit the plugins wiki on github:
https://github.com/drachels/moodle-mod_mootyper/wiki
3.5.4 (Build: 2019021400) (2019021400)
3.5.4 (Build: 2019021400)
Plugin type: Activities
Frankenstyle component name: mod_mootyper
Version build number: 2019021400
Version release name: 3.5.4 (Build: 2019021400)
Maturity: Stable
Supported Moodle versions: 2.7, 2.8, 2.9, 3.0, 3.1, 3.2, 3.3, 3.4, 3.5, 3.6
Repository URL (Git): https://github.com/drachels/moodle-mod_mootyper
Repository branch:
Repository tag:
Issue/bug tracker URL: https://github.com/drachels/moodle-mod_mootyper/issues
Moodle Mootyper module
- Moodle tracker component: https://github.com/drachels/moodle-mod_mootyper/issues
- Documentation: https://github.com/drachels/moodle-mod_mootyper/wiki
- Source Code: https://github.com/drachels/moodle-mod_mootyper
- License: http://www.gnu.org/licenses/gpl.txt
Install from git
- Navigate to Moodle root folder
- git clone git://github.com/drachels/moodle-mod_mootyper.git mod/mootyper
- cd mootyper
- git checkout MOODLE_XY_STABLE (where XY is the moodle version, e.g: MOODLE_30_STABLE, MOODLE_28_STABLE...)
- Click the 'Notifications' link on the frontpage administration block or php admin/cli/upgrade.php if you have access to a command line interpreter.
Install from a compressed file
- Extract the compressed file data
- Rename the main folder to mootyper
- Copy to the Moodle mod/ folder
- Click the 'Notifications' link on the frontpage administration block or php admin/cli/upgrade.php if you have access to a command line interpreter.
This is the README file for the MooTyper project. MooTyper is
a moodle extension, that adds the 'typing instructor' functionallity to Moodle.
The plugin url is: https://moodle.org/plugins/view.php?plugin=mod_mootyper
MooTyper is free software, the same as Moodle.
- REQUIREMENTS
The MooTyper module uses javascript which is not welcome in Moodle but it is a
requirement for the use of the module. The typing procedure cannot be done without
the client side logic.
It creates some new tables in a moodle database and inserts some sample
typing exercises. This is all done automaticaly through the intstallation,
but real lessons and exercises should be added by teachers afterwards.
- INSTALLATION
MooTyper is an activity module. You have to extract it to the 'mod' directory.
If the directory name is something like "moodle_mod_mootyper" you have to change
that to just "mootyper". So for example, the path should be like this:
Than go to Site Administration -> Notifications and click on the button to start
the install.
Right after an install or upgrade of the new MooTyper 3.4.1, you will then see
the settings page. You can now set the date display format for the grade views.
You can also set colors for grade views, the background of the new keyboard
layouts, and the color for keytops that are not home row keys. This allows you
to color coordinate MooTyper with your theme color scheme.
- USING MOOTYPER
Using MooTyper activity module is very simple. An instance can be added as a
new activity in a course like Lesson or Quiz. Thanks to Mary Cooch from moodle.org
we have this video, which shows how to add exercises, create mootyper instance,
and then view grades. It's a little outdated (one of the first versions of
mootyper), but I guess everything still holds:
- ADDITIONAL KEYBOARD LAYOUTS
This MooTyper currently includes support for Belgium(Dutch), Czech, Danish,
Dvorak, English(UK), English(US), Estonian, French, German(Swiss), German,
Hebrew, Italian, Norwegian, Japanese, Portuguese(Brazil), Portugues(Portugal),
Russian, Serbian, Slovenian, Spanish, Swediah, Thai, Turkish, Ukrainian,
and Vietnamese keyboard layouts, that are compatible with both the new Boost
theme, as well as, Clean.
To implement any other layout you have to:
Create a php file with keyboard layout defined with HTML. Create a javascript
file (with the same name and .js extension) that implements the logic of the keyboard
layout. If you have any mistakes in your js file the module won't work, so in
this case try to validate your code with a tool like this...
http://www.javascriptlint.com/online_lint.php
- SAVING YOUR OWN OR MODIFIED LESSONS
In previous versions of MooTyper, if you created your own lessons there was
no built in way to export a copy for backup purposes or for safekeeping.
Once installed, there was no way to add additional lessons to MooTyper
unless you used the built in editing capability, which is not as convenient
as it would be to create lessons in a word processing program. If you wanted
to add lessons to MooTyper without using the built in editor, you had to do
a completely new installation of MooTyper which meant you would lose all
student progress and grades.
As of version 3.1.0, MooTyper now supports Import and Export of MooTyper Lessons
via links in the Administration block, which overcomes these limitations.
- NEW IN THIS RELEASE
Implemented, Activity Completion for View and it is now
working in this version of MooTyper.
Added a few more keyboard layouts.
- OTHER RECENT NEW CAPABILITIES
There are now four settings that affect the typing modes.
1.The original mode - This mode requires you to type the correct letter before
you can move to the next letter. Extra spaces are ignored. Mistyped letters
are counted as mistakes.
2. Count mistyped spaces - Same as the original mode, but counts mistyped spaces
as well as mistyped letters.
3. Continuous typing - In this mode you do not have to type the correct letter
before moving to the next letter. All mistyped letters and space are counted
as mistakes.
4. Count all keystrokes - If you mistype the same key multiple times, you have the
option of counting it as one mistake, or counting all of them.
If a user clicks, View my grades, depending on the Moodle version, they will now
see a horizontal bar chart beneath their grade table that charts Hits per minute,
Precision, and WPM results. If a non-editing teacher, teacher, manager, or admin,
clicks on, 'View all grades, depending on the Moodle version, they will see the
normal grade table as well as horizontal bar charts showing Hits per minute,
Precision, and WPM for each exercise for each student.
For more info please visit the plugins wiki on github:
https://github.com/drachels/moodle-mod_mootyper/wiki
3.5.3 (Build: 2018113000) (2018113000)
3.5.3 (Build: 2018113000)
Plugin type: Activities
Frankenstyle component name: mod_mootyper
Version build number: 2018113000
Version release name: 3.5.3 (Build: 2018113000)
Maturity: Stable
Supported Moodle versions: 2.7, 2.8, 2.9, 3.0, 3.1, 3.2, 3.3, 3.4, 3.5, 3.6
Repository URL (Git): https://github.com/drachels/moodle-mod_mootyper
Repository branch:
Repository tag:
Issue/bug tracker URL: https://github.com/drachels/moodle-mod_mootyper/issues
Moodle Mootyper module
- Moodle tracker component: https://github.com/drachels/moodle-mod_mootyper/issues
- Documentation: https://github.com/drachels/moodle-mod_mootyper/wiki
- Source Code: https://github.com/drachels/moodle-mod_mootyper
- License: http://www.gnu.org/licenses/gpl.txt
Install from git
- Navigate to Moodle root folder
- git clone git://github.com/drachels/moodle-mod_mootyper.git mod/mootyper
- cd mootyper
- git checkout MOODLE_XY_STABLE (where XY is the moodle version, e.g: MOODLE_30_STABLE, MOODLE_28_STABLE...)
- Click the 'Notifications' link on the frontpage administration block or php admin/cli/upgrade.php if you have access to a command line interpreter.
Install from a compressed file
- Extract the compressed file data
- Rename the main folder to mootyper
- Copy to the Moodle mod/ folder
- Click the 'Notifications' link on the frontpage administration block or php admin/cli/upgrade.php if you have access to a command line interpreter.
This is the README file for the MooTyper project. MooTyper is
a moodle extension, that adds the 'typing instructor' functionallity to Moodle.
The plugin url is: https://moodle.org/plugins/view.php?plugin=mod_mootyper
MooTyper is free software, the same as Moodle.
- REQUIREMENTS
The MooTyper module uses javascript which is not welcome in Moodle but it is a
requirement for the use of the module. The typing procedure cannot be done without
the client side logic.
It creates some new tables in a moodle database and inserts some sample
typing exercises. This is all done automaticaly through the intstallation,
but real lessons and exercises should be added by teachers afterwards.
- INSTALLATION
MooTyper is an activity module. You have to extract it to the 'mod' directory.
If the directory name is something like "moodle_mod_mootyper" you have to change
that to just "mootyper". So for example, the path should be like this:
Than go to Site Administration -> Notifications and click on the button to start
the install.
Right after an install or upgrade of the new MooTyper 3.4.1, you will then see
the settings page. You can now set the date display format for the grade views.
You can also set colors for grade views, the background of the new keyboard
layouts, and the color for keytops that are not home row keys. This allows you
to color coordinate MooTyper with your theme color scheme.
- USING MOOTYPER
Using MooTyper activity module is very simple. An instance can be added as a
new activity in a course like Lesson or Quiz. Thanks to Mary Cooch from moodle.org
we have this video, which shows how to add exercises, create mootyper instance,
and then view grades. It's a little outdated (one of the first versions of
mootyper), but I guess everything still holds:
- ADDITIONAL KEYBOARD LAYOUTS
This MooTyper currently includes support for new versions (V4) of Belgium(Dutch),
Dvorak, English, Estonian, French, German(Swiss), Hebrew, Japanese, Portuguese(Brazil),
Portugues(Portugal), Russian, Slovenian, Spanish, and Thai keyboard layouts, that
are compatible with both the new Boost theme as well as Clean.
To implement any other layout you have to:
Create a php file with keyboard layout defined with HTML. Create a javascript
file (with the same name and .js extension) that implements the logic of the keyboard
layout. If you have any mistakes in your js file the module won't work, so in
this case try to validate your code with a tool like this...
http://www.javascriptlint.com/online_lint.php
- SAVING YOUR OWN OR MODIFIED LESSONS
In previous versions of MooTyper, if you created your own lessons there was
no built in way to export a copy for backup purposes or for safekeeping.
Once installed, there was no way to add additional lessons to MooTyper
unless you used the built in editing capability, which is not as convenient
as it would be to create lessons in a word processing program. If you wanted
to add lessons to MooTyper without using the built in editor, you had to do
a completely new installation of MooTyper which meant you would lose all
student progress and grades.
As of version 3.1.0, MooTyper now supports Import and Export of MooTyper Lessons
via links in the Administration block, which overcomes these limitations.
- NEW IN THIS RELEASE
Implemented, Activity Completion for View and it is now
working in this version of MooTyper.
Added a few more keyboard layouts.
- OTHER RECENT NEW CAPABILITIES
There are now four settings that affect the typing modes.
1.The original mode - This mode requires you to type the correct letter before
you can move to the next letter. Extra spaces are ignored. Mistyped letters
are counted as mistakes.
2. Count mistyped spaces - Same as the original mode, but counts mistyped spaces
as well as mistyped letters.
3. Continuous typing - In this mode you do not have to type the correct letter
before moving to the next letter. All mistyped letters and space are counted
as mistakes.
4. Count all keystrokes - If you mistype the same key multiple times, you have the
option of counting it as one mistake, or counting all of them.
If a user clicks, View my grades, depending on the Moodle version, they will now
see a horizontal bar chart beneath their grade table that charts Hits per minute,
Precision, and WPM results. If a non-editing teacher, teacher, manager, or admin,
clicks on, 'View all grades, depending on the Moodle version, they will see the
normal grade table as well as horizontal bar charts showing Hits per minute,
Precision, and WPM for each exercise for each student.
For more info please visit the plugins wiki on github:
https://github.com/drachels/moodle-mod_mootyper/wiki
3.5.2 (Build: 20180060300) (2018052503)
3.5.2 (Build: 20180060300)
Plugin type: Activities
Frankenstyle component name: mod_mootyper
Version build number: 2018052503
Version release name: 3.5.2 (Build: 20180060300)
Maturity: Stable
Supported Moodle versions: 2.7, 2.8, 2.9, 3.0, 3.1, 3.2, 3.3, 3.4, 3.5
Repository URL (Git): https://github.com/drachels/moodle-mod_mootyper
Repository branch:
Repository tag:
Issue/bug tracker URL: https://github.com/drachels/moodle-mod_mootyper/issues
Moodle Mootyper module
- Moodle tracker component: https://github.com/drachels/moodle-mod_mootyper/issues
- Documentation: https://github.com/drachels/moodle-mod_mootyper/wiki
- Source Code: https://github.com/drachels/moodle-mod_mootyper
- License: http://www.gnu.org/licenses/gpl.txt
Install from git
- Navigate to Moodle root folder
- git clone git://github.com/drachels/moodle-mod_mootyper.git mod/mootyper
- cd mootyper
- git checkout MOODLE_XY_STABLE (where XY is the moodle version, e.g: MOODLE_30_STABLE, MOODLE_28_STABLE...)
- Click the 'Notifications' link on the frontpage administration block or php admin/cli/upgrade.php if you have access to a command line interpreter.
Install from a compressed file
- Extract the compressed file data
- Rename the main folder to mootyper
- Copy to the Moodle mod/ folder
- Click the 'Notifications' link on the frontpage administration block or php admin/cli/upgrade.php if you have access to a command line interpreter.
This is the README file for the MooTyper project. MooTyper is
a moodle extension, that adds the 'typing instructor' functionallity to Moodle.
The plugin url is: https://moodle.org/plugins/view.php?plugin=mod_mootyper
MooTyper is free software, the same as Moodle.
- REQUIREMENTS
The MooTyper module uses javascript which is not welcome in Moodle but it is a
requirement for the use of the module. The typing procedure cannot be done without
the client side logic.
It creates some new tables in a moodle database and inserts some sample
typing exercises. This is all done automaticaly through the intstallation,
but real lessons and exercises should be added by teachers afterwards.
- INSTALLATION
MooTyper is an activity module. You have to extract it to the 'mod' directory.
If the directory name is something like "moodle_mod_mootyper" you have to change
that to just "mootyper". So for example, the path should be like this:
Than go to Site Administration -> Notifications and click on the button to start
the install.
Right after an install or upgrade of the new MooTyper 3.4.1, you will then see
the settings page. You can now set the date display format for the grade views.
You can also set colors for grade views, the background of the new keyboard
layouts, and the color for keytops that are not home row keys. This allows you
to color coordinate MooTyper with your theme color scheme.
- USING MOOTYPER
Using MooTyper activity module is very simple. An instance can be added as a
new activity in a course like Lesson or Quiz. Thanks to Mary Cooch from moodle.org
we have this video, which shows how to add exercises, create mootyper instance,
and then view grades. It's a little outdated (one of the first versions of
mootyper), but I guess everything still holds:
- ADDITIONAL KEYBOARD LAYOUTS
This MooTyper currently includes support for new versions (V4) of Belgium(Dutch),
Dvorak, English, Estonian, French, German(Swiss), Hebrew, Japanese, Portuguese(Brazil),
Portugues(Portugal), Russian, Slovenian, Spanish, and Thai keyboard layouts, that
are compatible with both the new Boost theme as well as Clean.
To implement any other layout you have to:
Create a php file with keyboard layout defined with HTML. Create a javascript
file (with the same name and .js extension) that implements the logic of the keyboard
layout. If you have any mistakes in your js file the module won't work, so in
this case try to validate your code with a tool like this...
http://www.javascriptlint.com/online_lint.php
- SAVING YOUR OWN OR MODIFIED LESSONS
In previous versions of MooTyper, if you created your own lessons there was
no built in way to export a copy for backup purposes or for safekeeping.
Once installed, there was no way to add additional lessons to MooTyper
unless you used the built in editing capability, which is not as convenient
as it would be to create lessons in a word processing program. If you wanted
to add lessons to MooTyper without using the built in editor, you had to do
a completely new installation of MooTyper which meant you would lose all
student progress and grades.
As of version 3.1.0, MooTyper now supports Import and Export of MooTyper Lessons
via links in the Administration block, which overcomes these limitations.
- NEW IN THIS RELEASE
Support for GDPR is in this version, if used in latest Moodle 3.3, 3.4, or 3.5. In earlier versions
it is ignored.
Other, minor bug fixes.
For more info please visit the plugins wiki on github:
https://github.com/drachels/moodle-mod_mootyper/wiki
3.5.1 (Build: 2018051300) (2018051300)
3.5.1 (Build: 2018051300)
Plugin type: Activities
Frankenstyle component name: mod_mootyper
Version build number: 2018051300
Version release name: 3.5.1 (Build: 2018051300)
Maturity: Stable
Supported Moodle versions: 2.7, 2.8, 2.9, 3.0, 3.1, 3.2, 3.3, 3.4, 3.5
Repository URL (Git): https://github.com/drachels/moodle-mod_mootyper
Repository branch:
Repository tag:
Issue/bug tracker URL: https://github.com/drachels/moodle-mod_mootyper/issues
Moodle Mootyper module
- Moodle tracker component: https://github.com/drachels/moodle-mod_mootyper/issues
- Documentation: https://github.com/drachels/moodle-mod_mootyper/wiki
- Source Code: https://github.com/drachels/moodle-mod_mootyper
- License: http://www.gnu.org/licenses/gpl.txt
Install from git
- Navigate to Moodle root folder
- git clone git://github.com/drachels/moodle-mod_mootyper.git mod/mootyper
- cd mootyper
- git checkout MOODLE_XY_STABLE (where XY is the moodle version, e.g: MOODLE_30_STABLE, MOODLE_28_STABLE...)
- Click the 'Notifications' link on the frontpage administration block or php admin/cli/upgrade.php if you have access to a command line interpreter.
Install from a compressed file
- Extract the compressed file data
- Rename the main folder to mootyper
- Copy to the Moodle mod/ folder
- Click the 'Notifications' link on the frontpage administration block or php admin/cli/upgrade.php if you have access to a command line interpreter.
This is the README file for the MooTyper project. MooTyper is
a moodle extension, that adds the 'typing instructor' functionallity to Moodle.
The plugin url is: https://moodle.org/plugins/view.php?plugin=mod_mootyper
MooTyper is free software, the same as Moodle.
- REQUIREMENTS
The MooTyper module uses javascript which is not welcome in Moodle but it is a
requirement for the use of the module. The typing procedure cannot be done without
the client side logic.
It creates some new tables in a moodle database and inserts some sample
typing exercises. This is all done automaticaly through the intstallation,
but real lessons and exercises should be added by teachers afterwards.
- INSTALLATION
MooTyper is an activity module. You have to extract it to the 'mod' directory.
If the directory name is something like "moodle_mod_mootyper" you have to change
that to just "mootyper". So for example, the path should be like this:
Than go to Site Administration -> Notifications and click on the button to start
the install.
Right after an install or upgrade of the new MooTyper 3.4.1, you will then see
the settings page. You can now set the date display format for the grade views.
You can also set colors for grade views, the background of the new keyboard
layouts, and the color for keytops that are not home row keys. This allows you
to color coordinate MooTyper with your theme color scheme.
- USING MOOTYPER
Using MooTyper activity module is very simple. An instance can be added as a
new activity in a course like Lesson or Quiz. Thanks to Mary Cooch from moodle.org
we have this video, which shows how to add exercises, create mootyper instance,
and then view grades. It's a little outdated (one of the first versions of
mootyper), but I guess everything still holds:
- ADDITIONAL KEYBOARD LAYOUTS
This MooTyper currently includes support for new versions (V4) of Belgium(Dutch),
Dvorak, English, Estonian, French, German(Swiss), Hebrew, Japanese, Portuguese(Brazil),
Portugues(Portugal), Russian, Slovenian, Spanish, and Thai keyboard layouts, that
are compatible with both the new Boost theme as well as Clean.
To implement any other layout you have to:
Create a php file with keyboard layout defined with HTML. Create a javascript
file (with the same name and .js extension) that implements the logic of the keyboard
layout. If you have any mistakes in your js file the module won't work, so in
this case try to validate your code with a tool like this...
http://www.javascriptlint.com/online_lint.php
- SAVING YOUR OWN OR MODIFIED LESSONS
In previous versions of MooTyper, if you created your own lessons there was
no built in way to export a copy for backup purposes or for safekeeping.
Once installed, there was no way to add additional lessons to MooTyper
unless you used the built in editing capability, which is not as convenient
as it would be to create lessons in a word processing program. If you wanted
to add lessons to MooTyper without using the built in editor, you had to do
a completely new installation of MooTyper which meant you would lose all
student progress and grades.
As of version 3.1.0, MooTyper now supports Import and Export of MooTyper Lessons
via links in the Administration block, which overcomes these limitations.
- NEW IN THIS RELEASE
There are a number of minor bug fixes in this version, as well as three major changes.
Probably the most noticeable change, is on the status bar in the WPM section. You will now see two calculations. On the left is the GWPM, (Gross Words Per Minute), and on the right is NWPM, (Net Words Per Minute). At the end of an exercise, when a student clicks Continue, ONLY the NWPM gets saved.
The change that will have the most impact in the use of MooTyper, is a new, Practice, mode. The mode is selected by the teacher at the time of setup, just as they would for Lesson or Exam mode. Once a mode is set and saved, just like the other two modes, it cannot be changed. During use, the word, Practice, will be included as part of the exercise name that you normally see right above the status bar.
When, Practice mode, is used, after completing one, more, or all exercises, in a lesson, a student can go to, View my grades, and will be able to remove any grade. Let us say the student has finished four exercises in a lesson containing six exercises, and they want to redo the second lesson. They must also remove three and four, as well as two. If they remove only the second lesson, they would be given exercise number five next, instead of two.
For more info please visit the plugins wiki on github:
https://github.com/drachels/moodle-mod_mootyper/wiki
3.5.0 (Build: 2018040400) (2018040400)
3.5.0 (Build: 2018040400)
Plugin type: Activities
Frankenstyle component name: mod_mootyper
Version build number: 2018040400
Version release name: 3.5.0 (Build: 2018040400)
Maturity: Stable
Supported Moodle versions: 2.7, 2.8, 2.9, 3.0, 3.1, 3.2, 3.3, 3.4
Repository URL (Git): https://github.com/drachels/moodle-mod_mootyper
Repository branch:
Repository tag:
Issue/bug tracker URL: https://github.com/drachels/moodle-mod_mootyper/issues
Moodle Mootyper module
- Moodle tracker component: https://github.com/drachels/moodle-mod_mootyper/issues
- Documentation: https://github.com/drachels/moodle-mod_mootyper/wiki
- Source Code: https://github.com/drachels/moodle-mod_mootyper
- License: http://www.gnu.org/licenses/gpl.txt
Install from git
- Navigate to Moodle root folder
- git clone git://github.com/drachels/moodle-mod_mootyper.git mod/mootyper
- cd mootyper
- git checkout MOODLE_XY_STABLE (where XY is the moodle version, e.g: MOODLE_30_STABLE, MOODLE_28_STABLE...)
- Click the 'Notifications' link on the frontpage administration block or php admin/cli/upgrade.php if you have access to a command line interpreter.
Install from a compressed file
- Extract the compressed file data
- Rename the main folder to mootyper
- Copy to the Moodle mod/ folder
- Click the 'Notifications' link on the frontpage administration block or php admin/cli/upgrade.php if you have access to a command line interpreter.
This is the README file for the MooTyper project. MooTyper is
a moodle extension, that adds the 'typing instructor' functionallity to Moodle.
The plugin url is: https://moodle.org/plugins/view.php?plugin=mod_mootyper
MooTyper is free software, the same as Moodle.
- REQUIREMENTS
The MooTyper module uses javascript which is not welcome in Moodle but it is a
requirement for the use of the module. The typing procedure cannot be done without
the client side logic.
It creates some new tables in a moodle database and inserts some sample
typing exercises. This is all done automaticaly through the intstallation,
but real lessons and exercises should be added by teachers afterwards.
- INSTALLATION
MooTyper is an activity module. You have to extract it to the 'mod' directory.
If the directory name is something like "moodle_mod_mootyper" you have to change
that to just "mootyper". So for example, the path should be like this:
Than go to Site Administration -> Notifications and click on the button to start
the install.
Right after an install or upgrade of the new MooTyper 3.5.0, you will then see
the settings page. You can now set the various default options of how you want the plugin to work and look. There are numerous color options that let you control how MooTyper looks and color coordinate with you site or course theme.
- USING MOOTYPER
Using MooTyper activity module is very simple. An instance can be added as a
new activity in a course like can a Lesson or Quiz. Thanks to Mary Cooch from moodle.org
we have this video, which shows how to add an exercises, create a MooTyper instance,
and then view grades. The video is a little outdated (one of the first versions of
mootyper), but everything still holds:
- ADDITIONAL KEYBOARD LAYOUTS
This MooTyper currently includes support for new versions (V4) of Belgium(Dutch),
Dvorak, English, Estonian, French, German(Swiss), Hebrew, Japanese, Portuguese(Brazil),
Portugues(Portugal), Russian, Slovenian, Spanish, and Thai keyboard layouts, that
are compatible with both the new Boost theme as well as Clean. The Hebrew layout is a new version that automatically adjusts itself to look correct when using LTR or RTL language settings.
To implement any other layout you have to:
Create a php file with keyboard layout defined with HTML. Create a javascript
file (with the same name and .js extension) that implements the logic of the keyboard
layout. If you have any mistakes in your js file the module won't work, so in
this case try to validate your code with a tool like this...
http://www.javascriptlint.com/online_lint.php
- SAVING YOUR OWN OR MODIFIED LESSONS
In previous versions of MooTyper, if you created your own lessons there was
no built in way to export a copy for backup purposes or for safekeeping.
Once installed, there was no way to add additional lessons to MooTyper
unless you used the built in editing capability, which is not as convenient
as it would be to create lessons in a word processing program. If you wanted
to add lessons to MooTyper without using the built in editor, you had to do
a completely new installation of MooTyper which meant you would lose all
student progress and grades.
As of version 3.1.0, MooTyper now supports Import and Export of MooTyper Lessons
via links in the Administration block, which overcomes these limitations.
- NEW IN THIS RELEASE
There are now four settings that affect the typing modes.
1.The original mode - This mode requires you to type the correct letter before
you can move to the next letter. Extra spaces are ignored. Mistyped letters
are counted as mistakes.
2. Count mistyped spaces - Same as the original mode, but counts mistyped spaces
as well as mistyped letters.
3. Continuous typing - In this mode you do not have to type the correct letter
before moving to the next letter. All mistyped letters and space are counted
as mistakes.
4. Count all keystrokes - If you mistype the same key multiple times, you have the
option of counting it as one mistake, or counting all of them.
If a user clicks, View my grades, depending on the Moodle version, they will now
see a horizontal bar chart beneath their grade table that charts Hits per minute,
Precision, and WPM results. If a non-editing teacher, teacher, manager, or admin,
clicks on, 'View all grades, depending on the Moodle version, they will see the
normal grade table as well as horizontal bar charts showing Hits per minute,
Precision, and WPM for each exercise for each student.
If you want to see how MooTyper works before installing it on your own system, In the, Useful links, section click on Website URL. You can log in as student1, student2, ..., student18, using Test12345! as the password. You can also self enroll using your own name and password. You can contact me directly via Moodle messaging to gain teacher access or ask for help.
For more info please visit the plugins wiki on github:
https://github.com/drachels/moodle-mod_mootyper/wiki
3.4.3 (Build: 2018031200) (2018031200)
3.4.3 (Build: 2018031200)
Plugin type: Activities
Frankenstyle component name: mod_mootyper
Version build number: 2018031200
Version release name: 3.4.3 (Build: 2018031200)
Maturity: Stable
Supported Moodle versions: 2.7, 2.8, 2.9, 3.0, 3.1, 3.2, 3.3, 3.4
Repository URL (Git): https://github.com/drachels/moodle-mod_mootyper
Repository branch:
Repository tag:
Issue/bug tracker URL: https://github.com/drachels/moodle-mod_mootyper/issues
Moodle Mootyper module
- Moodle tracker component: https://github.com/drachels/moodle-mod_mootyper/issues
- Documentation: https://github.com/drachels/moodle-mod_mootyper/wiki
- Source Code: https://github.com/drachels/moodle-mod_mootyper
- License: http://www.gnu.org/licenses/gpl.txt
Install from git
- Navigate to Moodle root folder
- git clone git://github.com/drachels/moodle-mod_mootyper.git mod/mootyper
- cd mootyper
- git checkout MOODLE_XY_STABLE (where XY is the moodle version, e.g: MOODLE_30_STABLE, MOODLE_28_STABLE...)
- Click the 'Notifications' link on the frontpage administration block or php admin/cli/upgrade.php if you have access to a command line interpreter.
Install from a compressed file
- Extract the compressed file data
- Rename the main folder to mootyper
- Copy to the Moodle mod/ folder
- Click the 'Notifications' link on the frontpage administration block or php admin/cli/upgrade.php if you have access to a command line interpreter.
This is the README file for the MooTyper project. MooTyper is
a moodle extension, that adds the 'typing instructor' functionallity to Moodle.
The plugin url is: https://moodle.org/plugins/view.php?plugin=mod_mootyper
MooTyper is free software, the same as Moodle.
- REQUIREMENTS
The MooTyper module uses javascript which is not welcome in Moodle but it is a
requirement for the use of the module. The typing procedure cannot be done without
the client side logic.
It creates some new tables in a moodle database and inserts some sample
typing exercises. This is all done automaticaly through the intstallation,
but real lessons and exercises should be added by teachers afterwards.
- INSTALLATION
MooTyper is an activity module. You have to extract it to the 'mod' directory.
If the directory name is something like "moodle_mod_mootyper" you have to change
that to just "mootyper". So for example, the path should be like this:
/mod/mootyper/view.php
Than go to Site Administration -> Notifications and click on the button to start
the install.
Right after an install or upgrade of the new MooTyper 3.4.3, you will then see
the settings page. You can now set the date display format for the grade views.
You can also set colors for grade views, the background of the new keyboard
layouts, and the color for keytops that are not home row keys. This allows you
to color coordinate MooTyper with your theme color scheme. You can also set
the default text alignment for the site.
- USING MOOTYPER
Using MooTyper activity module is very simple. An instance can be added as a
new activity in a course like Lesson or Quiz. Thanks to Mary Cooch from moodle.org
we have this video, which shows how to add exercises, create mootyper instance,
and then view grades. It's a little outdated (one of the first versions of
mootyper), but I guess everything still holds:
- ADDITIONAL KEYBOARD LAYOUTS
This MooTyper currently includes support for new versions (V4) of Belgium(Dutch),
Dvorak, English, Estonian, French, German(Swiss), Hebrew, Japanese, Portuguese(Brazil),
Portuguese(Portugal), Russian, Slovenian, Spanish, and Thai keyboard layouts, that are
compatible with both the new Boost theme as well as Clean.
To implement any other layout you have to:
Create a php file with keyboard layout defined with HTML. Create a javascript
file (with the same name and .js extension) that implements the logic of the keyboard
layout. If you have any mistakes in your js file the module won't work, so in
this case try to validate your code with a tool like this...
http://www.javascriptlint.com/online_lint.php
- SAVING YOUR OWN OR MODIFIED LESSONS
In previous versions of MooTyper, if you created your own lessons there was
no built in way to export a copy for backup purposes or for safekeeping.
Once installed, there was no way to add additional lessons to MooTyper
unless you used the built in editing capability, which is not as convienient
as it would be to create lessons in a word processing program. If you wanted
to add lessons to MooTyper without using the built in editor, you had to do
a completely new installation of MooTyper which meant you would lose all
student progress and grades.
As of version 3.1.0, MooTyper now supports Import and Export of MooTyper Lessons
via links in the Administration block, which overcomes these limitations.
- NEW IN THIS RELEASE
This version include three new keyboard layouts, Estonian, Thai and Hebrew. Since
Hebrew is written right-to-left, there are two new alignment settings. One for how
a typing exercise looks when a student is typing it, and one when a teacher is creating
or editing an exercise.
For more info please visit the plugins wiki on github:
https://github.com/drachels/moodle-mod_mootyper/wiki
3.4.2 (Build: 2017120402) (2017120402)
3.4.2 (Build: 2017120402)
Plugin type: Activities
Frankenstyle component name: mod_mootyper
Version build number: 2017120402
Version release name: 3.4.2 (Build: 2017120402)
Maturity: Stable
Supported Moodle versions: 2.7, 2.8, 2.9, 3.0, 3.1, 3.2, 3.3, 3.4
Repository URL (Git): https://github.com/drachels/moodle-mod_mootyper
Repository branch:
Repository tag:
Issue/bug tracker URL: https://github.com/drachels/moodle-mod_mootyper/issues
Moodle Mootyper module
- Moodle tracker component: https://github.com/drachels/moodle-mod_mootyper/issues
- Documentation: https://github.com/drachels/moodle-mod_mootyper/wiki
- Source Code: https://github.com/drachels/moodle-mod_mootyper
- License: http://www.gnu.org/licenses/gpl.txt
Install from git
- Navigate to Moodle root folder
- git clone git://github.com/drachels/moodle-mod_mootyper.git mod/mootyper
- cd mootyper
- git checkout MOODLE_XY_STABLE (where XY is the moodle version, e.g: MOODLE_30_STABLE, MOODLE_28_STABLE...)
- Click the 'Notifications' link on the frontpage administration block or php admin/cli/upgrade.php if you have access to a command line interpreter.
Install from a compressed file
- Extract the compressed file data
- Rename the main folder to mootyper
- Copy to the Moodle mod/ folder
- Click the 'Notifications' link on the frontpage administration block or php admin/cli/upgrade.php if you have access to a command line interpreter.
This is the README file for the MooTyper project. MooTyper is
a moodle extension, that adds the 'typing instructor' functionallity to Moodle.
The plugin url is: https://moodle.org/plugins/view.php?plugin=mod_mootyper
MooTyper is free software, the same as Moodle.
- REQUIREMENTS
The MooTyper module uses javascript which is not welcome in Moodle but it is a
requirement for the use of the module. The typing procedure cannot be done without
the client side logic.
It creates some new tables in a moodle database and inserts some sample
typing exercises. This is all done automaticaly through the intstallation,
but real lessons and exercises should be added by teachers afterwards.
- INSTALLATION
MooTyper is an activity module. You have to extract it to the 'mod' directory.
If the directory name is something like "moodle_mod_mootyper" you have to change
that to just "mootyper". So for example, the path should be like this:
Than go to Site Administration -> Notifications and click on the button to start
the install.
Right after an install or upgrade of the new MooTyper 3.4.1, you will then see
the settings page. You can now set the date display format for the grade views.
You can also set colors for grade views, the background of the new keyboard
layouts, and the color for keytops that are not home row keys. This allows you
to color coordinate MooTyper with your theme color scheme.
- USING MOOTYPER
Using MooTyper activity module is very simple. An instance can be added as a
new activity in a course like Lesson or Quiz. Thanks to Mary Cooch from moodle.org
we have this video, which shows how to add exercises, create mootyper instance,
and then view grades. It's a little outdated (one of the first versions of
mootyper), but I guess everything still holds:
- ADDITIONAL KEYBOARD LAYOUTS
This MooTyper currently includes support for new versions (V4) of Belgium(Dutch),
Dvorak, English, Japanese, German(Swiss), Japanese, Portuguese, Russian,
Slovenian, and Spanish keyboard layouts, that are compatible with both
the new Boost theme as well as Clean.
To implement any other layout you have to:
Create a php file with keyboard layout defined with HTML. Create a javascript
file (with the same name and .js extension) that implements the logic of the keyboard
layout. If you have any mistakes in your js file the module won't work, so in
this case try to validate your code with a tool like this...
http://www.javascriptlint.com/online_lint.php
- SAVING YOUR OWN OR MODIFIED LESSONS
In previous versions of MooTyper, if you created your own lessons there was
no built in way to export a copy for backup purposes or for safekeeping.
Once installed, there was no way to add additional lessons to MooTyper
unless you used the built in editing capability, which is not as convienient
as it would be to create lessons in a word processing program. If you wanted
to add lessons to MooTyper without using the built in editor, you had to do
a completely new installation of MooTyper which meant you would lose all
student progress and grades.
As of version 3.1.0, MooTyper now supports Import and Export of MooTyper Lessons
via links in the Administration block, which overcomes these limitations.
- NEW IN THIS RELEASE
There are now three typing modes.
1.The original mode - This mode requires you to type the correct letter before
you can move to the next letter. Extra spaces are ignored. Mistyped letters
are counted as mistakes.
2. Count mistyped spaces - Same as the original mode, but counts mistyped spaces
as well as mistyped letters.
3. Continuous typing - In this mode you do not have to type the correct letter
before moving to the next letter. All mistyped letters and space are counted
as mistakes.
If a user clicks 'Views my grades' they will now see a horizontal bar chart beneath
their grade table that charts Hits per minute, Presision, and WPM results.
If a non-editing teacher, teacher, manager, or admin, clicks on 'View all grades'
they will see the normal grade table as well as horizontal bar charts showing
Hits per minute, Prescison, and WPM for each exercise for each student.
For more info please visit the plugins wiki on github:
https://github.com/drachels/moodle-mod_mootyper/wiki
3.4.1 (Build: 2017120100) (2017120100)
3.4.1 (Build: 2017120100)
Plugin type: Activities
Frankenstyle component name: mod_mootyper
Version build number: 2017120100
Version release name: 3.4.1 (Build: 2017120100)
Maturity: Stable
Supported Moodle versions: 2.7, 2.8, 2.9, 3.0, 3.1, 3.2, 3.3, 3.4
Repository URL (Git): https://github.com/drachels/moodle-mod_mootyper
Repository branch:
Repository tag:
Issue/bug tracker URL: https://github.com/drachels/moodle-mod_mootyper/issues
Moodle Mootyper module
- Moodle tracker component: https://github.com/drachels/moodle-mod_mootyper/issues
- Documentation: https://github.com/drachels/moodle-mod_mootyper/wiki
- Source Code: https://github.com/drachels/moodle-mod_mootyper
- License: http://www.gnu.org/licenses/gpl.txt
Install from git
- Navigate to Moodle root folder
- git clone git://github.com/drachels/moodle-mod_mootyper.git mod/mootyper
- cd mootyper
- git checkout MOODLE_XY_STABLE (where XY is the moodle version, e.g: MOODLE_30_STABLE, MOODLE_28_STABLE...)
- Click the 'Notifications' link on the frontpage administration block or php admin/cli/upgrade.php if you have access to a command line interpreter.
Install from a compressed file
- Extract the compressed file data
- Rename the main folder to mootyper
- Copy to the Moodle mod/ folder
- Click the 'Notifications' link on the frontpage administration block or php admin/cli/upgrade.php if you have access to a command line interpreter.
This is the README file for the MooTyper project. MooTyper is
a moodle extension, that adds the 'typing instructor' functionallity to Moodle.
The plugin url is: https://moodle.org/plugins/view.php?plugin=mod_mootyper
MooTyper is free software, the same as Moodle.
- REQUIREMENTS
The MooTyper module uses javascript which is not welcome in Moodle but it is a
requirement for the use of the module. The typing procedure cannot be done without
the client side logic.
It creates some new tables in a moodle database and inserts some sample
typing exercises. This is all done automaticaly through the intstallation,
but real lessons and exercises should be added by teachers afterwards.
- INSTALLATION
MooTyper is an activity module. You have to extract it to the 'mod' directory.
If the directory name is something like "moodle_mod_mootyper" you have to change
that to just "mootyper". So for example, the path should be like this:
Than go to Site Administration -> Notifications and click on the button to start
the install.
Right after an install or upgrade of the new MooTyper 3.4.1, you will then see
the settings page. You can now set the date display format for the grade views.
You can also set colors for grade views, the background of the new keyboard
layouts, and the color for keytops that are not home row keys. This allows you
to color coordinate MooTyper with your theme color scheme.
- USING MOOTYPER
Using MooTyper activity module is very simple. An instance can be added as a
new activity in a course like Lesson or Quiz. Thanks to Mary Cooch from moodle.org
we have this video, which shows how to add exercises, create mootyper instance,
and then view grades. It's a little outdated (one of the first versions of
mootyper), but I guess everything still holds:
- ADDITIONAL KEYBOARD LAYOUTS
This MooTyper currently includes support for new versions (V4) of Belgium(Dutch),
Dvorak, English, Japanese, German(Swiss), Japanese, Portuguese, Russian,
Slovenian, and Spanish keyboard layouts, that are compatible with both
the new Boost theme as well as Clean.
To implement any other layout you have to:
Create a php file with keyboard layout defined with HTML. Create a javascript
file (with the same name and .js extension) that implements the logic of the keyboard
layout. If you have any mistakes in your js file the module won't work, so in
this case try to validate your code with a tool like this...
http://www.javascriptlint.com/online_lint.php
- SAVING YOUR OWN OR MODIFIED LESSONS
In previous versions of MooTyper, if you created your own lessons there was
no built in way to export a copy for backup purposes or for safekeeping.
Once installed, there was no way to add additional lessons to MooTyper
unless you used the built in editing capability, which is not as convienient
as it would be to create lessons in a word processing program. If you wanted
to add lessons to MooTyper without using the built in editor, you had to do
a completely new installation of MooTyper which meant you would lose all
student progress and grades.
As of version 3.1.0, MooTyper now supports Import and Export of MooTyper Lessons
via links in the Administration block, which overcomes these limitations.
- NEW IN THIS RELEASE
There are now three typing modes.
1.The original mode - This mode requires you to type the correct letter before
you can move to the next letter. Extra spaces are ignored. Mistyped letters
are counted as mistakes.
2. Count mistyped spaces - Same as the original mode, but counts mistyped spaces
as well as mistyped letters.
3. Continuous typing - In this mode you do not have to type the correct letter
before moving to the next letter. All mistyped letters and space are counted
as mistakes.
If a user clicks 'Views my grades' they will now see a horizontal bar chart beneath
their grade table that charts Hits per minute, Presision, and WPM results.
If a non-editing teacher, teacher, manager, or admin, clicks on 'View all grades'
they will see the normal grade table as well as horizontal bar charts showing
Hits per minute, Prescison, and WPM for each exercise for each student.
For more info please visit the plugins wiki on github:
https://github.com/drachels/moodle-mod_mootyper/wiki
3.4.0 (Build: 2017110700) (2017110700)
3.4.0 (Build: 2017110700)
Plugin type: Activities
Frankenstyle component name: mod_mootyper
Version build number: 2017110700
Version release name: 3.4.0 (Build: 2017110700)
Maturity: Stable
Supported Moodle versions: 2.7, 2.8, 2.9, 3.0, 3.1, 3.2, 3.3, 3.4
Repository URL (Git): https://github.com/drachels/moodle-mod_mootyper
Repository branch:
Repository tag:
Issue/bug tracker URL: https://github.com/drachels/moodle-mod_mootyper/issues
Moodle Mootyper module
- Moodle tracker component: https://github.com/drachels/moodle-mod_mootyper/issues
- Documentation: https://github.com/drachels/moodle-mod_mootyper/wiki
- Source Code: https://github.com/drachels/moodle-mod_mootyper
- License: http://www.gnu.org/licenses/gpl.txt
Install from git
- Navigate to Moodle root folder
- git clone git://github.com/drachels/moodle-mod_mootyper.git mod/mootyper
- cd mootyper
- git checkout MOODLE_XY_STABLE (where XY is the moodle version, e.g: MOODLE_30_STABLE, MOODLE_28_STABLE...)
- Click the 'Notifications' link on the frontpage administration block or php admin/cli/upgrade.php if you have access to a command line interpreter.
Install from a compressed file
- Extract the compressed file data
- Rename the main folder to mootyper
- Copy to the Moodle mod/ folder
- Click the 'Notifications' link on the frontpage administration block or php admin/cli/upgrade.php if you have access to a command line interpreter.
This is the README file for the MooTyper project. MooTyper is
a moodle extension, that adds the 'typing instructor' functionallity to Moodle.
The plugin url is: https://moodle.org/plugins/view.php?plugin=mod_mootyper
MooTyper is free software, the same as Moodle.
- REQUIREMENTS
The MooTyper module uses javascript which is not welcome in Moodle but it is a
requirement for the use of the module. The typing procedure cannot be done without
the client side logic.
It creates some new tables in a moodle database and inserts some sample
typing exercises. This is all done automaticaly through the intstallation,
but real lessons and exercises should be added by teachers afterwards.
- INSTALLATION
MooTyper is an activity module. You have to extract it to the 'mod' directory.
If the directory name is something like "moodle_mod_mootyper" you have to change
that to just "mootyper". So for example, the path should be like this:
Than go to Site Administration -> Notifications and click on the button to start
the install.
Right after an install or upgrade of the new MooTyper 3.1.1, you will then see
the settings page. You can now set the date display format for the grade views.
You can also set colors for grade views, the background of the new keyboard
layouts, and the color for keytops that are not home row keys. This allows you
to color coordinate MooTyper with your theme color scheme.
- USING MOOTYPER
Using MooTyper activity module is very simple. An instance can be added as a
new activity in a course like Lesson or Quiz. Thanks to Mary Cooch from moodle.org
we have this video, which shows how to add exercises, create mootyper instance,
and then view grades. It's a little outdated (one of the first versions of
mootyper), but I guess everything still holds:
- ADDITIONAL KEYBOARD LAYOUTS
This MooTyper currently includes support for new versions (V21) of English, Japanese,
Russian Slovenian, Spanish and Swiss keyboard layouts, that are compatible with both
the new Boost theme as well as Clean.
To implement any other layout you have to:
Create a php file with keyboard layout defined with HTML. Create a javascript
file (with the same name and .js extension) that implements the logic of the keyboard
layout. If you have any mistakes in your js file the module won't work, so in
this case try to validate your code with a tool like this...
http://www.javascriptlint.com/online_lint.php
- SAVING YOUR OWN OR MODIFIED LESSONS
In previous versions of MooTyper, if you created your own lessons there was
no built in way to export a copy for backup purposes or for safekeeping.
Once installed, there was no way to add additional lessons to MooTyper
unless you used the built in editing capability, which is not as convienient
as it would be to create lessons in a word processing program. If you wanted
to add lessons to MooTyper without using the built in editor, you had to do
a completely new installation of MooTyper which meant you would lose all
student progress and grades.
As of version 3.1.0, MooTyper now supports Import and Export of MooTyper Lessons
via links in the Administration block, which overcomes these limitations.
- NEW IN THIS RELEASE
There are now three typing modes.
1.The original mode -This mode requires you to type the correct letter before
you can move to the next letter. Extra spaces are ignored. Mistyped letters
are counted as mistakes.
2. Count mistyped spaces - Same as the original mode, but counts mistyped spaces
as well as mistyped letters.
3. Continuous typing - In this mode you do not have to type the correct letter
before moving to the next letter. All mistyped letters and space are counted
as mistakes.
If a user clicks 'Views my grades' they will now see a horizontal bar chart beneath
their grade table that charts Hits per minute, Presision, and WPM results.
If a non-editing teacher, teacher, manager, or admin, clicks on 'View all grades'
they will see the normal grade table as well as horizontal bar charts showing
Hits per minute, Prescison, and WPM for each exercise for each student.
For more info please visit the plugins wiki on github:
https://github.com/drachels/moodle-mod_mootyper/wiki
3.3.2 (Build: 2017102600) (2017102600)
3.3.2 (Build: 2017102600)
Plugin type: Activities
Frankenstyle component name: mod_mootyper
Version build number: 2017102600
Version release name: 3.3.2 (Build: 2017102600)
Maturity: Stable
Supported Moodle versions: 3.2, 3.3, 3.4
Repository URL (Git): https://github.com/drachels/moodle-mod_mootyper
Repository branch:
Repository tag:
Issue/bug tracker URL: https://github.com/drachels/moodle-mod_mootyper/issues
Moodle Mootyper module
- Moodle tracker component: https://github.com/drachels/moodle-mod_mootyper/issues
- Documentation: https://github.com/drachels/moodle-mod_mootyper/wiki
- Source Code: https://github.com/drachels/moodle-mod_mootyper
- License: http://www.gnu.org/licenses/gpl.txt
Install from git
- Navigate to Moodle root folder
- git clone git://github.com/drachels/moodle-mod_mootyper.git mod/mootyper
- cd mootyper
- git checkout MOODLE_XY_STABLE (where XY is the moodle version, e.g: MOODLE_30_STABLE, MOODLE_28_STABLE...)
- Click the 'Notifications' link on the frontpage administration block or php admin/cli/upgrade.php if you have access to a command line interpreter.
Install from a compressed file
- Extract the compressed file data
- Rename the main folder to mootyper
- Copy to the Moodle mod/ folder
- Click the 'Notifications' link on the frontpage administration block or php admin/cli/upgrade.php if you have access to a command line interpreter.
This is the README file for the MooTyper project. MooTyper is
a moodle extension, that adds the 'typing instructor' functionallity to Moodle.
The plugin url is: https://moodle.org/plugins/view.php?plugin=mod_mootyper
MooTyper is free software, the same as Moodle.
- REQUIREMENTS
The MooTyper module uses javascript which is not welcome in Moodle but it is a
requirement for the use of the module. The typing procedure cannot be done without
the client side logic.
It creates some new tables in a moodle database and inserts some sample
typing exercises. This is all done automaticaly through the intstallation,
but real lessons and exercises should be added by teachers afterwards.
- INSTALLATION
MooTyper is an activity module. You have to extract it to the 'mod' directory.
If the directory name is something like "moodle_mod_mootyper" you have to change
that to just "mootyper". So for example, the path should be like this:
Than go to Site Administration -> Notifications and click on the button to start
the install.
Right after an install or upgrade of the new MooTyper 3.1.1, you will then see
the settings page. You can now set the date display format for the grade views.
You can also set colors for grade views, the background of the new keyboard
layouts, and the color for keytops that are not home row keys. This allows you
to color coordinate MooTyper with your theme color scheme.
- USING MOOTYPER
Using MooTyper activity module is very simple. An instance can be added as a
new activity in a course like Lesson or Quiz. Thanks to Mary Cooch from moodle.org
we have this video, which shows how to add exercises, create mootyper instance,
and then view grades. It's a little outdated (one of the first versions of
mootyper), but I guess everything still holds:
- ADDITIONAL KEYBOARD LAYOUTS
This MooTyper currently includes support for new versions (V21) of English, Japanese,
Russian Slovenian, Spanish and Swiss keyboard layouts, that are compatible with both
the new Boost theme as well as Clean.
To implement any other layout you have to:
Create a php file with keyboard layout defined with HTML. Create a javascript
file (with the same name and .js extension) that implements the logic of the keyboard
layout. If you have any mistakes in your js file the module won't work, so in
this case try to validate your code with a tool like this...
http://www.javascriptlint.com/online_lint.php
- SAVING YOUR OWN OR MODIFIED LESSONS
In previous versions of MooTyper, if you created your own lessons there was
no built in way to export a copy for backup purposes or for safekeeping.
Once installed, there was no way to add additional lessons to MooTyper
unless you used the built in editing capability, which is not as convienient
as it would be to create lessons in a word processing program. If you wanted
to add lessons to MooTyper without using the built in editor, you had to do
a completely new installation of MooTyper which meant you would lose all
student progress and grades.
As of version 3.1.0, MooTyper now supports Import and Export of MooTyper Lessons
via links in the Administration block, which overcomes these limitations.
- NEW IN THIS RELEASE
There are now three typing modes.
1.The original mode -This mode requires you to type the correct letter before
you can move to the next letter. Extra spaces are ignored. Mistyped letters
are counted as mistakes.
2. Count mistyped spaces - Same as the original mode, but counts mistyped spaces
as well as mistyped letters.
3. Continuous typing - In this mode you do not have to type the correct letter
before moving to the next letter. All mistyped letters and space are counted
as mistakes.
If a user clicks 'Views my grades' they will now see a horizontal bar chart beneath
their grade table that charts Hits per minute, Presision, and WPM results.
If a non-editing teacher, teacher, manager, or admin, clicks on 'View all grades'
they will see the normal grade table as well as horizontal bar charts showing
Hits per minute, Prescison, and WPM for each exercise for each student.
For more info please visit the plugins wiki on github:
https://github.com/drachels/moodle-mod_mootyper/wiki
3.3.1 (Build: 2017102500) (2017102500)
3.3.1 (Build: 2017102500)
Plugin type: Activities
Frankenstyle component name: mod_mootyper
Version build number: 2017102500
Version release name: 3.3.1 (Build: 2017102500)
Maturity: Stable
Supported Moodle versions: 3.2, 3.3
Repository URL (Git): https://github.com/drachels/moodle-mod_mootyper
Repository branch:
Repository tag:
Issue/bug tracker URL: https://github.com/drachels/moodle-mod_mootyper/issues
Moodle Mootyper module
- Moodle tracker component: https://github.com/drachels/moodle-mod_mootyper/issues
- Documentation: https://github.com/drachels/moodle-mod_mootyper/wiki
- Source Code: https://github.com/drachels/moodle-mod_mootyper
- License: http://www.gnu.org/licenses/gpl.txt
Install from git
- Navigate to Moodle root folder
- git clone git://github.com/drachels/moodle-mod_mootyper.git mod/mootyper
- cd mootyper
- git checkout MOODLE_XY_STABLE (where XY is the moodle version, e.g: MOODLE_30_STABLE, MOODLE_28_STABLE...)
- Click the 'Notifications' link on the frontpage administration block or php admin/cli/upgrade.php if you have access to a command line interpreter.
Install from a compressed file
- Extract the compressed file data
- Rename the main folder to mootyper
- Copy to the Moodle mod/ folder
- Click the 'Notifications' link on the frontpage administration block or php admin/cli/upgrade.php if you have access to a command line interpreter.
This is the README file for the MooTyper project. MooTyper is
a moodle extension, that adds the 'typing instructor' functionallity to Moodle.
The plugin url is: https://moodle.org/plugins/view.php?plugin=mod_mootyper
MooTyper is free software, the same as Moodle.
- REQUIREMENTS
The MooTyper module uses javascript which is not welcome in Moodle but it is a
requirement for the use of the module. The typing procedure cannot be done without
the client side logic.
It creates some new tables in a moodle database and inserts some sample
typing exercises. This is all done automaticaly through the intstallation,
but real lessons and exercises should be added by teachers afterwards.
- INSTALLATION
MooTyper is an activity module. You have to extract it to the 'mod' directory.
If the directory name is something like "moodle_mod_mootyper" you have to change
that to just "mootyper". So for example, the path should be like this:
Than go to Site Administration -> Notifications and click on the button to start
the install.
Right after an install or upgrade of the new MooTyper 3.1.1, you will then see
the settings page. You can now set the date display format for the grade views.
You can also set colors for grade views, the background of the new keyboard
layouts, and the color for keytops that are not home row keys. This allows you
to color coordinate MooTyper with your theme color scheme.
- USING MOOTYPER
Using MooTyper activity module is very simple. An instance can be added as a
new activity in a course like Lesson or Quiz. Thanks to Mary Cooch from moodle.org
we have this video, which shows how to add exercises, create mootyper instance,
and then view grades. It's a little outdated (one of the first versions of
mootyper), but I guess everything still holds:
- ADDITIONAL KEYBOARD LAYOUTS
This MooTyper currently includes support for new versions (V21) of English, Japanese,
Russian Slovenian, Spanish and Swiss keyboard layouts, that are compatible with both
the new Boost theme as well as Clean.
To implement any other layout you have to:
Create a php file with keyboard layout defined with HTML. Create a javascript
file (with the same name and .js extension) that implements the logic of the keyboard
layout. If you have any mistakes in your js file the module won't work, so in
this case try to validate your code with a tool like this...
http://www.javascriptlint.com/online_lint.php
- SAVING YOUR OWN OR MODIFIED LESSONS
In previous versions of MooTyper, if you created your own lessons there was
no built in way to export a copy for backup purposes or for safekeeping.
Once installed, there was no way to add additional lessons to MooTyper
unless you used the built in editing capability, which is not as convienient
as it would be to create lessons in a word processing program. If you wanted
to add lessons to MooTyper without using the built in editor, you had to do
a completely new installation of MooTyper which meant you would lose all
student progress and grades.
As of version 3.1.0, MooTyper now supports Import and Export of MooTyper Lessons
via links in the Administration block, which overcomes these limitations.
- NEW IN THIS RELEASE
There are now three typing modes.
1.The original mode -This mode requires you to type the correct letter before
you can move to the next letter. Extra spaces are ignored. Mistyped letters
are counted as mistakes.
2. Count mistyped spaces - Same as the original mode, but counts mistyped spaces
as well as mistyped letters.
3. Continuous typing - In this mode you do not have to type the correct letter
before moving to the next letter. All mistyped letters and space are counted
as mistakes.
If a user clicks 'Views my grades' they will now see a horizontal bar chart beneath
their grade table that charts Hits per minute, Presision, and WPM results.
If a non-editing teacher, teacher, manager, or admin, clicks on 'View all grades'
they will see the normal grade table as well as horizontal bar charts showing
Hits per minute, Prescison, and WPM for each exercise for each student.
For more info please visit the plugins wiki on github:
https://github.com/drachels/moodle-mod_mootyper/wiki
3.3.0 (Build: 2017092901) (2017092901)
3.3.0 (Build: 2017092901)
Plugin type: Activities
Frankenstyle component name: mod_mootyper
Version build number: 2017092901
Version release name: 3.3.0 (Build: 2017092901)
Maturity: Stable
Supported Moodle versions: 3.2, 3.3
Repository URL (Git): https://github.com/drachels/moodle-mod_mootyper
Repository branch:
Repository tag:
Issue/bug tracker URL: https://github.com/drachels/moodle-mod_mootyper/issues
Moodle Mootyper module
- Moodle tracker component: https://github.com/drachels/moodle-mod_mootyper/issues
- Documentation: https://github.com/drachels/moodle-mod_mootyper/wiki
- Source Code: https://github.com/drachels/moodle-mod_mootyper
- License: http://www.gnu.org/licenses/gpl.txt
Install from git
- Navigate to Moodle root folder
- git clone git://github.com/drachels/moodle-mod_mootyper.git mod/mootyper
- cd mootyper
- git checkout MOODLE_XY_STABLE (where XY is the moodle version, e.g: MOODLE_30_STABLE, MOODLE_28_STABLE...)
- Click the 'Notifications' link on the frontpage administration block or php admin/cli/upgrade.php if you have access to a command line interpreter.
Install from a compressed file
- Extract the compressed file data
- Rename the main folder to mootyper
- Copy to the Moodle mod/ folder
- Click the 'Notifications' link on the frontpage administration block or php admin/cli/upgrade.php if you have access to a command line interpreter.
This is the README file for the MooTyper project. MooTyper is
a moodle extension, that adds the 'typing instructor' functionallity to Moodle.
The plugin url is: https://moodle.org/plugins/view.php?plugin=mod_mootyper
MooTyper is free software, the same as Moodle.
- REQUIREMENTS
The MooTyper module uses javascript which is not welcome in Moodle but it is a
requirement for the use of the module. The typing procedure cannot be done without
the client side logic.
It creates some new tables in a moodle database and inserts some sample
typing exercises. This is all done automaticaly through the intstallation,
but real lessons and exercises should be added by teachers afterwards.
- INSTALLATION
MooTyper is an activity module. You have to extract it to the 'mod' directory.
If the directory name is something like "moodle_mod_mootyper" you have to change
that to just "mootyper". So for example, the path should be like this:
Than go to Site Administration -> Notifications and click on the button to start
the install.
Right after an install or upgrade of the new MooTyper 3.1.1, you will then see
the settings page. You can now set the date display format for the grade views.
You can also set colors for grade views, the background of the new keyboard
layouts, and the color for keytops that are not home row keys. This allows you
to color coordinate MooTyper with your theme color scheme.
- USING MOOTYPER
Using MooTyper activity module is very simple. An instance can be added as a
new activity in a course like Lesson or Quiz. Thanks to Mary Cooch from moodle.org
we have this video, which shows how to add exercises, create mootyper instance,
and then view grades. It's a little outdated (one of the first versions of
mootyper), but I guess everything still holds:
- ADDITIONAL KEYBOARD LAYOUTS
This MooTyper currently includes support for new versions (V21) of English, Japanese,
Russian Slovenian, Spanish and Swiss keyboard layouts, that are compatible with both
the new Boost theme as well as Clean.
To implement any other layout you have to:
Create a php file with keyboard layout defined with HTML. Create a javascript
file (with the same name and .js extension) that implements the logic of the keyboard
layout. If you have any mistakes in your js file the module won't work, so in
this case try to validate your code with a tool like this...
http://www.javascriptlint.com/online_lint.php
- SAVING YOUR OWN OR MODIFIED LESSONS
In previous versions of MooTyper, if you created your own lessons there was
no built in way to export a copy for backup purposes or for safekeeping.
Once installed, there was no way to add additional lessons to MooTyper
unless you used the built in editing capability, which is not as convienient
as it would be to create lessons in a word processing program. If you wanted
to add lessons to MooTyper without using the built in editor, you had to do
a completely new installation of MooTyper which meant you would lose all
student progress and grades.
As of version 3.1.0, MooTyper now supports Import and Export of MooTyper Lessons
via links in the Administration block, which overcomes these limitations.
- NEW IN THIS RELEASE
There are now three typing modes.
1.The original mode -This mode requires you to type the correct letter before
you can move to the next letter. Extra spaces are ignored. Mistyped letters
are counted as mistakes.
2. Count mistyped spaces - Same as the original mode, but counts mistyped spaces
as well as mistyped letters.
3. Continuous typing - In this mode you do not have to type the correct letter
before moving to the next letter. All mistyped letters and space are counted
as mistakes.
If a user clicks 'Views my grades' they will now see a horizontal bar chart beneath
their grade table that charts Hits per minute, Presision, and WPM results.
If a non-editing teacher, teacher, manager, or admin, clicks on 'View all grades'
they will see the normal grade table as well as horizontal bar charts showing
Hits per minute, Prescison, and WPM for each exercise for each student.
For more info please visit the plugins wiki on github:
https://github.com/drachels/moodle-mod_mootyper/wiki
3.2.0 (Build: 2017081900) (2017081900)
3.2.0 (Build: 2017081900)
Plugin type: Activities
Frankenstyle component name: mod_mootyper
Version build number: 2017081900
Version release name: 3.2.0 (Build: 2017081900)
Maturity: Stable
Supported Moodle versions: 2.9, 3.0, 3.1, 3.2
Repository URL (Git): https://github.com/drachels/moodle-mod_mootyper
Repository branch:
Repository tag:
Issue/bug tracker URL: https://github.com/drachels/moodle-mod_mootyper/issues
Moodle Mootyper module
- Moodle tracker component: https://github.com/drachels/moodle-mod_mootyper/issues
- Documentation: https://github.com/drachels/moodle-mod_mootyper/wiki
- Source Code: https://github.com/drachels/moodle-mod_mootyper
- License: http://www.gnu.org/licenses/gpl.txt
Install from git
- Navigate to Moodle root folder
- git clone git://github.com/drachels/moodle-mod_mootyper.git mod/mootyper
- cd mootyper
- git checkout MOODLE_XY_STABLE (where XY is the moodle version, e.g: MOODLE_30_STABLE, MOODLE_28_STABLE...)
- Click the 'Notifications' link on the frontpage administration block or php admin/cli/upgrade.php if you have access to a command line interpreter.
Install from a compressed file
- Extract the compressed file data
- Rename the main folder to mootyper
- Copy to the Moodle mod/ folder
- Click the 'Notifications' link on the frontpage administration block or php admin/cli/upgrade.php if you have access to a command line interpreter.
This is the README file for the MooTyper project. MooTyper is
a moodle extension, that adds the 'typing instructor' functionallity to Moodle.
The plugin url is: https://moodle.org/plugins/view.php?plugin=mod_mootyper
MooTyper is free software, the same as Moodle.
- REQUIREMENTS
The MooTyper module uses javascript which is not welcome in Moodle but it is a
requirement for the use of the module. The typing procedure cannot be done without
the client side logic.
It creates some new tables in a moodle database and inserts some sample
typing exercises. This is all done automaticaly through the intstallation,
but real lessons and exercises should be added by teachers afterwards.
- INSTALLATION
MooTyper is an activity module. You have to extract it to the 'mod' directory.
If the directory name is something like "moodle_mod_mootyper" you have to change
that to just "mootyper". So for example, the path should be like this:
/mod/mootyper/view.php
Than go to Site Administration -> Notifications and click on the button to start
the install.
Right after an install or upgrade of the new MooTyper 3.1.1, you will then see
the settings page. You can now set the date display format for the grade views.
You can also set colors for grade views, the background of the new keyboard
layouts, and the color for keytops that are not home row keys. This allows you
to color coordinate MooTyper with your theme color scheme.
- USING MOOTYPER
Using MooTyper activity module is very simple. An instance can be added as a
new activity in a course like Lesson or Quiz. Thanks to Mary Cooch from moodle.org
we have this video, which shows how to add exercises, create mootyper instance,
and then view grades. It's a little outdated (one of the first versions of
mootyper), but I guess everything still holds:
- ADDITIONAL KEYBOARD LAYOUTS
MooTyper currently includes support for new versions (V2.1) of English, Japanese,
Russian Slovenian, Spanish and Swiss keyboard layouts, that include keys that
were not implemented in previous versions. You will need to import the new KB layouts and then switch to using them.
To implement any other layout you have to:
Create a php file with keyboard layout defined with HTML. Create a javascript
file (with the same name and .js extension) that implements the logic of the keyboard
layout. If you have any mistakes in your js file the module won't work, so in
this case try to validate your code with a tool like this...
http://www.javascriptlint.com/online_lint.php
- SAVING YOUR OWN OR MODIFIED LESSONS
In previous versions of MooTyper, if you created your own lessons there was
no built in way to export a copy for backup purposes or for safekeeping.
Once installed, there was no way to add additional lessons to MooTyper
unless you used the built in editing capability, which is not as convienient
as it would be to create lessons in a word processing program. If you wanted
to add lessons to MooTyper without using the built in editor, you had to do
a completely new installation of MooTyper which meant you would lose all
student progress and grades.
As of version 3.1.0, MooTyper now supports Import and Export of MooTyper Lessons
via links in the Administration block, which overcomes these limitations.
For more info please visit the plugins wiki on github:
https://github.com/drachels/moodle-mod_mootyper/wiki
3.1.4 (Build: 2017060800) (2017060800)
3.1.4 (Build: 2017060800)
Plugin type: Activities
Frankenstyle component name: mod_mootyper
Version build number: 2017060800
Version release name: 3.1.4 (Build: 2017060800)
Maturity: Stable
Supported Moodle versions: 2.9, 3.0, 3.1
Repository URL (Git): https://github.com/drachels/moodle-mod_mootyper
Repository branch:
Repository tag:
Issue/bug tracker URL: https://github.com/drachels/moodle-mod_mootyper/issues
Moodle Mootyper module
- Moodle tracker component: https://github.com/drachels/moodle-mod_mootyper/issues
- Documentation: https://github.com/drachels/moodle-mod_mootyper/wiki
- Source Code: https://github.com/drachels/moodle-mod_mootyper
- License: http://www.gnu.org/licenses/gpl.txt
Install from git
- Navigate to Moodle root folder
- git clone git://github.com/drachels/moodle-mod_mootyper.git mod/mootyper
- cd mootyper
- git checkout MOODLE_XY_STABLE (where XY is the moodle version, e.g: MOODLE_30_STABLE, MOODLE_28_STABLE...)
- Click the 'Notifications' link on the frontpage administration block or php admin/cli/upgrade.php if you have access to a command line interpreter.
Install from a compressed file
- Extract the compressed file data
- Rename the main folder to mootyper
- Copy to the Moodle mod/ folder
- Click the 'Notifications' link on the frontpage administration block or php admin/cli/upgrade.php if you have access to a command line interpreter.
This is the README file for the MooTyper project. MooTyper is
a moodle extension, that adds the 'typing instructor' functionallity to Moodle.
The plugin url is: https://moodle.org/plugins/view.php?plugin=mod_mootyper
MooTyper is free software, the same as Moodle.
- REQUIREMENTS
The MooTyper module uses javascript which is not welcome in Moodle but it is a
requirement for the use of the module. The typing procedure cannot be done without
the client side logic.
It creates some new tables in a moodle database and inserts some sample
typing exercises. This is all done automaticaly through the intstallation,
but real lessons and exercises should be added by teachers afterwards.
- INSTALLATION
MooTyper is an activity module. You have to extract it to the 'mod' directory.
If the directory name is something like "moodle_mod_mootyper" you have to change
that to just "mootyper". So for example, the path should be like this:
Than go to Site Administration -> Notifications and click on the button to start
the install.
Right after an install or upgrade of the new MooTyper 3.1.1, you will then see
the settings page. You can now set the date display format for the grade views.
You can also set colors for grade views, the background of the new keyboard
layouts, and the color for keytops that are not home row keys. This allows you
to color coordinate MooTyper with your theme color scheme.
- USING MOOTYPER
Using MooTyper activity module is very simple. An instance can be added as a
new activity in a course like Lesson or Quiz. Thanks to Mary Cooch from moodle.org
we have this video, which shows how to add exercises, create mootyper instance,
and then view grades. It's a little outdated (one of the first versions of
mootyper), but I guess everything still holds:
- ADDITIONAL KEYBOARD LAYOUTS
MooTyper currently includes support for new versions (V2) of English, Japanese,
Russian Slovenian, Spanish and Swiss keyboard layouts, that include keys that
were not implemented in previous versions.
To implement any other layout you have to:
Create a php file with keyboard layout defined with HTML. Create a javascript
file (with the same name and .js extension) that implements the logic of the keyboard
layout. If you have any mistakes in your js file the module won't work, so in
this case try to validate your code with a tool like this...
http://www.javascriptlint.com/online_lint.php
- SAVING YOUR OWN OR MODIFIED LESSONS
In previous versions of MooTyper, if you created your own lessons there was
no built in way to export a copy for backup purposes or for safekeeping.
Once installed, there was no way to add additional lessons to MooTyper
unless you used the built in editing capability, which is not as convienient
as it would be to create lessons in a word processing program. If you wanted
to add lessons to MooTyper without using the built in editor, you had to do
a completely new installation of MooTyper which meant you would lose all
student progress and grades.
As of version 3.1.0, MooTyper now supports Import and Export of MooTyper Lessons
via links in the Administration block, which overcomes these limitations.
For more info please visit the plugins wiki on github:
https://github.com/drachels/moodle-mod_mootyper/wiki
3.1.3 (Build: 2016101101) (2016101101)
3.1.3 (Build: 2016101101)
Plugin type: Activities
Frankenstyle component name: mod_mootyper
Version build number: 2016101101
Version release name: 3.1.3 (Build: 2016101101)
Maturity: Stable
Supported Moodle versions: 2.9, 3.0, 3.1
Repository URL (Git): https://github.com/drachels/moodle-mod_mootyper
Repository branch:
Repository tag:
Issue/bug tracker URL: https://github.com/drachels/moodle-mod_mootyper/issues
Moodle Mootyper module
- Moodle tracker component: https://github.com/drachels/moodle-mod_mootyper/issues
- Documentation: https://github.com/drachels/moodle-mod_mootyper/wiki
- Source Code: https://github.com/drachels/moodle-mod_mootyper
- License: http://www.gnu.org/licenses/gpl.txt
Install from git
- Navigate to Moodle root folder
- git clone git://github.com/drachels/moodle-mod_mootyper.git mod/mootyper
- cd mootyper
- git checkout MOODLE_XY_STABLE (where XY is the moodle version, e.g: MOODLE_30_STABLE, MOODLE_28_STABLE...)
- Click the 'Notifications' link on the frontpage administration block or php admin/cli/upgrade.php if you have access to a command line interpreter.
Install from a compressed file
- Extract the compressed file data
- Rename the main folder to mootyper
- Copy to the Moodle mod/ folder
- Click the 'Notifications' link on the frontpage administration block or php admin/cli/upgrade.php if you have access to a command line interpreter.
This is the README file for the MooTyper project. MooTyper is
a moodle extension, that adds the 'typing instructor' functionallity to Moodle.
The plugin url is: https://moodle.org/plugins/view.php?plugin=mod_mootyper
MooTyper is free software, the same as Moodle.
- REQUIREMENTS
The MooTyper module uses javascript which is not welcome in Moodle but it is a
requirement for the use of the module. The typing procedure cannot be done without
the client side logic.
It creates some new tables in a moodle database and inserts some sample
typing exercises. This is all done automaticaly through the intstallation,
but real lessons and exercises should be added by teachers afterwards.
- INSTALLATION
MooTyper is an activity module. You have to extract it to the 'mod' directory.
If the directory name is something like "moodle_mod_mootyper" you have to change
that to just "mootyper". So for example, the path should be like this:
Than go to Site Administration -> Notifications and click on the button to start
the install.
Right after an install or upgrade of the new MooTyper 3.1.1, you will then see
the settings page. You can now set the date display format for the grade views.
You can also set colors for grade views, the background of the new keyboard
layouts, and the color for keytops that are not home row keys. This allows you
to color coordinate MooTyper with your theme color scheme.
- USING MOOTYPER
Using MooTyper activity module is very simple. An instance can be added as a
new activity in a course like Lesson or Quiz. Thanks to Mary Cooch from moodle.org
we have this video, which shows how to add exercises, create mootyper instance,
and then view grades. It's a little outdated (one of the first versions of
mootyper), but I guess everything still holds:
- ADDITIONAL KEYBOARD LAYOUTS
MooTyper currently includes support for new versions (V2) of English, Japanese,
Russian Slovenian, Spanish and Swiss keyboard layouts, that include keys that
were not implemented in previous versions.
To implement any other layout you have to:
Create a php file with keyboard layout defined with HTML. Create a javascript
file (with the same name and .js extension) that implements the logic of the keyboard
layout. If you have any mistakes in your js file the module won't work, so in
this case try to validate your code with a tool like this...
http://www.javascriptlint.com/online_lint.php
- SAVING YOUR OWN OR MODIFIED LESSONS
In previous versions of MooTyper, if you created your own lessons there was
no built in way to export a copy for backup purposes or for safekeeping.
Once installed, there was no way to add additional lessons to MooTyper
unless you used the built in editing capability, which is not as convienient
as it would be to create lessons in a word processing program. If you wanted
to add lessons to MooTyper without using the built in editor, you had to do
a completely new installation of MooTyper which meant you would lose all
student progress and grades.
As of version 3.1.0, MooTyper now supports Import and Export of MooTyper Lessons
via links in the Administration block, which overcomes these limitations.
For more info please visit the plugins wiki on github:
https://github.com/drachels/moodle-mod_mootyper/wiki
2.7.1 (Build: 2016032200) (2016031501)
2.7.1 (Build: 2016032200)
Plugin type: Activities
Frankenstyle component name: mod_mootyper
Version build number: 2016031501
Version release name: 2.7.1 (Build: 2016032200)
Maturity: Stable
Supported Moodle versions: 2.7, 2.8
Repository URL (Git): https://github.com/drachels/moodle-mod_mootyper
Repository branch:
Repository tag:
Issue/bug tracker URL: https://github.com/drachels/moodle-mod_mootyper/issues
Moodle Mootyper module
- Moodle tracker component: https://github.com/drachels/moodle-mod_mootyper/issues
- Documentation: https://github.com/drachels/moodle-mod_mootyper/wiki
- Source Code: https://github.com/drachels/moodle-mod_mootyper
- License: http://www.gnu.org/licenses/gpl.txt
Install from git
- Navigate to Moodle root folder
- git clone git://github.com/drachels/moodle-mod_mootyper.git mod/mootyper
- cd mootyper
- git checkout MOODLE_XY_STABLE (where XY is the moodle version, e.g: MOODLE_30_STABLE, MOODLE_28_STABLE...)
- Click the 'Notifications' link on the frontpage administration block or php admin/cli/upgrade.php if you have access to a command line interpreter.
Install from a compressed file
- Extract the compressed file data
- Rename the main folder to mootyper
- Copy to the Moodle mod/ folder
- Click the 'Notifications' link on the frontpage administration block or php admin/cli/upgrade.php if you have access to a command line interpreter.
2.6 (Build: 2014080300) (2014080300)
2.6 (Build: 2014080300)
Plugin type: Activities
Frankenstyle component name: mod_mootyper
Version build number: 2014080300
Version release name: 2.6 (Build: 2014080300)
Maturity: Stable
Supported Moodle versions: 2.3
Repository URL (Git): http://github.com/jl2035/moodle_mod_mootyper
Repository branch:
Repository tag:
Issue/bug tracker URL: https://github.com/drachels/moodle-mod_mootyper/issues
This is the README file for the MooTyper project. MooTyper is
a moodle extension, that adds the 'typing instructor' functionallity to Moodle.
The plugin url is: https://moodle.org/plugins/view.php?plugin=mod_mootyper
MooTyper is a free software just like Moodle.
- REQUIREMENTS
Module uses javascript which is not welcome in Moodle but it is a requirement
for the use of the module. The typing procedure cannot be done without the
client side logic.
It creates some new tables in a moodle database and inserts some sample
typing exercises. This is all done automaticaly through the intstallation,
but real lessons and exercises should be added by teachers afterwards.
- INSTALLATION
MooTyper is an activity module. You have to extract it to the 'mod' directory.
If directory name is something like "moodle_mod_mootyper" you have to change
that to just "mootyper". So for example path should be like this:
/mod/mootyper/view.php
Than go to Site Administration -> Notifications and click on the button below.
- USING MOOTYPER
Using MooTyper activity module is very simple. An instance can be added as
new activity in a course like Lesson or Quiz. Thanks to Mary Cooch from moodle.org
we have this video, which shows how to add exercises, create mootyper instance,
and than view grades. It's a little outdated (one of the first versions of
mootyper), but I guess everything stil holds:
- ADDITIONAL KEYBOARD LAYOUTS
Module currently includes support for English and Slovenian keyboard layout.
To implement any other layout you have to:
Create a php file with keyboard layout defined with HTML. Create javascript
file(with the same name and .js extension) that defines some functions for
your layout. If you have any mistakes in your js file the module won't work,
so in this case try to validate your code with a tool like this...
http://www.javascriptlint.com/online_lint.php
For more info please visit the plugins wiki on github:
https://github.com/jl2035/moodle_mod_mootyper/wiki
This plugin is being maintained for 3 years now, by only one person, so
donations are welcome: 1LxKs67fXMQemeAsSx3ancVZGtRD7kKBEE
2.2 (Build: 2013012100) (2013012100)
2.2 (Build: 2013012100)
Plugin type: Activities
Frankenstyle component name: mod_mootyper
Version build number: 2013012100
Version release name: 2.2 (Build: 2013012100)
Maturity: Stable
Supported Moodle versions: 2.2
Repository URL (Git): http://github.com/jl2035/moodle_mod_mootyper
Repository branch:
Repository tag:
Issue/bug tracker URL: https://github.com/drachels/moodle-mod_mootyper/issues
This is the README file for the MooTyper project. MooTyper is
a moodle extension, that adds the 'typing instructor' functionallity to Moodle.
MooTyper is a free software just like Moodle.
- REQUIREMENTS
MooTyper requires javascript.
It creates some new tables in a moodle database and inserts a quite some sample
typing exercises. This is all done automaticaly through the intstallation.
After the successfull installation you will have a complete collection of
exercises, but you can also add your owns and modify or delete the existing ones.
- INSTALLATION
MooTyper is an activity module. You have to extract it to the 'mod' directory.
Than go to Site Administration -> Notifications and click on the button below.
- USE
Using MooTyper activity module is very simple. An instance can be added as
new activity in a course like Lesson or Quiz. This video shows how to add
exercise, create an instance and than view grades:
- ADDITIONAL KEYBOARD LAYOUTS
Module currently includes support for English and Slovenian keyboard layout.
To implement any other layout you have to:
Create a php file with keyboard layout defined with HTML. Create javascript
file(with the same name and .js extension) that defines some functions for
your layout. If you have any mistakes in your js file the module won't work,
so in this case try to validate your code with a tool like this...
http://www.javascriptlint.com/online_lint.php
For more info please visit the plugins wiki on github:
https://github.com/jl2035/moodle_mod_mootyper/wiki